How to Enable WebSockets for Mosquitto MQTT Broker
This article explains WebSockets and configuring them for the Mosquitto MQTT Broker. We provide a detailed description of how to install, configure and test the broker.
Below you will find some rationale on the WebSockets protocol itself, what it is, how it works, and why one would want to use WebSocket with an MQTT broker.
Suppose you are already familiar with those topics and only want to know how to configure WebSockets on Mosquitto specifically. In that case, you can go directly to How to configure WebSockets for the Mosquitto broker section.
What is WebSocket?
WebSocket is a stateful communication protocol that provides a persistent full-duplex channel between the server and the client by reusing the same connection that was opened at the beginning of the communication (during the opening handshake). WebSocket works over a TCP connection and resides at layer 7 in the OSI model.
But don’t worry if this sounds complicated, we are going to explore the concepts of WebSocket in more details below.
Why not HTTP?
A widely used web communication protocol is HTTP (Hypertext Transfer Protocol). So why not always use it? The answer is always: “It depends on the use case.” HTTP was designed as a stateless connection-oriented protocol for data retrieval on request. Stateless connection-oriented implies that for every request, a new connection is opened. This connection is one-time: the connection is terminated once a request is answered with a response.
Additionally, it’s a one-sided connection. A client sends requests to the server, and the server responds to them. As a result, this connection is called an upstream connection (from the client to the server). On the contrary, the server cannot initiate a connection with a client (downstream connection) because it does not keep track of its clients.
So, the main points to take away are that HTTP initiates a new connection on every request and only allows an upstream connection (from the client to the server, which can alternatively be called a client polling of the server).
Now imagine a case where we have data updated thousands of times per second on the server’s side. We will encounter specific issues if we want to propagate these data updates to the client and use HTTP. We would have to set up a very frequent (thousand times per second) polling of the server for every client. This activity, in turn, would mean that we will have thousands of HTTP connections for every client opening and closing every second, which would put a considerable load both on the clients and the server.
Also, it’s doubtful that all our clients will receive all the data updates as frequently as they come to the server because the time it takes to create an HTTP connection might already be longer than the interval between the updates in the data on the server. And don’t forget to add a noticeable computational load on the server, which can cause response delays since the server now needs to handle thousands of requests from many clients during short time intervals.
A typical HTTP server processes work package after work package. Work packages cannot be processed simultaneously. As a result, not only would we not be able to reflect all the frequent data changes on the client’s side as soon as they appear, but we would also unnecessarily overload our entire system.
So, what do we do? It is when WebSocket protocol (sometimes simply “WebSockets”) comes to the rescue.
To test our Pro Mosquitto MQTT broker, sign up for a free 14-day trial here!
How does WebSocket protocol work?
WebSockets’s main philosophy is simple and can be described as “why don’t we use a single connection for the entire communication with a client?” Instead of opening and closing the connection on every request, we establish it first and reuse it whenever we want to send new data. The critical part here is that our established connection is now a duplex (two-way) which means it can be used for both upstream (client to server) and downstream (server to client) messaging.
Of course, this also means that our connection now needs to be stateful, and the server should keep track of all the established connections to every end-user/client to know where to send the data to reach a specific client. But the main benefit is that there is no connection establishment overhead on every client’s request. The server can now also push the data to the clients downstream in contrast to HTTP, which supports only the upstream connections. This is exactly what we need to do to solve our previous use case with a thousand data updates per second.
Since WebSocket protocol works over TCP, we get a secure, reliable connection where no data gets lost (no loss occurs on the transport or application layer). The application logic handles the loss of data on the application layer, not the protocol). The communication itself now happens faster than in the case of HTTP.
WebSocket connection only terminates whenever one of the communicating parties decides to terminate it or becomes unavailable/leaves the conversation. In the case of HTTP, the connection always terminates after the server’s response.
To establish a WebSocket connection, the browser issues an Upgrade HTTP response that tells the other communication party that a WebSocket channel needs to be established. This point is also an important one to remember: to establish a WebSocket connection, an initial HTTP request has to be performed.
To test our Pro Mosquitto MQTT broker, sign up for a free 14-day trial here!
HTTP vs WebSocket summary
In the following table we provide a short comparison of WebSocket and HTTP protocols:
| WebSocket | HTTP |
| Works on application layer in the OSI model | Works on application layer in the OSI model |
| Stateful | Stateless |
| Works over TCP connection | Works over TCP connection |
| Establishes a single persistent connection | Establishes a new connection for every request |
| Terminates connection only when one of the communicating parties terminates it | Terminates connection right after sending a response to the request |
| Bidirectional connection (both upstream and downstream) | Unidirectional connection (only upstream possible) |
| Does not define any format for data that is being exchanged | Uses HTTP format with appropriate headers, (body) for every HTTP request type |
| Initial request to establish WebSocket is sent as an HTTP Upgrade request | Prevents the server from sending data to the client without an explicit request |
If you are also interested in learning about the differences between HTTP and MQTT, check out the blog here on HTTP vs. MQTT: Choose the best Protocol for your IoT Project.
When to use WebSockets?
As we have seen in the sections above, WebSockets appear to be a fitting solution whenever we need to frequently and reliably update data (that comes from the server) on the client and/or exchange the messages between a client and server in both directions. You can think of the frequently changing data as real-time data. Just imagine some meteorological station that takes many measurements per second in many locations in the real world and sends this data to the server. It’s a bit of a contrived example because such stations don’t operate like that, but for the sake of an intuitive analogy, let’s take this for granted. Notably, a data visualization application for such a station would be an excellent example of using WebSockets.
In short, the WebSocket protocol is a good solution for interactive, dynamically updated services and real-time web applications. However, there is no point in using it for data that is not updated or is rarely updated and does not need to be immediately pushed to the client. Online catalogs, articles, and this blog you are currently reading are not being updated in real-time. Therefore, in all these cases, one will get no speed up from a WebSocket connection (since, as we have seen, to establish a WebSocket channel, an HTTP request has to be issued first anyway).
On the other hand, some well-known real-world examples of WebSocket applications include:
- Browser push notifications: browsers only use HTTP or WebSocket. We would need to establish a WebSocket connection to connect downstream and push some messages to the client from the server. For example, we can display notifications about incoming messages in a personal cabinet of a ticketing system or an online store;
- Online chats / real-time comment sections, including customer support services, hold the same rationale as above. Note that we are also dealing with systems that are liable to frequent updates: new messages/comments and so on;
- In online games, especially in multiplayer: the user receives data about the new actions and the state changes of the other players on the map. Then the client part of the game renders the changes;
- Exchanges, trading platforms, and other commercial services with rapidly changing statistics, prices, etc. Dealing with dashboards and graphs with real-time data;
- Social networks and blogs: Facebook Messenger, Instagram, or Telegram use WebSocket for sending, receiving, and updating messages (especially in the browser, since mobile devices also implement different protocols).
So, now that we know about the WebSocket technology and its applications, let’s explore why we might need this protocol for an MQTT broker and how we can configure Mosquitto MQTT over WebSockets.
To test our Pro Mosquitto MQTT broker, sign up for a free 14-day trial here!
Why use WebSockets for an MQTT broker?
Imagine a scenario where we want to visualize or get the data from the MQTT broker directly into the client web application (web app running in the browser). We might want to create a graphic browser interface for the MQTT broker. Unfortunately, we wouldn’t be able to achieve direct communication between the broker and the web browser using the MQTT protocol itself because web browsers don’t implement (speak) MQTT. However, since the data in the MQTT broker might change frequently and we need a downstream connection (from the broker to the client), it is a perfect use case for WebSockets.
The following scheme shows how one can use WebSockets with a client application in the browser:
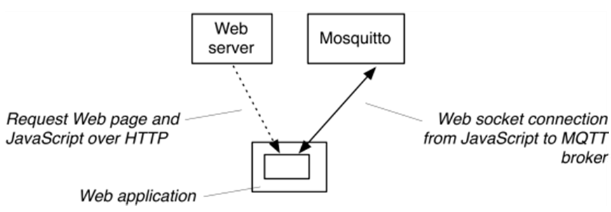
Here we can see a web server that, upon the user’s request, issues a client web application (you can think of this application as some HTML web pages with javascript code for handling the logic). This application then runs in the browser and opens a WebSocket connection to the Mosquitto MQTT broker over the WebSockets. After that, the web app can freely and quickly receive and visualize the latest data from the broker.
Also, for those looking into commercial use of an MQTT broker for their IoT project, don’t forget to check out the Pro Edition for Eclipse Mosquitto. If you want to test the product first, please sign up for a free 14 day trial here.
How to configure WebSockets for the Mosquitto broker (Unix systems)
For Linux
Step 1: Initial installation of dependencies
First of all, you need to make sure that our environment has the necessary build tools to complete the setup:
// use to keep all of your packages up to date in Debian or a Debian-based Linux distribution: sudo apt-get update
// use to install all important dependencies to install WebSocket and the Mosquitto MQTT broker and a text editor (our choice: nano):
sudo apt-get install --yes mosquitto nanoStep 2: Configure Mosquitto to use WebSocket
Now open mosquitto.conf file with the following command:
sudo nano /etc/mosquitto/mosquitto.conf // Of course, you can use another text editor like vim or always search for the file on your system and open it manually.
The file will open in your text editor.
// You can also find all these commands already in config but commented out – though there might be slight differences. We recommend you simply add the new commands.
Search for the “Listeners” section. In this section, add:
listener 1883
listener 8080
protocol websockets
allow_anonymous true
Search for the “Logging” section. In this section, add the following:
connection_messages true
log_timestamp true
We will need the above commands only to show the Mosquitto logs in the console. You may not want to touch them, but we will enable the logs for testing later.
Step 3: Test WebSocket
To test, you can run Mosquitto with the flag “-c” which should point to the configuration file you just created. Insert the following command into the terminal and click Enter:
mosquitto -c /etc/mosquitto/mosquitto.confAs a result, you should see that the MQTT broker starts with a standard MQTT protocol listener (port 1883) and a WebSocket listener running on port 8080:
1658680400: mosquitto version 2.0.15 starting
1658680400: Config loaded from /etc/mosquitto/mosquitto.conf.
1658680400: Opening ipv4 listen socket on port 1883.
1658680400: Opening ipv6 listen socket on port 1883.
1658680400: Opening websockets listen socket on port 8080.
1658680400: mosquitto version 2.0.15 running.
For MacOS
Step 1: Install the “Homebrew” packet manager.
Go to the website, https://brew.sh/. Follow the instructions there to install Homebrew.
Step 2: Install Mosquitto
In the terminal window, execute the following command to install Mosquitto:
brew install mosquittoStep 3: Configure Mosquitto to use WebSockets
Now you will need to edit the Mosquitto /opt/homebrew/etc/mosquitto/mosquitto.conf file.
To open the “.config file” with your text editor, execute the following command in your terminal:
open -a textedit /opt/homebrew/etc/mosquitto/mosquitto.conf Search for the “Listeners” section. Within this section, add the following:
listener 1883
listener 8080
protocol websockets
allow_anonymous true
Search for the “Logging” section. In this section, add:
connection_messages true
log_timestamp true
Step 4: Test WebSocket
To test, you can run Mosquitto and point it to the configuration file you have just modified.
Run the following:
mosquitto -c /opt/homebrew/etc/mosquitto/mosquitto.confAnd as a result, you should see that the MQTT broker starts with a standard MQTT protocol listener (port 1883) and a web socket listener running on port 8080:
1663084872: mosquitto version 2.0.15 starting
1663084872: Config loaded from /etc/mosquitto/mosquitto.conf.
1663084872: Opening ipv4 listen socket on port 1883.
1663084872: Opening ipv6 listen socket on port 1883.
1663084872: Opening websockets listen socket on port 8080.
1663084872: mosquitto version 2.0.15 running.
Testing with MQTT Explorer
Now that we have configured the broker to use WebSockets, let’s test it and see if it works. For that, we can use the visual interface of the MQTT Explorer.
First, you need to install the MQTT Explorer. You can find all information on installing this program on the official website of MQTT Explorer in the Download section.
To test our Pro Mosquitto MQTT broker, sign up for a free 14-day trial here!
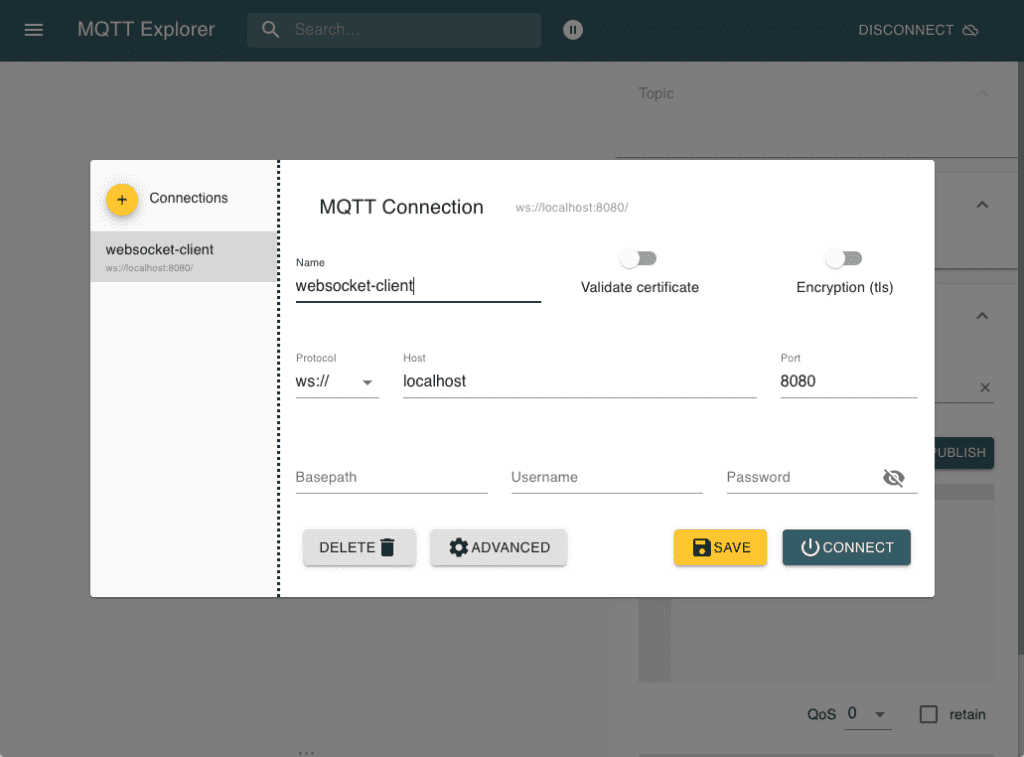
After you have installed the MQTT Explorer, start Mosquitto as described in the sections above according to your operating system – if it’s not already running. Start the MQTT Explorer application and fill in the following connection details:
Click the CONNECT button and a window with a subscription on the brokers $SYS topic will appear:
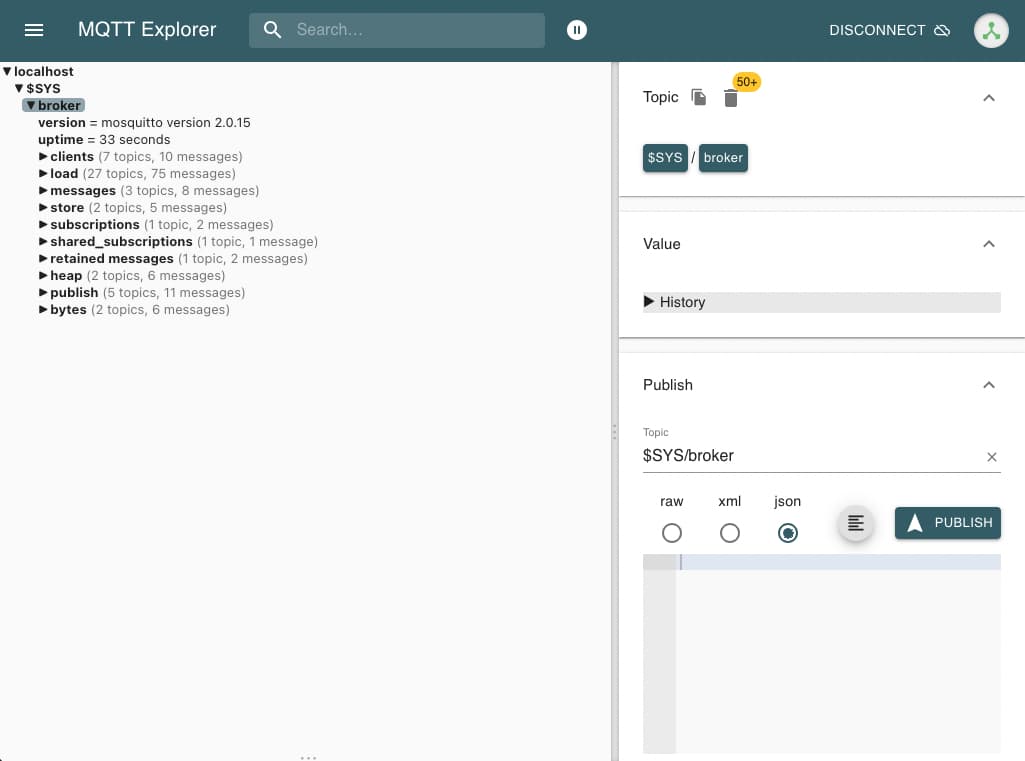
In the terminal window, Mosquitto should show information about the new connection like this:
1663085440: New client connected from 127.0.0.1:46750 as mqtt-explorer-079b58b5 (p2, c1, k60).Now that the connection is established, we can create topics and publish messages on them.
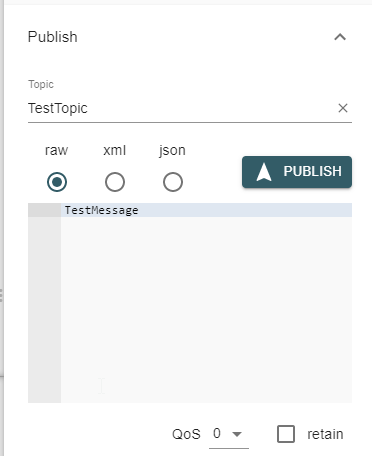
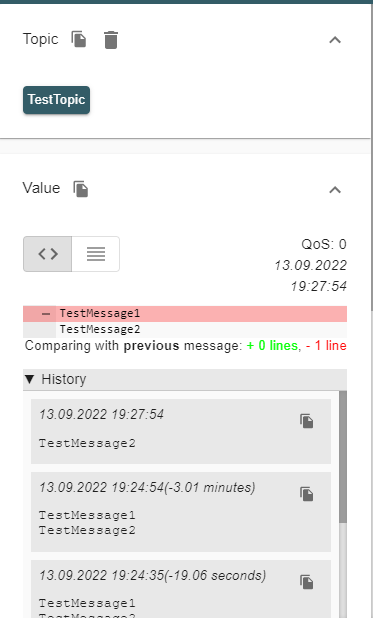
To do this, please select the topic field. And change it to a topic of your choice, e.g., “TestTopic.”
Select “raw” for plain text messages, type your message into the textbox, and click the PUBLISH button.
On the left panel, you can see all the published Topics and their values.
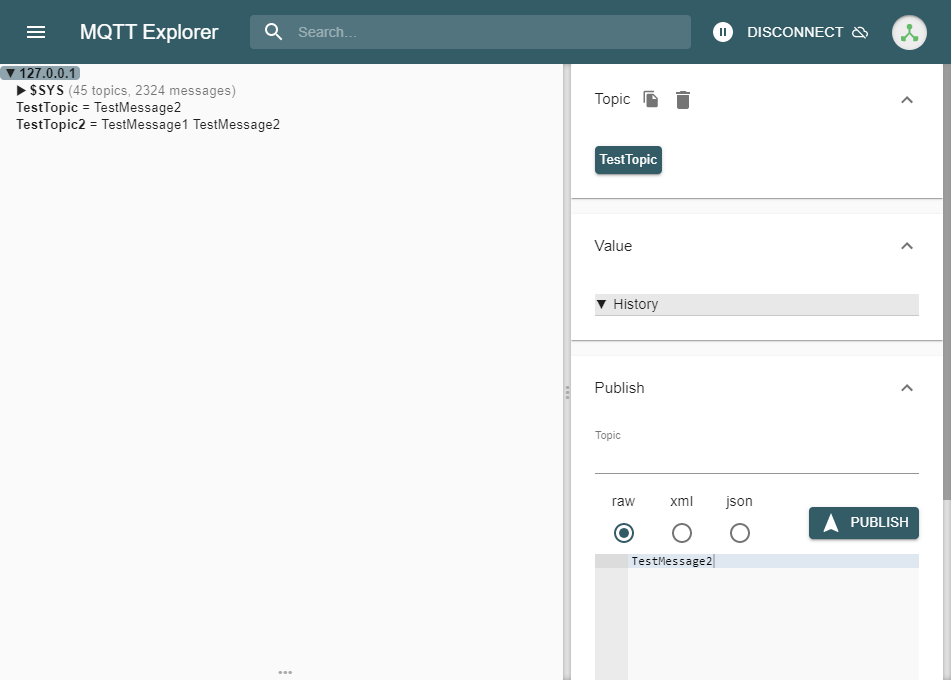
By clicking on a specific topic, you will see the added and removed values and the post history.
After pressing the DISCONNECT button or closing the MQTT Explorer application, you can see that the connection with the client is disconnected in the terminal.
1663086849: Client mqtt-explorer-079b58b5 disconnected.Conclusion
In this article, you have learned about the WebSocket protocol and gained practical knowledge of the installation and configuration of WebSockets for the Mosquitto MQTT broker. Mosquitto is flexible and customizable, so you can easily configure it to your needs using the simple steps described in this article.
As a summary, let us revise the most important. The main takeaway points are:
1) WebSocket is a protocol that creates a single stateful persіstant two-way connection between the server and the client.
2) Websocket works on the application layer in the OSI model. It establishes a single persistent connection that is only terminated when a communicating party stops it.
3) Open a WebSockets connection on the MQTT broker whenever you need to forward the data from the broker directly into the browser.
4) To enable WebSockets in Mosquitto MQTT broker, the main things that you need to do are to build Mosquitto with WebSockets and add listener and protocol properties to the config file.
About the author
Tizian is a dedicated team member of Cedalo and has embraced the opportunity to wear many hats, driven by an unwavering passion for technology. His journey has been dynamic, allowing him to craft a multifaceted expertise.
His foundation in IT, developed during his studies, has been further refined through hands-on experience in various roles.
As a Quality Manager, Tizian ensures the functionality and usability of Cedalo's products. As a Solutions Engineer, he eagerly dives into technical inquiries, guiding their clients toward success. As a Scrum Master, he leads their agile team, fostering collaboration and effective communication.

Subscribe for monthly updates