
Modern MQTT infrastructures require secure authentication methods beyond traditional username/password credentials. Pro Mosquitto addresses this need by adapting the OAuth 2.0 framework to support decentralized token authentication for MQTT clients.
OAuth 2.0 can help maintain the integrity and security of data exchanges in MQTT environments by issuing JSON Web Tokens (JWT) for clients and ensuring that only authenticated clients can publish or subscribe to specific topics. Therefore, it provides several advantages when it comes to managing access securely and efficiently in digital applications, particularly through features like session management, token/session expiration times, and token revocation. These functionalities are provided by Identity and Access Management (IAM) solutions using the OAuth 2.0 standard, like Keycloak, Okta, IAM solutions from Microsoft, Google, AWS, Github and many more.
This article demonstrates how to set up the Pro Edition for Mosquitto™ MQTT broker to handle MQTT client authentication using JWT. Figure 1 shows a simple concept comparing it to user/password authentication.
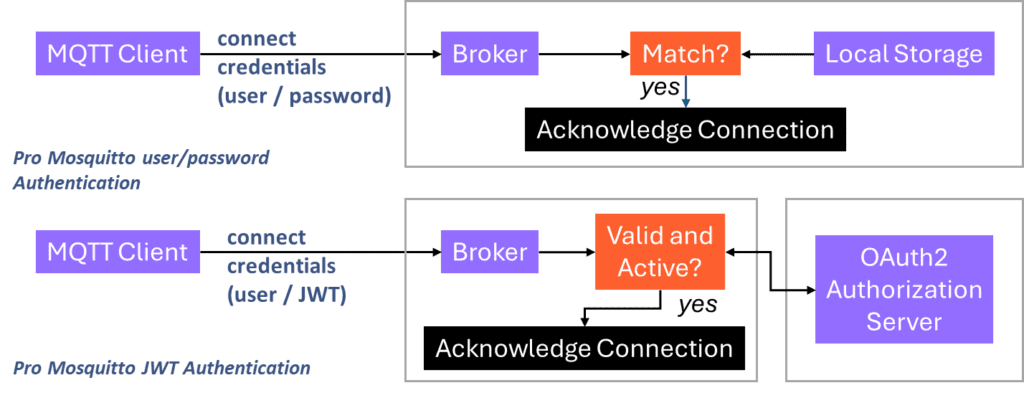
Figure 1 - Simple comparison of JWT versus username/password Authentication for the Pro Mosquitto MQTT Broker.
What is JWT?
A JSON Web Token (JWT) is a compact and self-contained way of securely transmitting information between parties as a JSON object. An IAM solution digitally signs this information, ensuring it is verified and trustworthy. As shown in Figure 2, a JWT is a base64-encoded string consisting of three parts: the Header, Payload, and Signature. The token encodes various details about the client application or user who initiated and granted the request. Therefore, the IAM solution creates and signs the JWT.
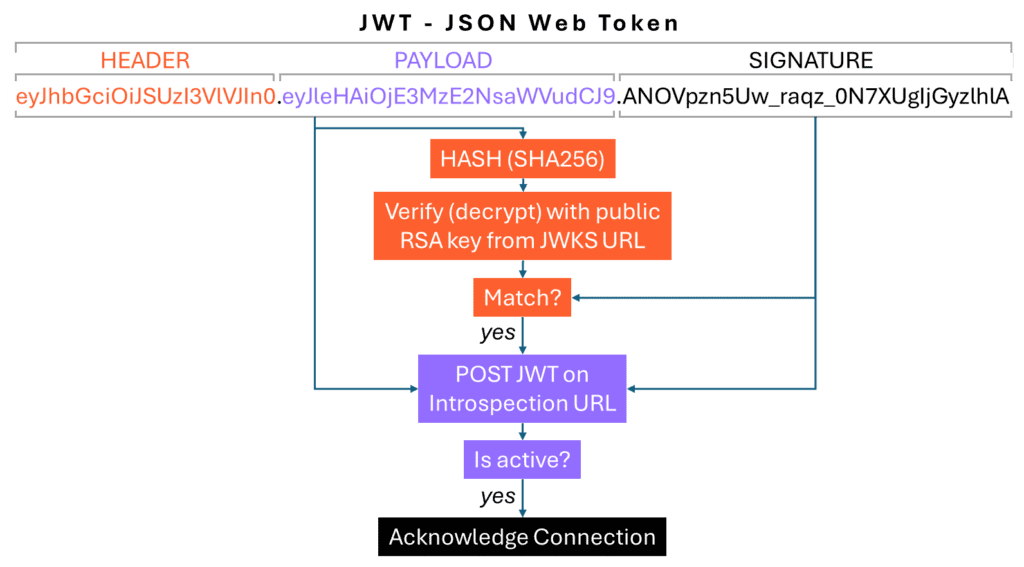
Figure 2 - JWT’s structure consists of three parts: acknowledging the connection request and performing introspection.
Below is an example of a decoded payload section. The ‘sub’ key refers to the JWT’s subject claim, which can be used for authorization purposes on the Mosquitto broker (see next sections).
{
 'exp': 1737567566,
 'iat': 1737567266,
 'jti': 'd68e3603-66b3-44d3-a527-ca0dd66e5ecc',
 'iss': 'https://keycloak.example.com/realms/promosquitto',
 'aud': 'promosquittoclient',
 'sub': 'smart-iot-device-4711',
}
If a client application on a device starts a standardized (OAuth2.0) authentication flow, it ends with receiving a JWT from the IAM solution. The MQTT client then uses this JWT as credentials to connect to the broker (Figure 1). The resource service – in this case, the Mosquitto MQTT broker – verifies the JWT (Figure 2) and decides whether to use it only for authentication or extract additional information from the subject claim to authorize the client for specific roles.
Token-based authentication method for the Mosquitto MQTT broker
Clients typically authenticate and connect to the Mosquitto MQTT broker using a username and password. Additional options for authentication and authorization are available through the dynamic security plugin. For more information, refer to this Authentication and Authorization blog.
The Pro Mosquitto MQTT broker uses the JWT plugin to authenticate clients that use JWT as a password.
The plugin requires access to the authorization server to perform two actions:
- Verify the JWT signature by using the public key of the issuing authorization server.
- Check if the JWT is active by requesting an introspection of the JWT from the authorization server.
This enables the plugin to handle the authentication process on each (re)connect request. The dynamic security plugin handles the authorization, granting access to publish and/or subscribe to specific topics. It obtains the necessary information, namely the username and client ID, either from the connect information during the connection process or by mapping it from the encoded subject field within the JWT (namely matchUsernameToSubject and matchClientIdToSubject in the config options section).
Pro Mosquitto MQTT broker setup
Configuring the token-based authentication is simple using Pro Mosquitto’s JWT plugin. You can test it on your PC by running the broker as a Docker container. Start by, signing up for a Cedalo MQTT Platform trial to obtain the Pro Mosquitto license. After completing the registration and login processes, create your first project to evaluate the broker’s capabilities.
There are two options for running a Pro Mosquitto MQTT broker instance:
- For the cloud option, Cedalo will provide the necessary infrastructure to ensure its availability.
- The on-premises option allows you to run the broker on your own infrastructure as a Docker container.
Setting up the on-premises Pro Mosquitto MQTT broker
To evaluate and test the JWT plugin, select the on-premises option within your created project. Then, download the deployment files and trial licence. Refer to Figure 3 for visual instructions and a checklist on the right to guide you. Moreover, you can find additional links to documentation under the link on the left side.
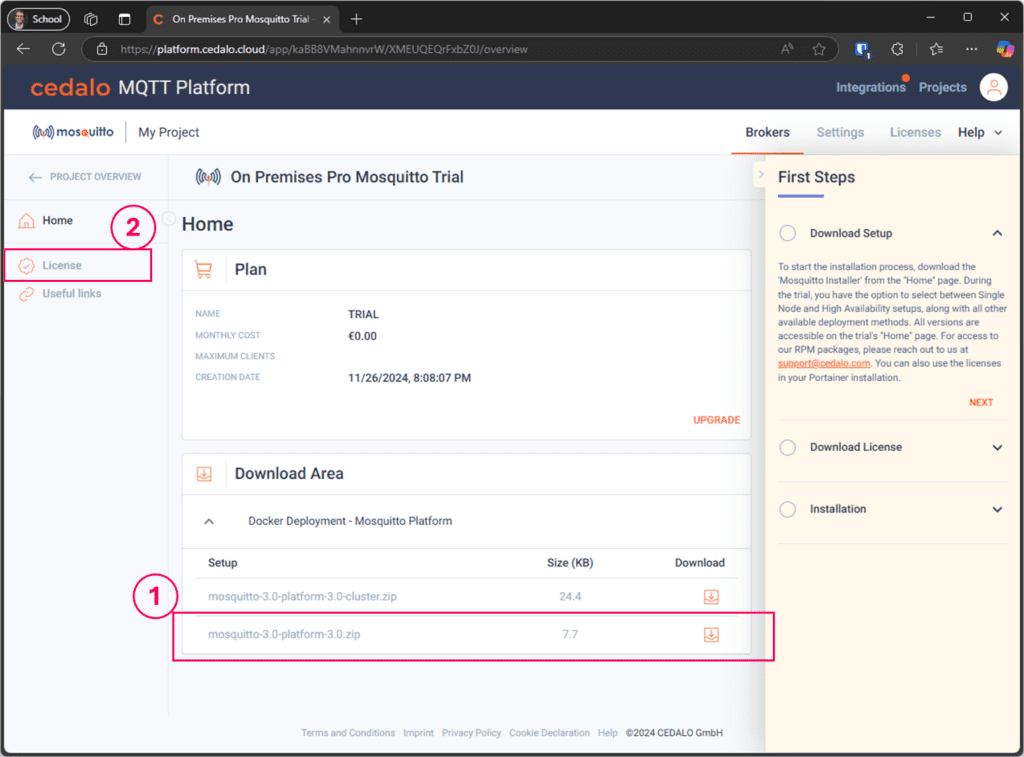
Figure 3 - Cedalo MQTT Platform project view for on-premises installation: follow the steps to download the necessary Docker files and trial license.
I assume that you’ve already downloaded and extracted the Docker deployment files on a PC with internet access and a Docker runtime. Please refer to the documentation for guidance on how to set up a single-node environment.
The extracted files and directories will have the following structure:
📁license
     📄license.lic (← adapt)
📁mosquitto
     📁config
          📄mosquitto.conf (← adapt)
     📁data
          📄dynamic-security.json
          📄jwt.json (← create)
📁platform
     📁data
          📄platform-business.sqlite3
📄docker-compose.yml
Configuring the JWT plugin for your MQTT project
You’ll need to make small adjustments to enable and configure the JWT plugin.
First, activate the JWT plugin in the mosquitto.conf file by searching the corresponding line in the file and uncommenting it. As a result, the lines should look like the following:
# JWT based authentication
plugin /usr/lib/cedalo_jwt_auth.so
Then, save the mosquitto.conf file*.*
Next, create a new file named jwt.json in the mosquitto/data folder (refer to the directory structure above for further details). This file contains the information necessary to verify the JWT and check its status using the introspection URL. Additionally, it allows you to set session-checking intervals and map the subject field from the JWT.
The following example demonstrates a configuration using Keycloak, an open-source Identity and Access Management (IAM) solution.
{
    "version": 1,
    "algorithm": "RS256",
    "mode": "jwks",
    "options": {
        "lazyConnect": false,
        "modes": {
            "jwks": {
                "uri": "http://<YOUR-KEYCLOAK-OR-IAM>/realms/test/protocol/openid-connect/certs",
                "timeoutMs": 5000,
                "cache": {
                    "enabled": true,
                    "ttlMs": 30000,
                    "respectCacheHeaders": false
                }
            }
        },
        "common": {
            "validateExpiration": true,
            "matchUsernameToSubject": true,
            "matchClientIdToSubject": false,
            "kickExpiredClients": true,
            "kickExpiredClientsWithWill": true
        },
        "revocation": {
            "introspection": {
                "uri": "http://<YOUR-KEYCLOAK-OR-IAM>/realms/test/protocol/openid-connect/token/introspect",
                "clientId": "client-id",
                "clientSecret": "secret",
                "includeTokenTypehint": false
            },
            "timeoutMs": 5000
        }
    }
}
After updating the mosquitto.conf file and creating the JWT configuration, start the containers with the command:
docker compose upWhen running the command for the first time, the containers are pulled from Cedalo’s public container registry. The output during this pull process can resemble the example in Figure 4.
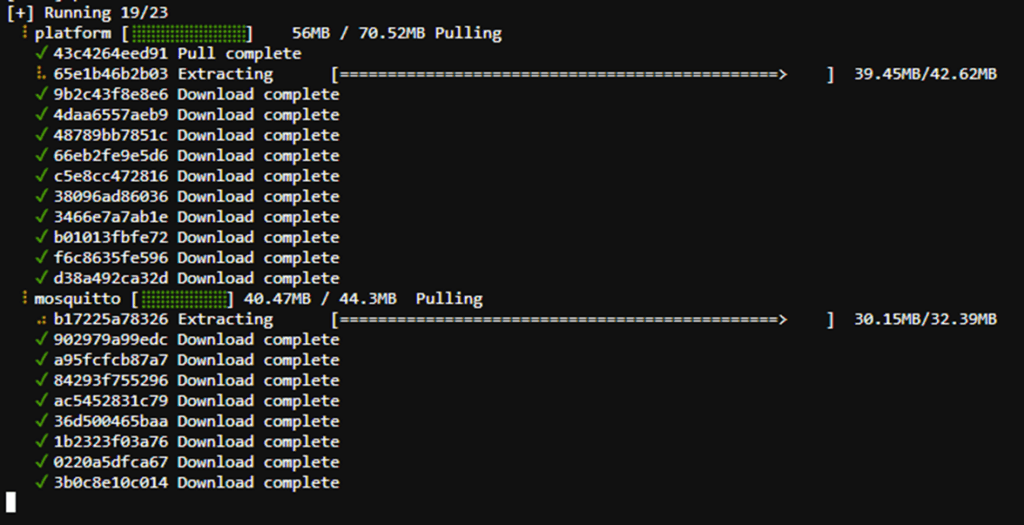
Figure 4 - Log output during the initial container startup.
After pulling the containers, the broker instance logs show the initialization of the JWT plugin. Figure 5 shows a successful setup.

Figure 5 - Log output excerpt from the broker instance showing the JWT initialization.
At this stage, there are typically two issues that can arise:
- The first is if the configuration file jwt.json is not found or is inaccessible at the specified path (
mosquitto/data/jwt.json). - The second is if the IAM framework – the Keycloak instance in this example – is unavailable or the URL is misconfigured. If the IAM follows the OpenID specification, it should include an endpoint at
.well-known/openid-configuration(for example: keycloak.thws.education/realms/promosquitto/.well-known/openid-configuration). This endpoint provides the correct URLs for the example use case.
MQTT JWT testing and configuration options
With the Mosquitto broker and Platform web UI now ready via the Cedalo MQTT Platform trial, you can start evaluating various functionalities, especially authentication by JWT.
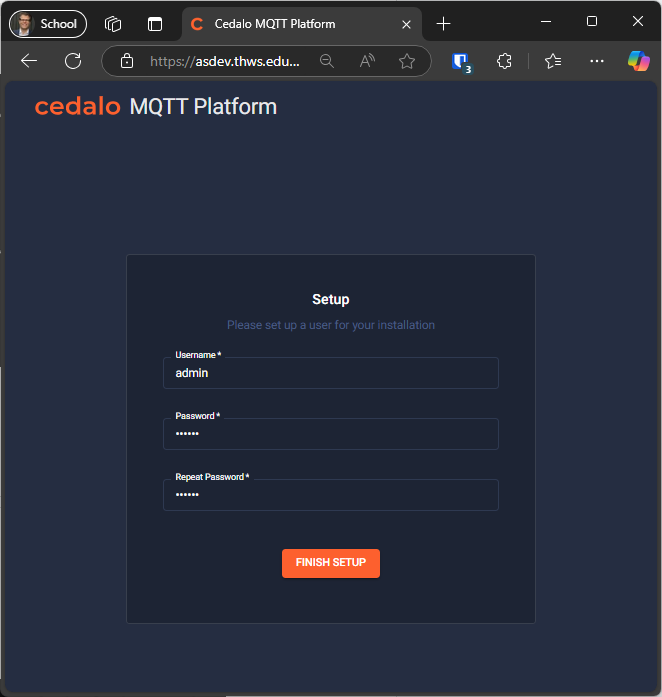
Figure 6 - Initial user creation in the on-premise deployment of the Platform web UI.
To test the setup, first open the platform web UI in your browser at http://localhost:3000. Next, set up an admin user with a password, then sign in with the admin credentials. After that, the Platform’s landing page will provide some useful insights about the locally connected broker instance.
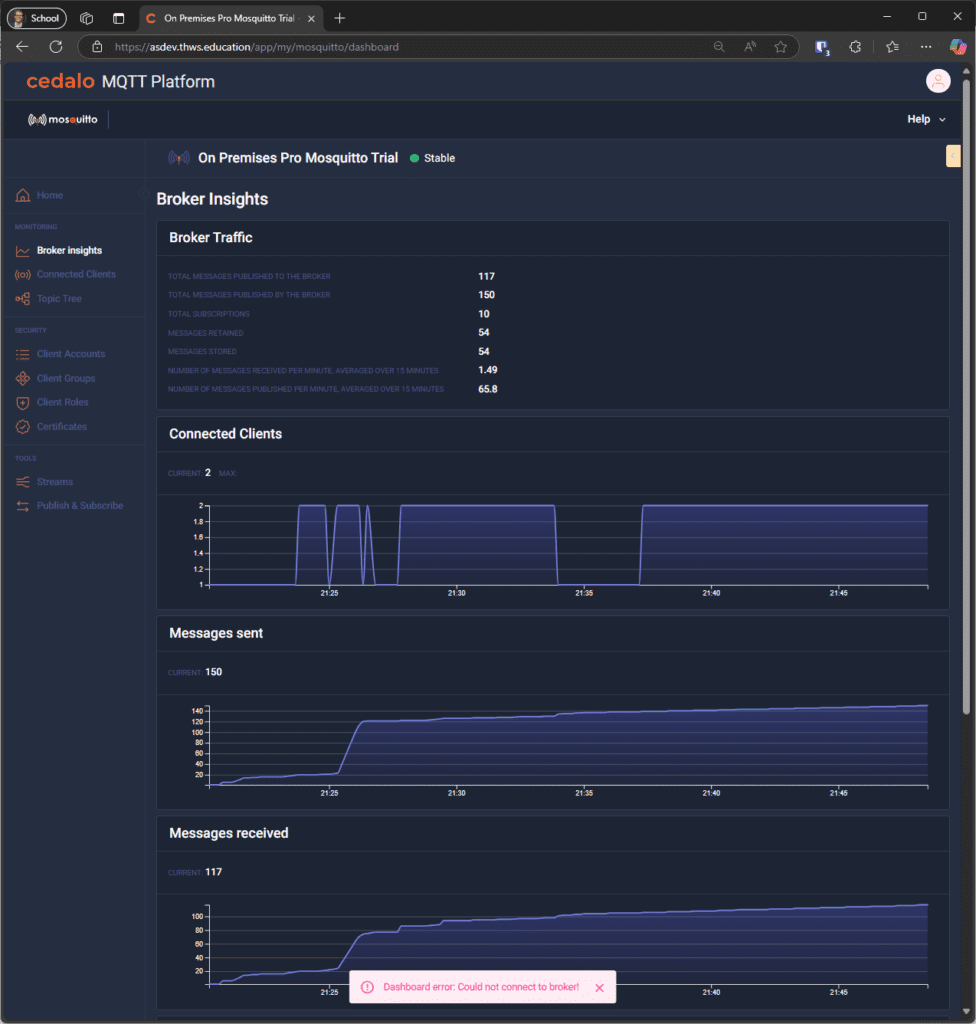
Figure 7 - View of the Platform web UI landing page.
Configuring an MQTT client account for JWT authentication
Now, proceed with creating a user client account with a chosen name and an empty client ID. Note, you can set a random character as the password, as it will not be used if the JWT plugin is activated.
After creating the account, assign a client role to authorize the client to specific topics. By default, you can use the preset “client” role, which provides comprehensive access.
The recommended authentication setup involves mapping the JWT subject to the user name. Therefore, set the username of the created client account to match the subject in the JWT. Multiple connections are then possible by using different client IDs.
Below is an example of a decoded JWT payload. Please note the subject field specified by the JSON key sub.
{
    'exp': 1731310476,
    'iat': 1731310176,
    'jti': '991c83cd-d92c-4428-8efd-fb656705d96e',
    'iss': 'https://keycloak.thws.education/realms/promosquitto',
    'aud': 'promosquittoclient',
    'sub': 'service-account-promosquittoclient',
    'typ': 'Bearer'
}
Now, the MQTT client can connect using the credentials:
- username: username of the publishing client (this will be replaced because the JWT configuration option
matchUsernameToSubjectis set totrue) - password: eyJhbGciOi….pAA_cpRMXgw (the encoded JWT)
- clientId:
(for example, the serial number of the connected device)
Figure 8 shows the created client account on the broker side, with the username service-account-promosquittoclient and the client role.
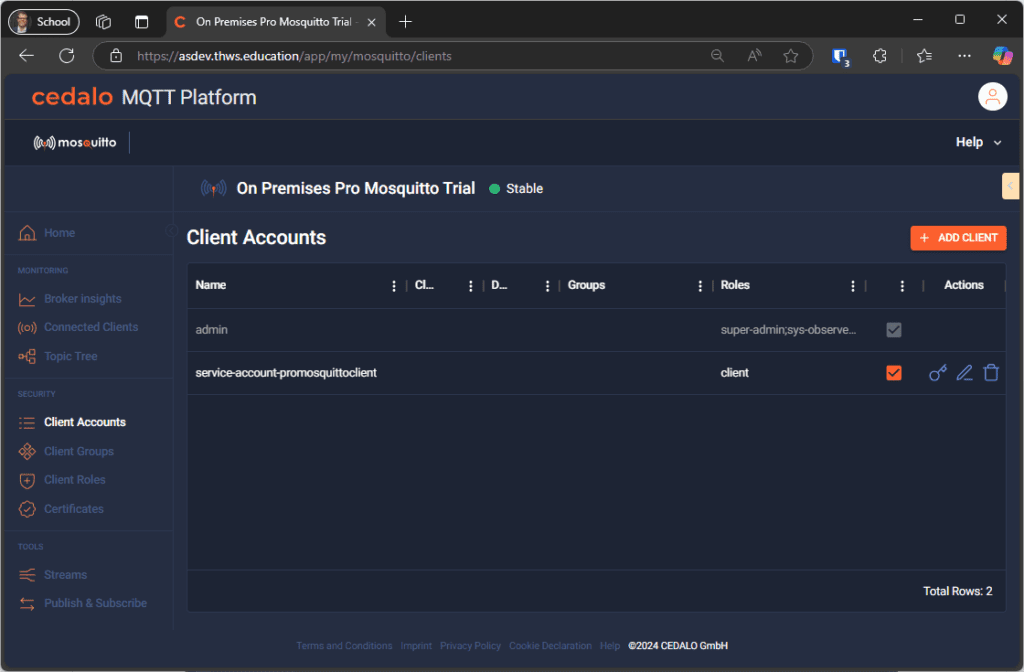
Figure 8 - View of the platform showing client accounts on the selected broker instance.
Verifying client connections
Once the client sends a CONNECT request, the broker will verify the JWT and check that the token is active. If both of these conditions are met, the connection will be established. You can observe the client connection in the platform’s client inspection view, as shown in Figure 9. This illustrates two connected clients: one using JWT authentication and the other utilizing the $CONTROL topics for the platform admin connection.
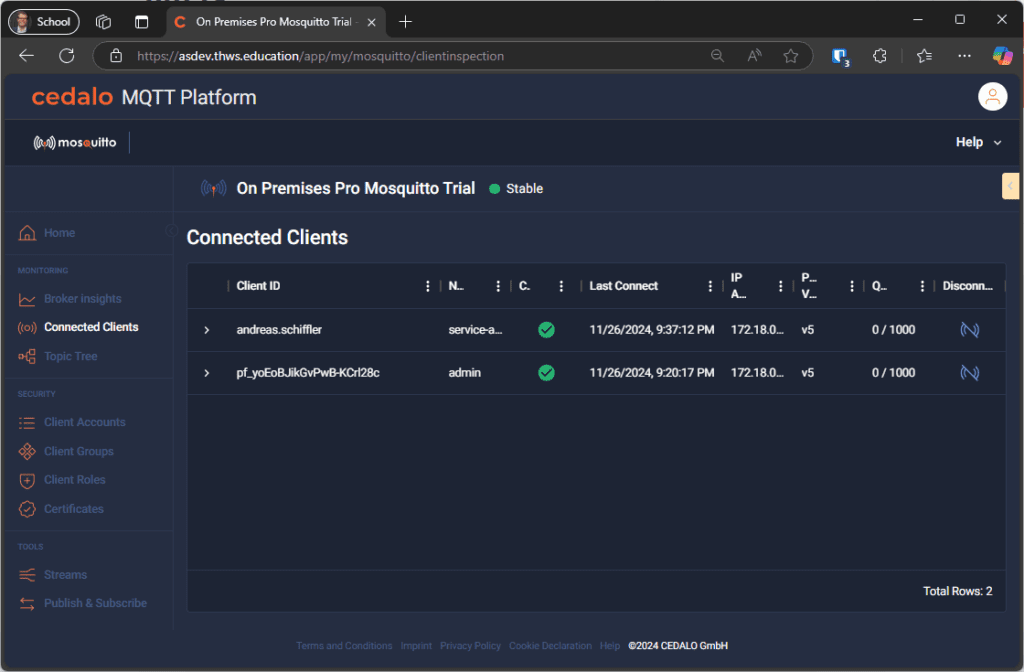
Figure 9 - Platform view for the client inspection feature showing two connected clients and additional information and statistics.
One potential scenario that aligns with a robust information security approach is as follows:
- The client establishes a connection using protocol version 5, sets the session expiration interval to 10 minutes, and publishes a message.
- The token expiration is configured with a short-term session duration of less than 10 minutes.
To illustrate the connection closure on the client side, disable the mechanism for utilizing the refresh token to obtain a new, up-to-date JWT. Furthermore, the client publishes a message upon the initial connection.
Handling JWT token expiration
The broker’s log output shows the resulting behaviour. Once the MQTT session expires, the client will send a new connection request using the same token. The broker then initiates a revocation check on the token, which reveals it has been revoked. The connection is subsequently closed, and the last will message is published. To avoid this on the client side, it is necessary to use the refresh token before it expires and to use a fresh token to renew the MQTT session.

Figure 10 - Pro Mosquitto MQTT broker log output.
This scenario is ideal for enterprise-grade MQTT-based applications running in Internet browsers that use WebSockets for the broker connection. By leveraging the IAM solution’s SSO capabilities, users can enjoy a secure and seamless access experience.
Summary
Using the combination of MQTT and OAuth 2.0 protocols with the corresponding IAM solutions ensures the secure and convenient use of digital services and resources. The Pro Edition for Mosquitto provides a high-performance, feature-rich MQTT broker. Enabling the JWT plugin on the broker unlocks the potential for secure, enterprise-grade applications. Single Sign-On (SSO) usage for MQTT-based information exchange is possible, in addition to other edge use cases.


