
Various applications extensively use the MQTT protocol to share information among devices or superordinate systems. Decisions are based on received or aggregated information. This makes information security a mandatory function for digital communication among systems and devices. Therefore, one crucial factor to consider when using the MQTT protocol is authentication. This article provides a comprehensive guide on setting up and configuring the Mosquitto MQTT broker, and offers best practices for authentication.
Authenticate for identification
Authentication is the process of verifying the identity of a specific user or device connected to the MQTT broker. While, authorization, described later, refers to the logic and mechanism used to grant access to specific information. This includes messages on topics for known identities.
There are different ways to achieve authentication, such as using a username and password, or by issuing a specific client certificate to use with mutual TLS authentication. The Mosquitto MQTT broker supports both of these options.
To enhance security beyond traditional authentication methods, check out the JWT authentication on Mosquitto MQTT broker article for setup details.”
MQTT authentication core mechanisms
The Open Systems Interconnection model divides authentication mechanisms into two approaches. One approach is at the application layer, while the other is at the transport layer. For the latter, it is necessary to use transport layer security (TLS) in the current version (e.g. > 1.2). It is advisable for any productive installation and usage of information exchange over a network.
Authentication on the application level
To enable and make use of authentication on the application level using the client name, client ID, and password, you have two options:
a) Use the dynamic security plugin which enables you to administer authentication (and authorization, described later) during operation. This is the preferred and comfortable way. In the case of a Pro Mosquitto installation, the global HA plugin also includes dynamic security functionality.
b) Use a static file that holds the user credentials in the Mosquitto configuration file.
Using dynamic configuration
For the first option (a), named before using the dynamic security plugin – you need the following in the Mosquitto configuration.
allow_anonymous false
plugin /usr/lib/mosquitto_dynamic_security.so
plugin_opt_config_file /path/to/dynamic-security.json
listener 8883
certfile /certs/tls.crt
keyfile /certs/tls.key
Or, use the global plugin for the Pro Edition for Eclipse Mosquitto installation (a free trial is available):
allow_anonymous false
global_plugin /usr/lib/cedalo_mosquitto_ha.so
persistence_location /path/to
listener 8883
certfile /certs/tls.crt
keyfile /certs/tls.key
Both plugins use a file named dynamic-security.json to define client credentials, groups, and roles. As the name already suggests, you can update the authentication and authorization during the operation of the MQTT broker.
To manually create an initial version of the file dynamic-security.json, you can use the command line application mosquitto_ctrl.
mosquitto_ctrl dynsec init /path/to/dynamic-security.json admin
> New password for admin: ****
> Reenter password for admin: ****
This command line will create the file dynamic-security.json and configure the access of the client named admin to the control topic $CONTROL/dynamic-security/# with the password given on the command prompt.
For the Pro Mosquitto installation using the global plugin from Cedalo, you just need to set the environment variable MOSQUITTO_DYNSEC_PASSWORD to a chosen password before starting the broker instance within the same environment. The plugin will then automatically create the dynamic-security.json file during start-up, eliminating the need to configure it on the command line, as shown in the following lines.
To create a new client manually, you can again use the command line application mosquitto_ctrl with the following options:
mosquitto_ctrl -u admin dynsec createClient cedalo
> New password for cedalo: ****
> Reenter password for cedalo: ****
> Password for admin: ****
This creates a client with the name “cedalo” and the given password on the prompt. To execute the action, you also need to prompt the admin credentials set during the initialization step of the dynamic-security.json file described before.
This command line assumes that you can connect to the broker via localhost and without TLS encryption. See this reference for other connect options.
In general, you can create clients with:
mosquitto_ctrl <options> dynsec createClient <username> -i <client id>where the use of the client ID is optional.
As written in this reference to the dynamic-security plugin, you can now continue to use the command line application to set groups, roles, and access rights.
A more convenient and graphical way to do this is using the Mosquitto Management Center (MMC), which comes with the Pro Mosquitto installation.
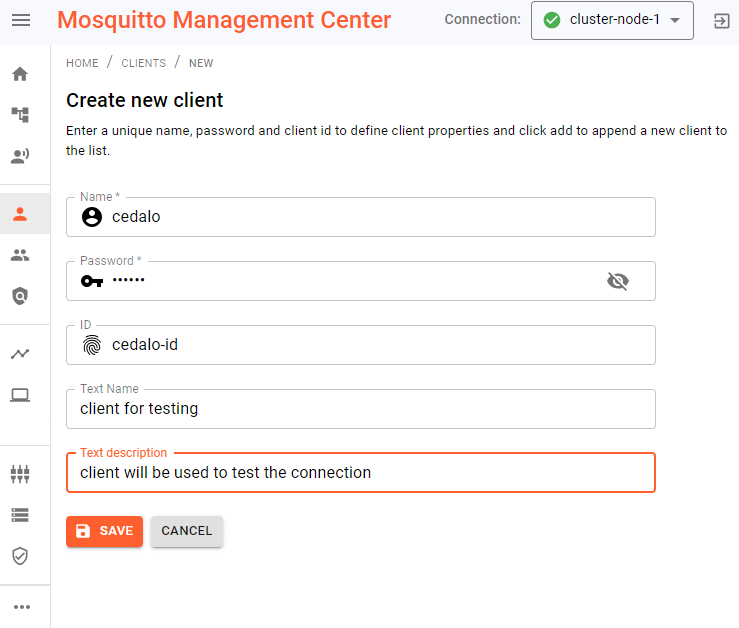
Figure 1 - Screenshot of
the Mosquitto Management Center (MMC) with opened dialog to create a new client.
As shown in Figure 1, you can easily create a new client given the name, ID and password. If the optional (client) ID is set, a client must provide the name, ID and password to connect to the broker. Any subsequent connection without the same three correct credentials will not be able to connect. If the ID is left empty, any client with a unique ID and the correct combination of name/password can connect.
Let’s summarize authentication for the Mosquitto broker on the application level. Hashed credentials are stored either in a static password file on a disk or managed by the dynamic security plugin. The administration of the clients is achievable by the command line applications or by using the graphical browser-based MMC in the Pro Mosquitto installation.
This all results in a controlled access of known clients on the broker. This occurs only if the configuration is set to allow_anonymous false (the default case) and TLS encryption is used by setting the correct file paths for certfile and keyfile. (Refer to the instructions on how to set this up, here).
Using static configuration
For the second option (b), named before using a static file – you create a file named credentials for each client with the following content (example):
cedalo:$7$101$06zHuiwDelQjsNg==This line stands for a client named “cedalo” with the hashed password cedaloisawesome, utilizing the sha512-pbkdf2 hashing algorithm*.* But to make things easy, every Mosquitto installation includes a small tool to create the file credentials and ensure correct hashing. To do so, execute the command line:
mosquitto_passwd -c /path/to/credentials cedalo
> Password: ****
> Reenter Password: ****
Executing this line will ask you to enter and re-enter the password to use for authentication. The clear text password will never be stored on disk, and the prompt is hidden to prevent the creation of any record in the bash/shell history.
To use this static client credentials for authentication, you need to set it in the configuration file of the Mosquitto broker. A small example configuration file mosquitto.conf will look like this:
allow_anonymous false
password_file /path/to/credentials
listener 8883
certfile /certs/tls.crt
keyfile /certs/tls.key
This assumes the password file (credentials) created before, is stored in the path /path/to.
Clients that now use the correct credentials will be able to connect to the broker. Other clients without or with the wrong credentials will not be able to connect. It is important to note that multiple connections with the same credentials (client name and password) but different client IDs are possible.
MQTT authentication on the transport level using TLS mechanisms
The productive application of authentication mechanisms will use transport layer security (TLS) to transmit credentials and messages between the clients and the MQTT broker. This additional overhead in the communication ensures end-to-end transport encryption.
Another functionality of TLS is identifying the communication partners using different methods and algorithms. In general, many so-called cipher suites define the set of algorithms for encryption/hashing/authentication and key exchange. In the context of authentication of MQTT clients, one common method involves using X.509 certificates to identify clients. These certificates serve as a standard format for (public) key exchange in addition to the encryption of the transport.
Client authentication using X.509 certificates
When using X.509 certificates for client authentication, the client presents its certificate to the MQTT broker during the TLS handshake process. The MQTT broker then verifies the certificate by checking its signature and ensuring it was issued by the configured and trusted Certificate Authority (CA). If the certificate is valid, the server allows the client to establish a connection and encrypts the transport with the exchanged (public) keys. To authenticate the client, a suitable Mosquitto configuration is as follows:
listener 8883
require_certificate true
use_identity_as_username true
cafile /certs/my-ca.crt
certfile /certs/tls.crt
keyfile /certs/tls.key
The line require_certificate true forces the client to present a certificate which is then verified against the certificate of the CA defined by the option cafile.
For a test case, you can create a self-signed CA certificate (my-ca.crt) using the command line application openssl with the following arguments.
openssl req -nodes -x509 -newkey rsa:4096 \
-keyout my-ca-key.pem -out my-ca.crt \
-days 356
To create a valid client certificate for a client named demo-client using the previously created CA, follow the next two steps. Create a certificate signing request for the client and include the subject CN=demo-client. This sets the identity and will be utilized as the username, as configured by the option use_identity_as_username true:
openssl req -new -newkey rsa:2048 -nodes \
-keyout demo-client-key.pem -out demo-client.csr \
-subj "/CN=demo-client"
Now you, or the CA, need to sign (= create) the client certificate:
openssl x509 -req -CAkey my-ca-key.pem -CA my-ca.crt \
-CAcreateserial -in demo-client.csr -out demo-client.crt
Once this is done, the client (application) can use the certificate demo-client.crt and the key demo-client-key.pem to authenticate itself to the MQTT broker that requires client authentication. To check authentication and connect via the command line, you can use the application mosquitto_pub, for example:
mosquitto_pub -h <broker-ip> -p 8883 -t DemoTopic -m Hello -i demo-id –cert demo-client.crt –key demo-client-key.pemIn the log files of the MQTT broker, you can find an entry after successful authentication via the client certificate:
> New client connected from *** as demo-id (p4, c1, k60, u'demo-client')
> Client demo-id negotiated TLSv1.3 cipher TLS_AES_256_GCM_SHA384
The log lines show the use of a client with client ID “demo-id” and client name “demo-client,” derived from the client certificate subject.
A more convenient and graphical way to inject dynamic CA certificates in the configuration of the MQTT broker is to use the MMC for the Pro Mosquitto broker. You can use the interface to deploy additional CA certificates to verify client identities.
Two minor changes are needed in the configuration of the MQTT broker. Instead of specifying one fixed CA certificate with the config option cafile, use the capath option and point it to a directory where the running instance of the broker has write permissions. Finally, use the certificate plugin provided by the Pro Mosquitto installation. The configuration then looks like this:
listener 8883
require_certificate true
use_identity_as_username true
capath /my-ca-certs/
certfile /certs/tls.crt
keyfile /certs/tls.key
plugin /usr/lib/cedalo_certificate_management.so
With this configuration, you can dynamically add and deploy the specific CA certificates to your MQTT broker in three simple steps (see Figure 2 as a hint on how to do this).
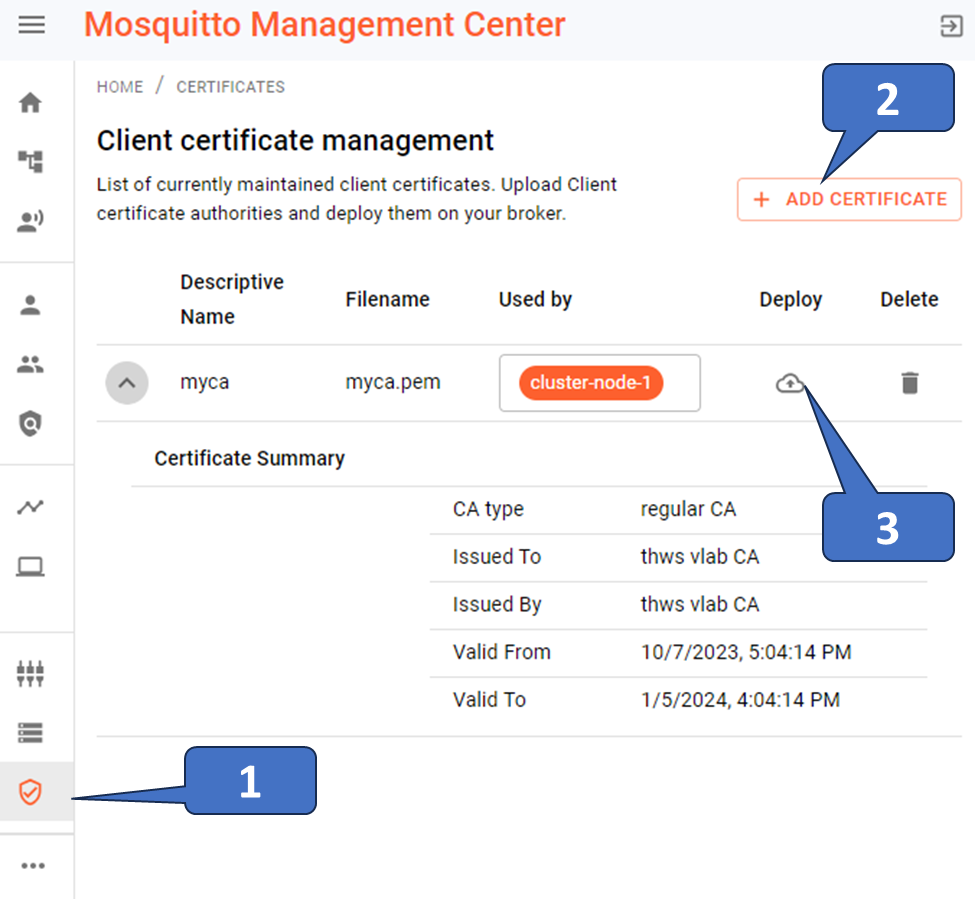
Figure 2 - Screenshot of MMC showing how to add custom CA certificates on specific listeners during the MQTT broker operation.
Authorizing the process of getting access to specific topics
Once the authentication of users or devices (commonly referred to as clients) is complete, the authorization process can begin as required. Managing this involves the usage of access control lists (ACLs). A client can successfully establish a connection to the broker (= authentication is passed). If the client identity is absent in the ACL for a specific topic, the client will not be able to subscribe or publish on that topic.
MQTT Authorization core mechanism
A successful authentication ensures that the connected client is known either by client name or by client name and ID. However, you must configure the broker’s access control lists (ACL) to authorize clients to publish or subscribe to specific topics . If you are not using the dynamic-security-plugin and have no ACL in place, then by default, authenticated clients can not publish or subscribe to any topics. To grant access, you must configure authorization as described in the following sections.
Using the dynamic-security-plugin and the Mosquitto Management Center (MMC)
As already introduced in the sections above, the dynamic-security plugin has the functionality to define authentication and authorization for connecting clients. A convenient way to configure this is using the MMC graphical interface to define the ACL during the broker operation. If you use the plugin, the default authorization denies all client access, even if they have successfully authenticated. You can define an anonymous group to manage access for unauthenticated clients if you enable anonymous access (refer to this). In any case, you need to define at least one role and assign an ACL to this role. To do so:
Create a new role, as shown in Figure 3.
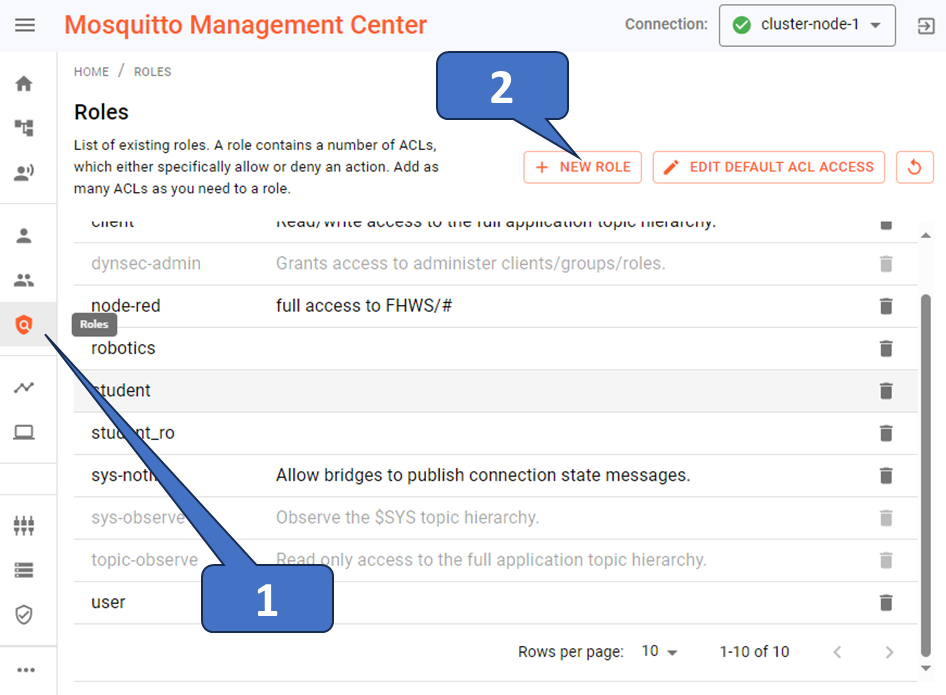
Figure 3 - Screenshot of MMC showing the creation of a new role and proceeding further to assign ACL (see Figure 4).
Give the role a name and an optional description. Then click on ACL and define the access. Figure 4 illustrates a typical setting. Refer to this page for further details about the ACL types and settings.
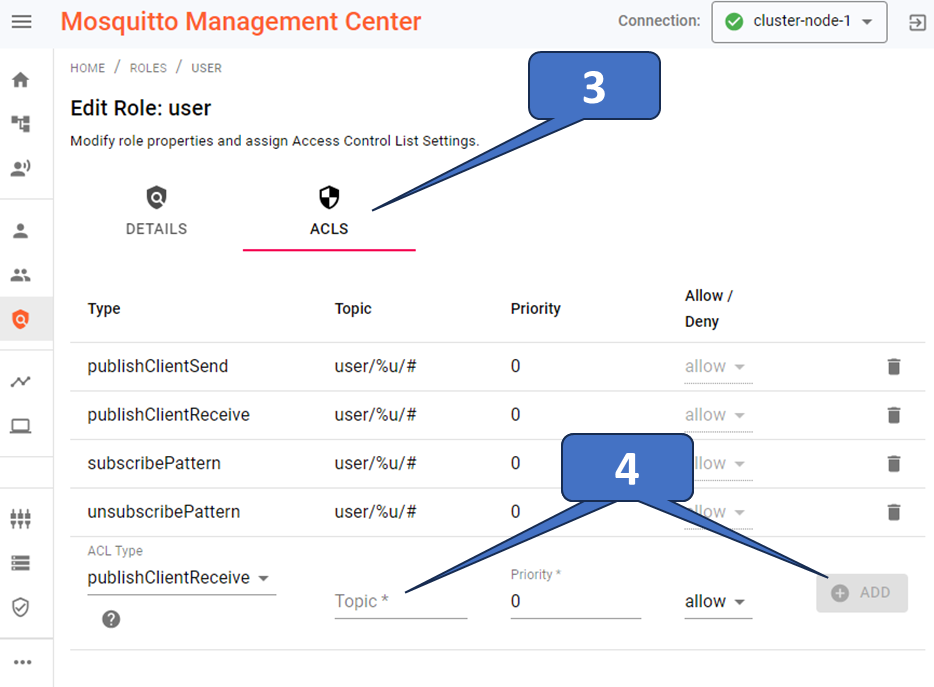
Figure 4 - Screenshot of MMC showing a typical access configuration for a created role named “user.”
Finally, you must assign a role to an existing client, a new client if required (see Figure 5), or a group. Use the drop-down menu to assign one or more roles to clients or groups. This will take effect immediately.
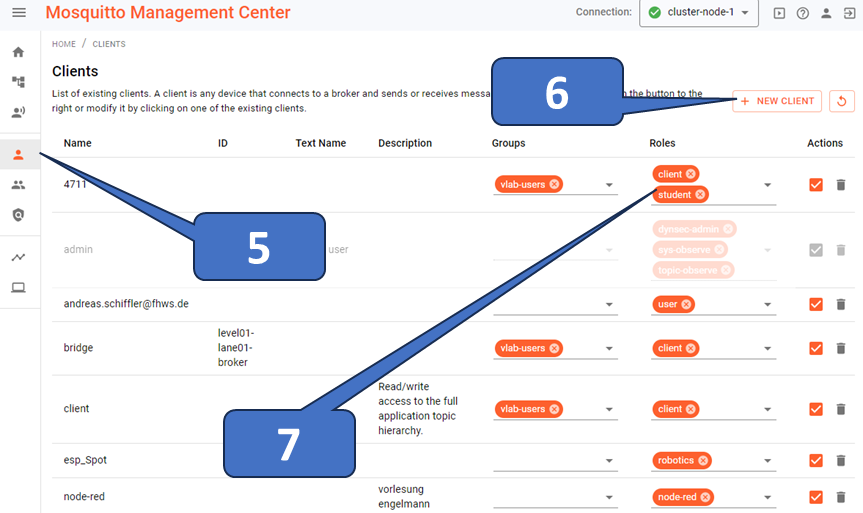
Figure 5 - Screenshot of MMC showing how to assign specific roles/ACL to new or existing clients by using the dropdown menus.
If you enable access, you can handle anonymous clients by setting a specific group and, therefore, a role/ACL, as shown in Figure 6.
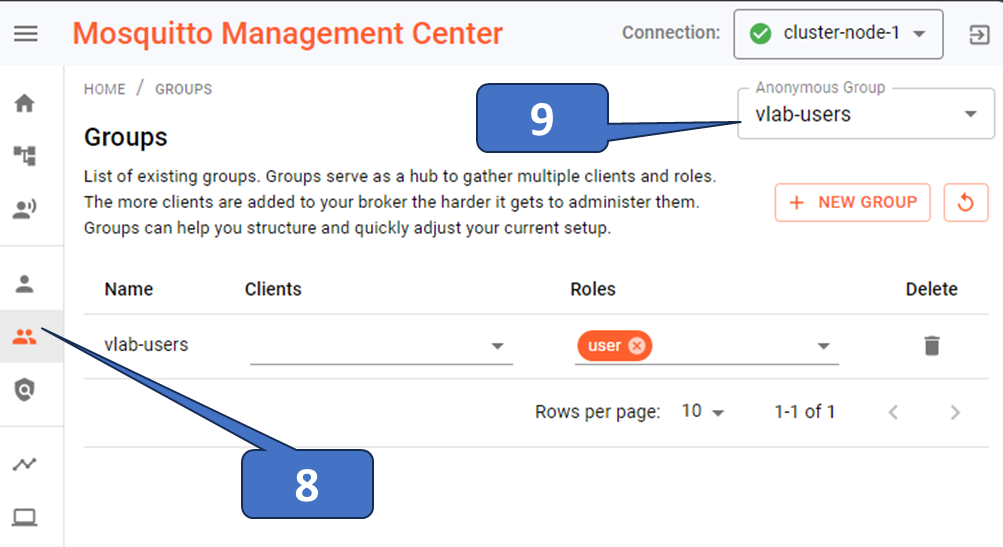
Figure 6 - Screenshot of MMC showing the option to assign anonymous clients to a previously specified group with corresponding role/ACL.
Use static authorization configuration with ACL file
Another way to control the authorization on topics is to use an access control list (ACL) file. You must add the configuration option acl_file with a valid file defining the authorization for clients and topics.
listener 8883
password_file /path/to/credentials
acl_file /path/to/acl-file
certfile /certs/tls.crt
keyfile /certs/tls.key
The ACL file can have, for example, the following content:
topic readwrite public/all

user demo-client
Topic readwrite private/mytopic

pattern readwrite users/%u/mytopic
This will result in the following: Any authenticated client can publish and subscribe to the topic public/all. Only the specifically authenticated client with the client name “demo-client” can publish/subscribe on the topic private/mytopic. Using the pattern setting makes it possible to use the client name – denoted by the %u in the topic – for access control. For instance, if the client name is demo-client, it can publish/subscribe on the topic users/demo-client/mytopic but cannot access, e.g., users/another-demo-client/mytopic. For further details, see the configuration reference here: mosquitto.conf man page | Eclipse Mosquitto.
MQTT authentication and authorization on the Mosquitto Management Center (MMC)
The previous section discusses authentication and authorization on the Mosquitto MQTT broker. Table 1 below outlines the best practices for using the MMC. A different set of users from those defined in Mosquitto, manages this web-based application. Each MMC user must be assigned a role and can also be added to a user group. Additionally, a REST API can also use MMC’s functionality.
| Use case | Username / Password | X509 certificate (+TLS) | Authentication via | Authorization via |
|---|---|---|---|---|
| 1 | – | – | – | ACL file |
| 2 | – | – | Anonymous group in dynamic security plugin | |
| 3 | x | – | Password file | ACL file |
| 4 (best practice) | x | – | dynamic security plugin | dynamic security plugin |
| 5 | x | x | Verify against certificate(s) in cafile / capath | ACL file OR dynamic security plugin |
| 6 (best practice) | – | x | Verify against certificate(s) in cafile / capath and use_identity_as_username |
Table 1 - Overview of selection combinations for authentication and authorization on Mosquitto MQTT broker.
The authentication backend on the MMC can utilize either an internally managed system (basic use case) or an externally managed identity like a company-wide identity provider (IDP), which is an advanced use case.
This applies regardless of whether you are using an external or internal identity provider for authentication. If you have credentials that authenticate you as a registered user in MMC, you can utilize MMC’s functionality via:
- WebUI: by passing username and password
- REST API: by passing username/password or providing an application token
Using the Web UI is straightforward as its graphical interface will guide you through the process. You have to log in with your username and password. If you are an administrator, you can create new users and groups and assign roles to them. For more information please refer to this document.
Please note: The application startup via CEDALO_MC_USERNAME and CEDALO_MC_PASSWORD environment variables will define the initial MMC root user’s credentials. After authentication as a root user, you can create additional users via User Management. To learn more about User Management in MMC refer to the documentation page here.
Using the REST API of MMC with user credentials or tokens
You can do the following to use the REST API with your user credentials for automation purposes. Assuming you have the widely known command line application curl in place, the following command line will log you in and store a session cookie on disk.
curl -X POST https://<YOUR-MMC-HOST>/auth?json=true \
-H 'Content-Type: application/x-www-form-urlencoded' \
-d "username=<USERNAME>&password=<PASSWORD>"  \
-c mycookie
In the command line above, you must set your specific MMC host, username, and password. The option -c mycookie creates a file where the authentication information is stored and can be used in subsequent requests to the REST API. One next possible request that will work for any user role is to request the profile using the option -b mycookie to reuse the authentication information.
curl -X GET https://<YOUR-MMC-HOST>/api/profile \
-b mycookie
An example response for the request above on the path api/profile is shown below.
{ "username": "<USERNAME>",
  "roles": ,

  "connections": [],
  "groups": ,
  "sessionId": "baca5c53-8c38-469b-b7e9-c2b031cdf71f" }
Instead of using a username and password, you can also use an application token. The creation of such a token needs administrative privileges on MMC. Refer to the documentation on navigating MMC to create such a token and assign a specific role. For instance, the intention of working with application tokens is to automate the monitoring or client creation. To access the REST API with an application token, you must set the Authorization header to Bearer <YOUR-APP-TOKEN>. For example, if you use curl as shown before, you can get the system status by calling the path api/system/status:
curl -X GET https://<YOUR-MMC-HOST>/api/system/status \
-H 'Authorization: Bearer <YOUR-APP-TOKEN>'
For more details on using the API, including creating users and broker connections, refer to the REST API documentation.
Using an external identity provider for authentication on MMC
So far, the authentication on MMC is made against the internal identity provider (IDP) of MMC. That means credentials provided by users are verified against those stored and administered by MMC. In more advanced scenarios, it is possible to use external IDP, which might be present in companies in the form of domain controllers like Microsoft Azure Entra ID, to enable single sign-on (SSO) functionalities for many applications. The advantage is that there is no need for redundant user management, and enables the implementation of a secure multi-factor authentication.
Note that currently MMC supports only SAML-based IDPs. Therefore, adjusting the configuration of the MMC will enable the use of the Security Assertion Markup Language (SAML) endpoint of the external IDP. MMC admins must create users on MMC with the desired role and a unique email address serving as an identity. The external IDP then does the authentication, and the defined roles in MMC grant the authorization. Refer to the documentation on how to set up external authentication and SSO. You can also rely on the Pro Mosquitto Support Service by Cedalo for advanced cases.
Wrap-up
Authentication against the broker is done on the application or transport level. On the other hand, the definition of ACL determines authorization. Table 1 shows a selected part of the possible variants for authentication and authorization for the Mosquitto MQTT broker.
It is advisable to use case 4 from Table 1 for optimal comfort and security, especially when installing Pro Mosquitto. Combining case 6 with the certificate plugin on the Pro Mosquitto installation will enable fully automated deployment and operation of thousands of devices. It eliminates the need for manually creating clients and passwords.
The usage of the Mosquitto Management Center (MMC) itself also relies on different options to authenticate. You can use a username/password, tokens, or your company-wide identity provider (via SAML single sign-on). The MMC graphical web UI or the REST API allows you to authorize different users and assign roles to them.


