
In today’s technological world, databases are essential for storing and managing significant volumes of data. From web applications to the rapidly growing Internet of Things (IoT), efficient data handling has become more crucial than ever.
In the context of IoT, MQTT is a widely adopted lightweight messaging protocol that facilitates data exchange between IoT devices. But how can you efficiently leverage this protocol to store data for future analysis?
This is where the MySQL Bridge plugin comes into play. In this article, I will demonstrate the integration of MySQL databases and MQTT, using the Pro Edition for Mosquitto™ MQTT broker.
Why use MySQL?
MySQL stands out as a top choice when selecting a database to pair with your MQTT broker for IoT data storage. Let’s focus on three key reasons why:
- Reliability and proven track record
MySQL has been a trusted database solution for decades, powering systems of all sizes. Its reliability ensures secure data storage and consistent performance. - Scalability
IoT systems often grow quickly as new devices are added. MySQL can easily handle increasing data volumes. - Ease of integration with MQTT
MySQL integrates easily with the Pro Mosquitto MQTT broker via the MySQL bridge.
A real-world use case for MQTT to MySQL integration
Let’s explore a potential application in smart building management to illustrate the practical advantages of integrating Pro Mosquitto and MySQL.
Modern buildings have sensors to monitor various parameters, such as indoor air quality, temperature, and occupancy levels, to ensure comfort and energy efficiency. These sensors communicate with a central system, providing real-time data for analysis and control. In this scenario, each sensor sends MQTT messages to a Mosquitto broker within the building’s management network.
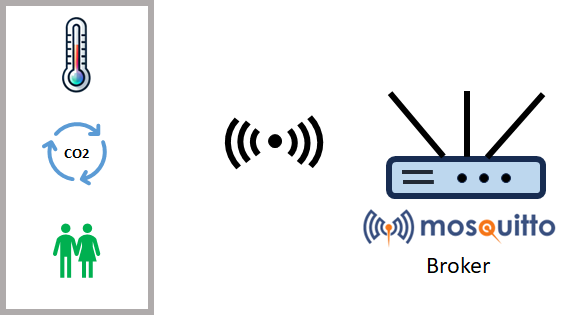
Figure 1 – Temperature, indoor air quality, and occupancy sensors send data to a Mosquitto broker.
The next step is to transfer this data from the broker to a database where the system stores and analyzes it for trend detection or predictive maintenance. Achieving this integration would require developing custom software, often involving considerable time and effort. With the Pro Mosquitto MySQL bridge, this process becomes far more efficient.
Pushing MQTT: The MySQL Bridge
Typically, MQTT brokers lack functionality for a direct database integration. However, the Pro version of the open-source Mosquitto MQTT broker addresses this with its exclusive MySQL Bridge feature (Figure 2).
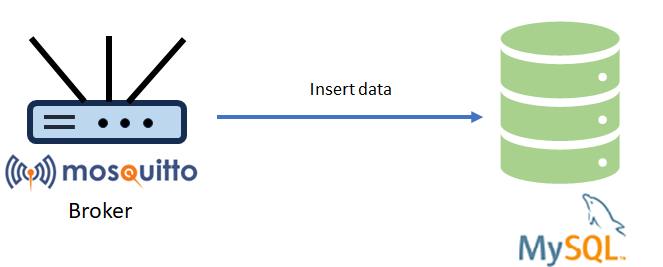
Figure 2 – The Pro Mosquitto broker efficiently stores MQTT data in a MySQL database through the MySQL bridge.
As a result, this enables the broker to connect directly and insert data into a MySQL database, providing a one-way MQTT-to-SQL bridge.
Configuring the MQTT to MySQL Bridge project
I will describe the project setup using the elements shown in Figure 3.

Figure 3 – Main project elements.
Typically, the project consists of three elements:
- A Linux bash script that simulates the building sensors, sending the relevant data over MQTT.
- The Pro Mosquitto broker with the MySql Bridge plugin.
- A MySql database that stores the incoming data from the broker.
Note: this solution uses Docker containers for a portable, consistent environment and runs on Ubuntu version 22.04 (Jammy Jellyfish).
Building an MQTT sensor simulation
Creating the simulation environment is straightforward using a bash script.
The script will use the mosquitto_pub utility to simulate sending MQTT messages containing sensor data. The bash script content is as follows:
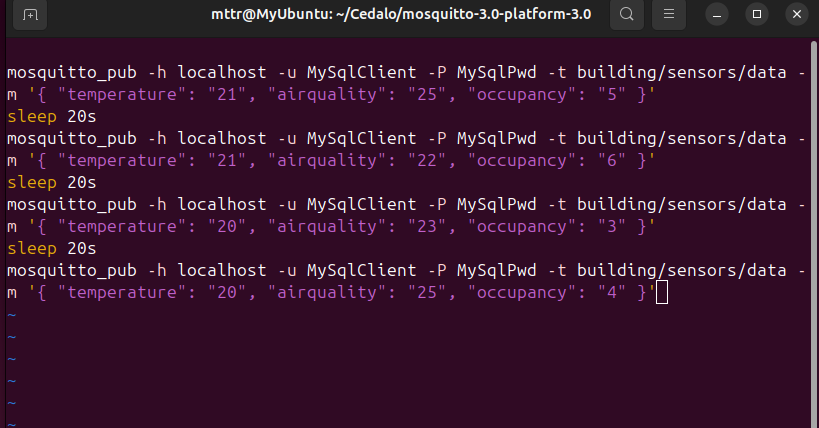
Figure 4 - Content of the building simulator shell script
After that, the mosquitto_pub utility will send a JSON-formatted message containing information on temperature, air quality, and occupancy sensors over the topic building/sensors/data. Additionally, the MQTT broker will receive these messages and store them in the MySQL database.
You can consider the numerical values purely as an example and assume Celsius for temperature, Air Quality Index (AQI) for air quality, and the number of occupied rooms for the “occupancy” parameter.
Next, the script sends the message 4 times, with different values, pausing for 20 seconds between each send.
Consequently, the script is stored in a file named buildingnet_simulator.sh, which must first be enabled for execution using the command:
chmod +x ./buildingnet_simulator.shMySQL database configuration
The next step involves setting up the MySQL database. Run the following command in your terminal to get the MySQL Docker container:
docker pull mysql:latestThis command pulls the latest version of the official MySQL Docker image.
Then, start the container with the following command:
docker run --name=mysqldb -e MYSQL_ROOT_PASSWORD=rootpwd -d mysql:latestWhere:
--name=mysqldb: Defines the container’s name.-e MYSQL_ROOT_PASSWORD=rootpwd: Sets the root password for the MySQL database.-d: Runs the container in detached mode, allowing it to operate in the background.
After running this command, verify that the container is running by using:
docker psThis will display relevant information about running containers, including their container ID, name, and status (Figure 5).
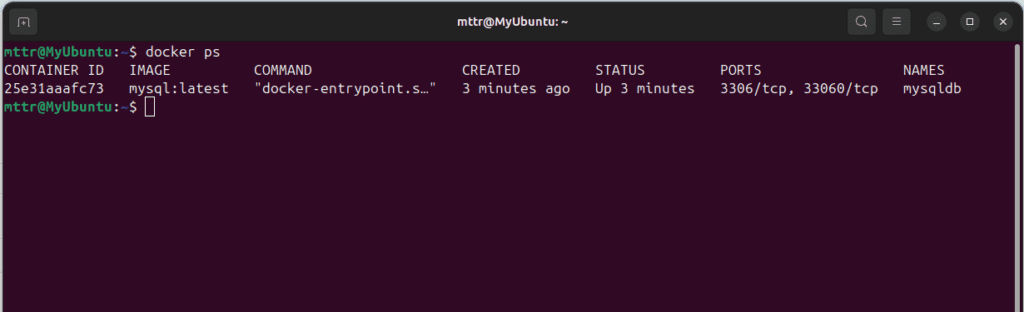
Figure 5 – Docker ps output.
With MySQL now running, the next step is creating a Docker network to connect the MySQL database and the Pro Mosquitto broker. Run the following command to create the Docker network:
docker network create buildingnetThis creates an internal Docker network with the name buildingnet, which will serve as a communication channel for the containers.
Next, connect the MySQL container to this network using:
docker network connect buildingnet mysqldbAlternatively, you can connect the container to the network during startup by adapting the run command as follows:
docker run --name=mysqldb --network buildingnet -e MYSQL_ROOT_PASSWORD=rootpwd -d mysql:latestNow, let’s proceed with configuring the database. Start the MySQL docker container’s bash with the command:
docker exec -it mysqldb bash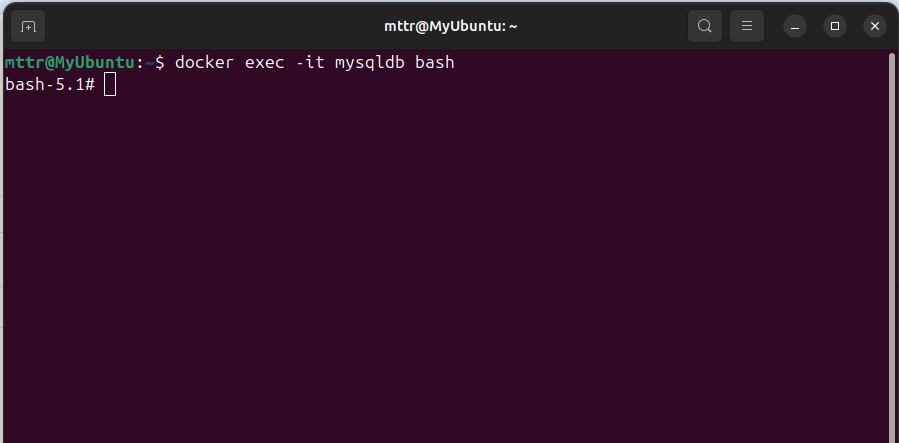
Figure 6 - MySQL docker container bash.
In the bash terminal, enter the following command and then the root password (rootpwd) to start the MySQL monitor:
mysql -u root -p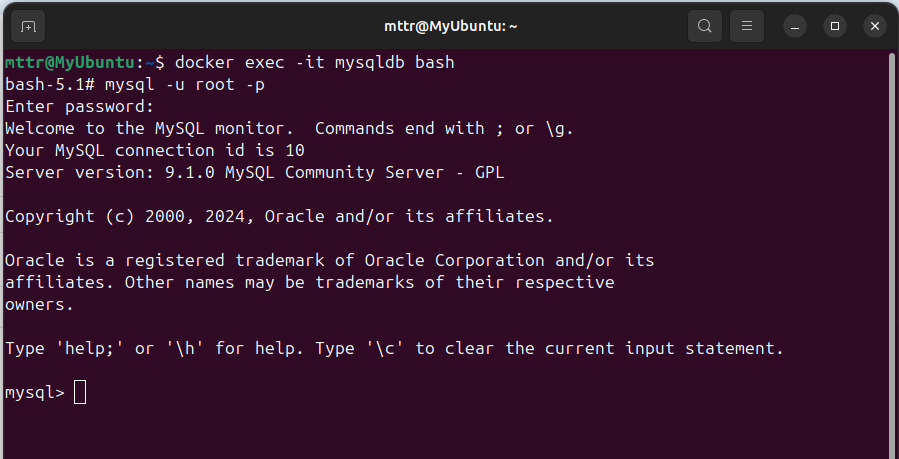
Figure 7 - MySQL monitor.
At this point, you can execute SQL queries in the MySQL monitor. Start by creating a database with the name “building_db” by running the command:
CREATE DATABASE building_db;Next, switch to the database using:
USE building_db;Now, create the table “building_1,” which will represent the example building. Use the following SQL command:
CREATE TABLE building_1
(
   temperature INT,
   airquality INT,
   occupancy INT,
   timestamp INT
);
To confirm the successful table creation, use:
SHOW TABLES;This will display a list of all tables in the current database.
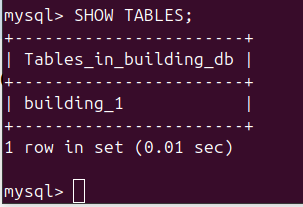
Figure 8 - Table building_1 into the building_db database.
With the MySQL instance now configured, you can proceed with configuring Pro Mosquitto.
Pro Mosquitto configuration
To begin using the Pro Edition for Mosquitto™ MQTT broker in your MySQL project, sign up for a Cedalo MQTT Platform trial.
This trial gives you access to the Pro Mosquitto broker and the Management Center for Mosquitto™ web UI, offering a complete solution for managing and deploying MQTT brokers.
For this article, I use the on-premises trial option, which includes a single node setup, basic MQTT HA configuration, and access to many advanced features. This setup uses a single-node Docker broker, ideal for demonstrating a local, controlled environment. For setup instructions, refer to the Pro Mosquitto Docker container guide.
To configure the MySQL bridge integration, activate the plugin and create the appropriate configuration file.
After that, add the following lines to the mosquitto.conf file to activate the SQL bridge plugin in the broker:
plugin /usr/lib/cedalo_sql_bridge.so
persistence_location /mosquitto/data
The persistence_location parameter specifies the base path of the plugin configuration.
Next, create the integration configuration file. Go to the folder mosquitto/data and create the file sql-bridge.json. This file will contain the plugin configuration, which is detailed in the following documentation page.
For this project, I will use the following configuration:
{
	"version": "1",
	"connections": [
    	{
        	"name": "MySQL - Bridge",
        	"connection": {
                "driver": "mysql",
                "hostname": "mysqldb",
                "port": 3306,
                "database": "building_db",
                "credentials": {
                    "username": "root",
                    "password": "rootpwd"
                },
                "debug": true
        	},
        	"options": {
                "bufferSize": 10000,
                "batchSize": 1000,
                "timeoutMs": 4000,
                "queueMaxSize": 10000,
                "maxRetries": 15,
                "retryDelayMs": 1000
        	},
        	"topicMappings": [
            	{
                	    "name": "topic-mapping-to-mysql-table",
                	    "target": "building_1",
                	    "schemaMapping": "schema-mapping-1",
                	    "mqttTopics":
            	}
        	]
    	}
	],
	"schemaMappings": [
    	{
        	"name": "schema-mapping-1",
        	"mapping": [
            	{
                	    "source": "",
                	    "target": "temperature"
            	},
                    	{
                	    "source": "",
                	    "target": "airquality"
            	},
            	{
                      "source": "",
                	    "target": "occupancy"
            	},
        	      {
                	    "source": "",
                	    "target": "timestamp"
            	}
        	]
    	}
	]
}
Accordingly, the mysqldb Docker container hosts the MySQL database (building_db) with access credentials: root (username) and rootpwd (password).
The debug option is set to enable, allowing you to log extra debug information about every SQL query the plugin performs. However, you should disable this option for production.
The MQTT messages have the payload in JSON format, since the plugin is configured to extract specific fields from the JSON structure and to map them to the appropriate database columns.
Note: the payload does not have to be in JSON format. Moreover, it can be forwarded to the database as is (Refer to the doc for details).
The topic mapping is performed for building/sensors/# and specifies which schema-mapping to use for this topic (schema-mapping-1 in this case). The schema-mapping defines a relationship between the JSON payload and the database schema.
Additionally, fields such as temperature, airquality, and occupancy are extracted from the JSON payload and stored in corresponding columns (temperature, airquality, occupancy) in the building1 table. It also maps the timestamp metadata field from the MQTT message () to the _timestamp column in the database.
Finally, you must configure the container to automatically connect to the buildingnet network during startup. To do this, edit the docker-compose.yml file in two places.
First, update the mosquitto section under services to include the buildingnet network. Then, define the new buildingnet network in the networks section at the end of the file.
The following two figures illustrate these updates:
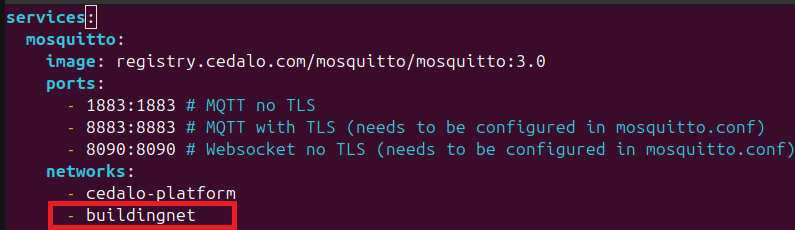
Figure 9 – Add buildingnet network to the “services” section.
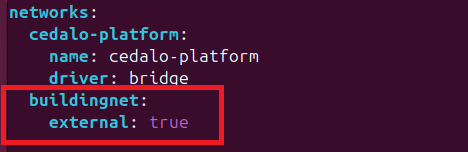
Figure 10 – Defining buildingnet network.
The final step is to create the client in the Cedalo MQTT Platform with the username MySqlClient and the password MySqlPwd.
Testing the Mosquitto MQTT broker MySQL Bridge
With the configuration set up, let’s test the MySQL bridge. Make sure the MySQL Docker container is still running.
Next, start the Pro Mosquitto broker container by navigating to the mosquitto folder and executing (Figure 11):
docker compose up -d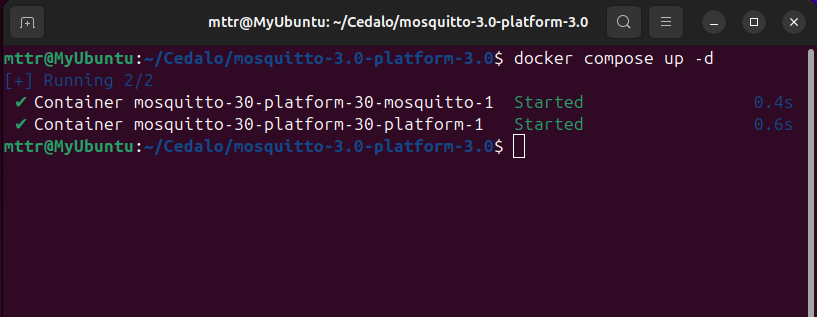
Figure 11 – Pro Mosquitto broker starts.
Then, verify the MySql bridge is running by analyzing the Pro Mosquitto container logs. Type docker logs mosquitto-30-platform-30-mosquitto-1 in the Terminal:
A possible output is shown below:
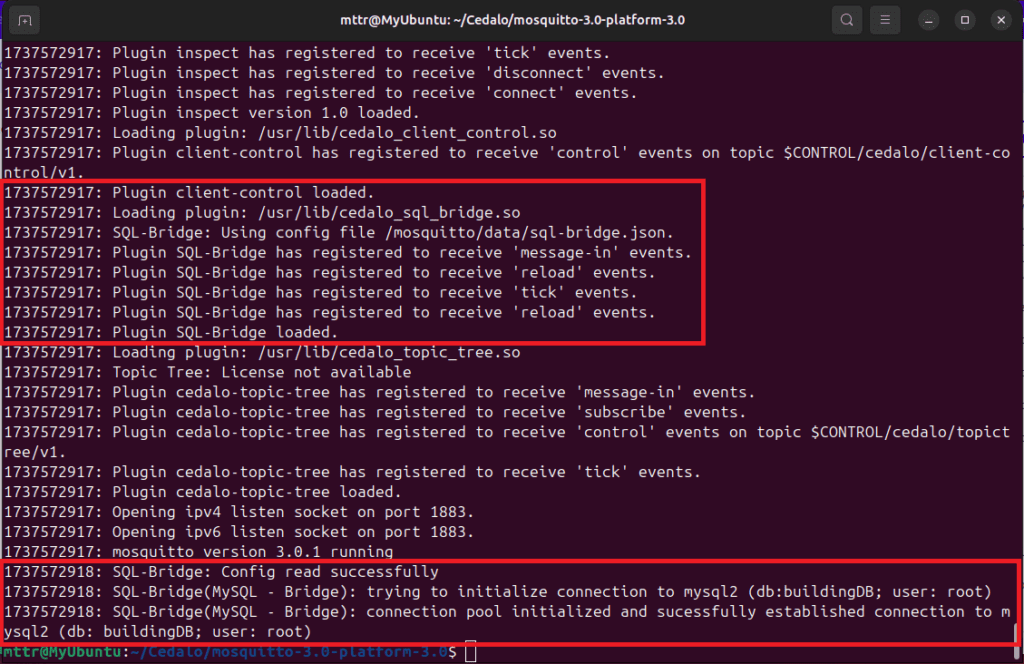
Figure 12 – Pro Mosquitto container logs.
The first red rectangle highlights the log section, indicating that the plugin started successfully. The second rectangle shows a successful Pro Mosquitto connection to the building_db database.
Now, you’re ready to start the sensor simulator script. Navigate to the script’s folder and type the command:
./buildingnet_simulator.shWhen the script execution finishes, you can verify the content of the MySql database.
Start the MySql bash shell as previously shown (command: docker exec -it mysqldb bash), and move to the building_db (command: USE building_db;) database.
Then, use the following query to visualize the table content:
SELECT * FROM building_1;A possible output is shown below:
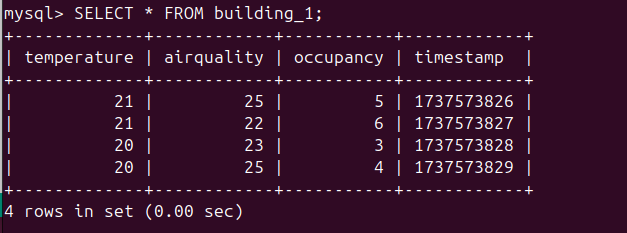
Figure 13 – building_1 table content.
As a result, Figure 13 shows how the MQTT data transmitted by the script was captured from the broker and stored in the MySql table, demonstrating the core integration functionality.
Utilizing MQTT data collected in MySQL
This project demonstrates how to store data from MQTT messages in a MySQL database, but the next step is effectively leveraging this data.
One practical method involves querying the database based on specific criteria and visualizing the results using external tools. For instance, plotting this data on graphs can show trends over time, uncovering patterns or potential issues. However, integrating dynamic, auto-updating graphs takes real-time monitoring a step further.
As a result, combining these techniques makes raw data actionable, allowing users to optimize performance, detect anomalies, and make informed choices in IoT system management.
Expanding your Pro Mosquitto MySQL Bridge configuration
Beyond the basic functionalities covered in the article, the Pro Mosquitto MySQL Bridge plugin offers other advanced capabilities like:
- Automatic retry and recovery: The plugin buffers incoming MQTT messages, enabling automatic retries for failed records and recovery from database connection interruptions.
- In-order “at least once” delivery: Ensures messages are delivered in the correct order and guarantees delivery at least once within the configured retry attempts.
- Advanced payload destructuring and transformation: Supports complex payloads (not only JSON-based), allowing for detailed data extraction and transformations, including type casting and date format conversions.
- Extended metadata support: In addition to timestamps, the plugin supports metadata, including MQTT topic and message QoS levels, providing a richer context for stored data.
- Wildcard topic mappings: Facilitates dynamic handling of multiple MQTT topics through wildcard topic mappings support.
Troubleshooting
1. MySQL container fails to connect to the network
If the connection fails to the MySQL database in Mosquitto logs, ensure the buildingnet network is correctly configured in the docker-compose.yml file. Then, assign the MySQL container to the network and restart it.
2. MQTT data not stored in MySQL database
If MQTT data fails to appear in the MySQL database, check Pro Mosquitto logs for any SQL Bridge plugin errors using the docker logs command. Next, ensure you configure the root password, database name, and other connection details correctly in the bridge configuration file (sql-bridge.json). Any mismatches in these values can prevent the system from inserting data into the database.
Conclusion
This guide demonstrates how to integrate the Pro Mosquitto broker with a MySQL database using the MySQL Bridge plugin. By following these steps, you can establish a reliable system that transfers MQTT data from IoT devices into a structured database for storage and analysis.
With this setup, you now have a starting point for processing and analyzing sensor data, unlocking insights to drive smarter decisions. In conclusion, sign up for an on-premises Cedalo MQTT Platform trial and unlock the full potential of integrating the Pro Mosquitto MQTT broker with MySQL. Leverage this powerful ecosystem to streamline your IoT data management and stay ahead in this rapidly evolving field.


