
The MQTT protocol has become a go-to solution for reliable, lightweight communication between devices in the IoT and embedded systems world. As Rust continues to grow in popularity for systems programming due to its memory safety and performance, more developers are looking to integrate MQTT functionality into their Rust projects. This article will guide you through setting up and using the Paho MQTT Client Library in your next Rust project.
What is Rust?
Rust is a systems programming language known for emphasizing safety, performance, and concurrency. Unlike traditional systems languages like C and C++, its unique ownership model enforces strict rules about how programs access and share memory.
Its critical feature focuses on eliminating common programming errors, such as null pointer dereferencing, buffer overflows, and data races. This makes Rust ideal for building reliable and robust software, particularly in IoT and embedded systems, where efficiency and safety are crucial.
Choosing the right Rust MQTT library
When working with MQTT in Rust, developers have several library options, each offering varying features and levels of support. Key considerations when selecting a library include performance, ease of use, and community support. Some popular options are rumqtt, mqtt-async-client, and paho-mqtt.
I will use the Paho MQTT Client Library (paho-mqtt) for this project due to its reliability, active maintenance by the Eclipse Foundation, and compatibility with synchronous and asynchronous programming models. Paho also offers comprehensive documentation and support for multiple platforms, making it a solid choice for integrating MQTT into Rust projects.
Setting up a Rust project with MQTT
This chapter guides you through creating a simple Rust application demonstrating essential MQTT functionalities like connect, publish, subscribe, and disconnect.
The project will use the Pro Edition for Eclipse Mosquitto™ broker from the Cedalo MQTT Platform, with the Rust application acting as an MQTT client. It will handle publishing and subscribing, and communicate with a second client using the mosquitto_pub and mosquitto_sub utilities.
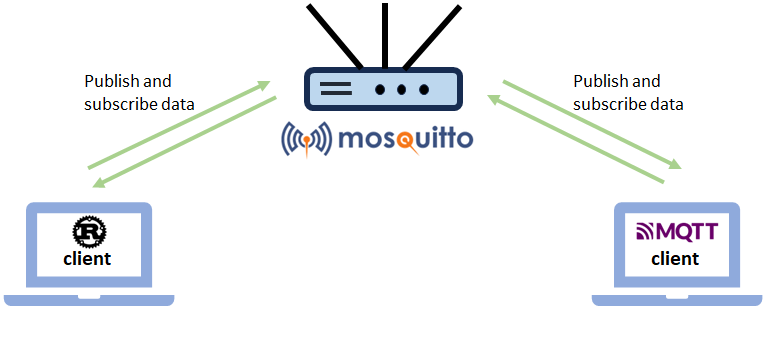
Figure 1 - Project design with the Pro Mosquitto broker and Rust application.
Before starting the project, you must install the necessary tools and configure your environment. This project will run on the Ubuntu operating system, version 22.04 (Jammy Jellyfish).
Setting up a Rust project is straightforward with Rust’s package manager, Cargo. It handles project creation, dependency management, and project build, streamlining the development process.
To begin, install Rust and Cargo using the following terminal command:
curl --proto '=https' --tlsv1.2 -sSf https://sh.rustup.rs | shThis command installs the Rust toolchain using rustup, a version manager and toolchain installer for Rust.
The installation process allows you to modify some configurations (see Figure 2). However, for this tutorial, you can proceed with the default settings (standard installation).
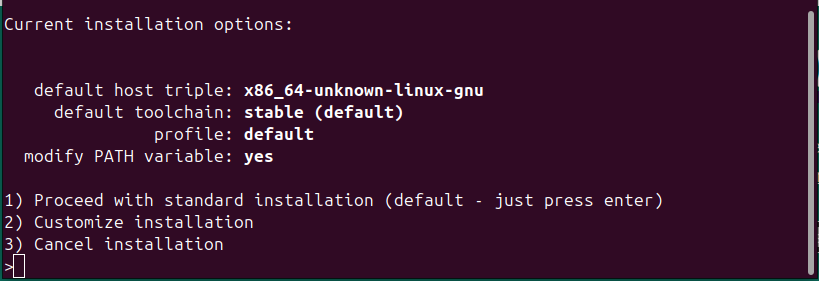
Figure 2 - Rust toolchain installation options.
Once the installation is complete, you’ll be ready to create a new Rust project. Use cargo new mqtt_rust_project to initialize the example project.
Now, navigate to the mqtt_rust_project folder and add the latest version of the paho-mqtt library dependency by executing, cargo add paho-mqtt.
Open the Cargo.toml file to verify you have added the dependency correctly. In my example, the latest version (0.12.5) was added.
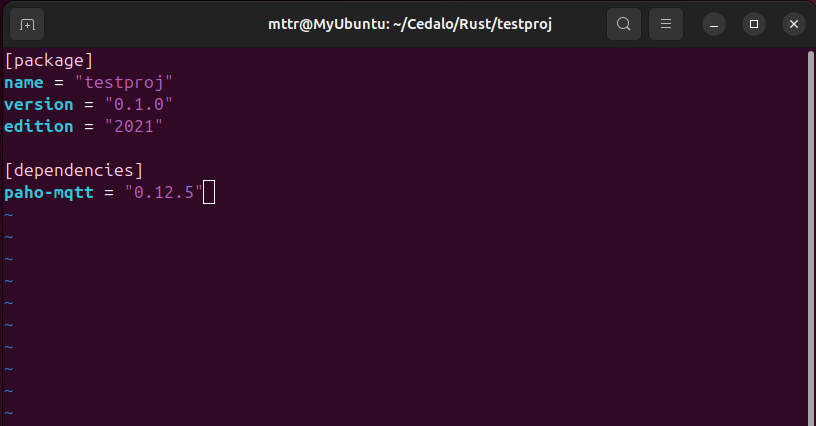
Figure 3 - Adding the Paho library dependency.
Finally, build the project with the terminal command, cargo build.
After setting up your basic Rust project and adding the Paho MQTT library, you’re ready to configure Pro Mosquitto.
To begin using the Pro Mosquitto broker in your Rust project, sign up for a Cedalo MQTT Platform trial. This trial gives you access to the broker and the Management Center for Mosquitto™ web UI, offering a complete solution for managing and deploying MQTT brokers. The platform offers cloud and on-premises options, allowing you to choose the setup that best fits your project’s needs.
For this article, I am using the on-premises trial option, which includes basic MQTT HA configuration and access to advanced features. This setup lets you download a single node Docker broker, ideal for demonstrating a local, controlled environment. For more details, refer to this documentation. The on-premises setup aligns better with the needs of this article, as it provides flexibility to customize and test configurations locally while maintaining complete control over the broker environment.
After registering, you will receive a confirmation email containing a link to access the Cedalo MQTT Platform. Click on it and log in to your account.
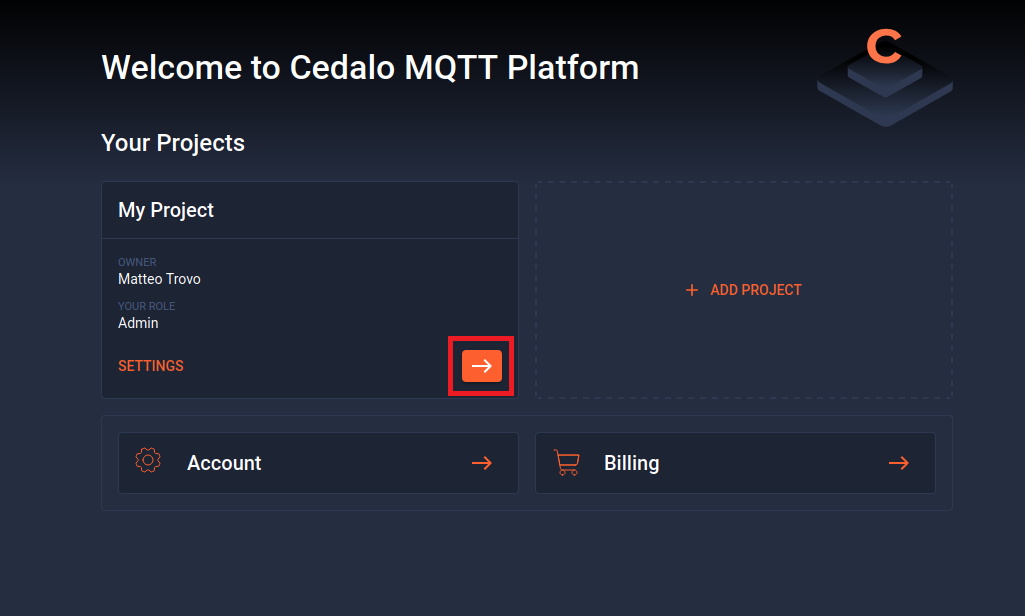
Figure 4 - Start screen of the Cedalo MQTT Platform.
At this stage, you can use a pre-existing project or create a new one. To configure the project, click on the arrow icon (red rectangle in Figure 4). Within the configurations, select the correct Broker (in this case, the on-premises Pro Mosquitto option). This will give you access to the Download Area, where you can download your single-node setup by clicking the specific Docker image (Figure 5).
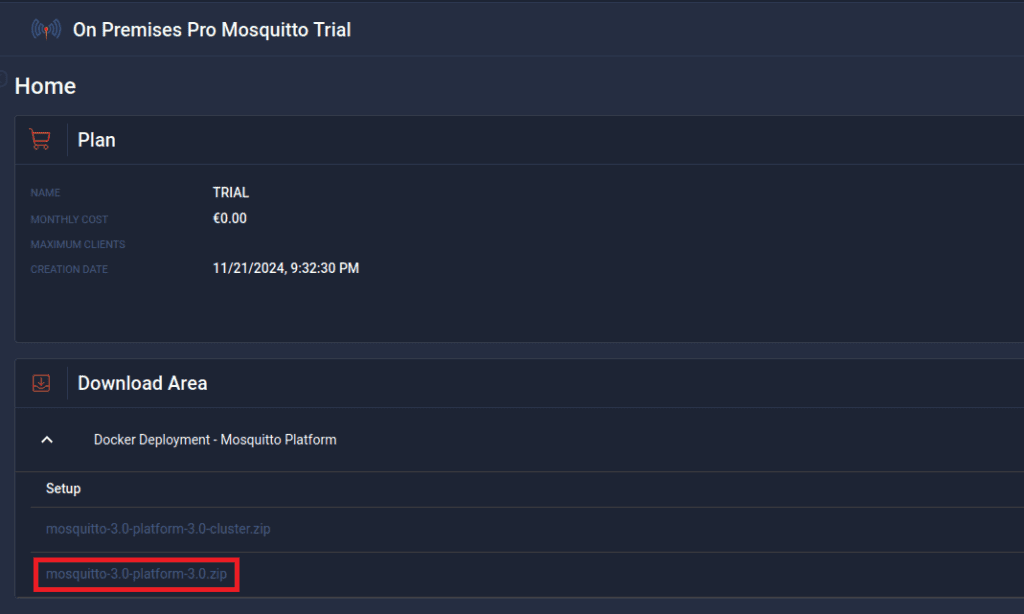
Figure 5 - Download Pro Mosquitto docker container.
Lastly, after downloading the Pro Mosquitto Docker container, you can use it with Docker. This comprehensive guide provides detailed instructions on setting up and starting Docker and Pro Mosquitto.
Writing the Rust application
This section presents the complete application code and explains its most relevant parts. The code should be placed in the main.rs file, generated during the project’s creation.
use paho_mqtt as mqtt;
use std::{thread, time::Duration};

fn main() {
   let hostname = "localhost";
   let client_id = "rust_cedalo_client";
   let topic = "test/topic";
   let qos = 1;
   let username = "RustClient";
   let password = "RustPwd";

   // Create a client creation option object. This is used to pass further information during the client creation process.
   let client_options = mqtt::CreateOptionsBuilder::new()
       .server_uri(hostname)
       .client_id(client_id)
       .finalize();

   // Create the MQTT client
   let mut client = mqtt::Client::new(client_options).expect("Error during client creation");

   // Create a connection option object to configure the username and other information.
   let connection_options = mqtt::ConnectOptionsBuilder::new()
       .clean_session(true)
       .user_name(username)
       .password(password)
       .finalize();

   // Connect to the MQTT broker
   client.connect(connection_options).expect("Failed to connect to broker");

   // Subscribe to the topic
   client.subscribe(topic, qos).expect("Failed to subscribe");

   // Starts the client receiving messages
   let rx_queue = client.start_consuming();
   // Create a thread that stays pending over incoming messages.
   let handle = thread::spawn(move || {
       for mqttmsg in rx_queue.iter() {
           if let Some(mqttmsg) = mqttmsg {
               println!("Received: -> {}", mqttmsg.payload_str());
           } else {
               println!("Unsubscribe: connection closed");
               break;
           }
       }
   });

   // Publish a message
   let mqttmsg = mqtt::Message::new(topic, "Hello from Rust client!", qos);
   client.publish(mqttmsg).expect("Failed to publish message");

   // Keep the program alive for a few seconds to receive messages
   thread::sleep(Duration::from_secs(10));

   // Disconnect the client
   client.disconnect(None).expect("Failed to disconnect");
   handle.join().expect("Failed to join thread");
   println!("Disconnected");
}
Connecting to the Mosquitto MQTT broker
The following code snippet demonstrates how to establish a connection to the Mosquitto MQTT broker:
let client_options = mqtt::CreateOptionsBuilder::new()
	.server_uri(hostname)
	.client_id(client_id)
	.finalize();
let mut client = mqtt::Client::new(client_options).expect("Error during client creation");

let connection_options = mqtt::ConnectOptionsBuilder::new()
	.clean_session(true)
	.user_name(username)
	.password(password)
	.finalize();
client.connect(connection_options).expect("Failed to connect to broker");
This code initializes the MQTT client with the broker’s hostname (localhost) and a unique client ID (rust_cedalo_client) through a CreateOptionsBuilder object. A ConnectOptionsBuilder object configures connection settings, such as authentication credentials.
Finally, the connect method then connects the client to the broker, preparing the application for subsequent MQTT operations.
The expect method handles errors, which is acceptable for demonstration purposes. However, it is not ideal for production as it causes the program to panic if an operation fails, potentially leading to abrupt termination and a poor user experience. Instead, adopt robust error-handling approaches like pattern matching, unwrap_or, or similar methods to gracefully manage failures, ensuring the application remains reliable and maintainable.
Rust MQTT Subscribe example
In this example, the following code demonstrates how to subscribe to an MQTT topic in Rust and handle incoming messages.
client.subscribe(topic, qos).expect("Failed to subscribe");

let rx_queue = client.start_consuming();
let handle = thread::spawn(move || {
   for mqttmsg in rx_queue.iter() {
    	if let Some(mqttmsg) = mqttmsg {
        	println!("Received: -> {}", mqttmsg.payload_str());
    	} else {
        	println!("Unsubscribe: connection closed");
            break;
    	}
   }
});
This snippet first subscribes to the specified topic (test/topic) using the subscribe method to ensure the client listens for messages published on this topic. If the subscription fails, the application will print a specific error message.
The start_consuming method initializes a message queue (rx_queue) that the client uses to process incoming messages. The thread::spawn method creates a separate thread to handle messages as they arrive. The thread iterates over the message queue, using the blocking method iter to check for new messages. When a message is received, the iter method returns the message payload, which then prints on the console.
This structure allows the application to listen for messages continuously in parallel with other tasks.
Rust MQTT Publish example
The following code demonstrates how to publish a message to an MQTT topic using the Paho MQTT library:
let mqttmsg = mqtt::Message::new(topic, "Hello from Rust client!", qos);
client.publish(mqttmsg).expect("Failed to publish message");
This snippet creates an MQTT message object specifying the target topic (test/topic), the message payload (“Hello from Rust client!”), and the quality of service.
The publish method sends the message to the specified topic.
Disconnecting from the Mosquitto MQTT broker
The next example demonstrates how to gracefully disconnect from the MQTT broker using the Paho MQTT library:
client.disconnect(None).expect("Failed to disconnect");
handle.join().expect("Failed to join thread");
println!("Disconnected");
This snippet uses the MQTT client’s disconnect method to terminate the connection with the broker. Passing None indicates that no additional disconnect options are required. If the disconnection process fails, the application will print a specific error message .
After that, the subscribing thread will be joined.
Testing the Rust application using Mosquitto
Having explained the code, you can now begin testing. Start by running the Pro Mosquitto broker. Open a terminal, navigate to the folder where you downloaded the Pro Mosquitto broker container, and execute the following command to launch it:
docker compose up -dThe README.md file provides more information about the Pro Mosquitto broker’s first setup.
The next step is to create a new client to test the Rust application using the Management Center for Mosquitto, which you have access through your Cedalo MQTT Platform trial. Simply enter http://localhost:3000 in your browser, log in, and the MQTT broker web UI opens.

Figure 6 - Screenshot of the Management Center.
Next, navigate to the left menu and click Client Accounts (red rectangle in Figure 5). Then, select “Add Client” in the top-right corner (Figure 7).
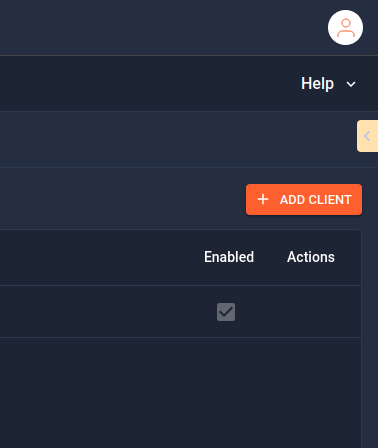
Figure 7 - Add client button. Click here to create new clients.
Create a client with the username RustClient and set the password to RustPwd, and assign the role as “client.”
Next, start a subscriber client using the mosquitto_sub utility. Open a terminal and enter:
mosquitto_sub -h localhost -t test/topic -u RustClient -P RustPwdWith the subscriber client running, it’s time to start the Rust application. First, rebuild the Rust application by running cargo build in the terminal. Once the build completes, navigate to the target/debug folder to locate the application and start it with the command ./mqtt_rust_project.
After that, the application starts and publishes a message that will appear in the subscriber client’s console.
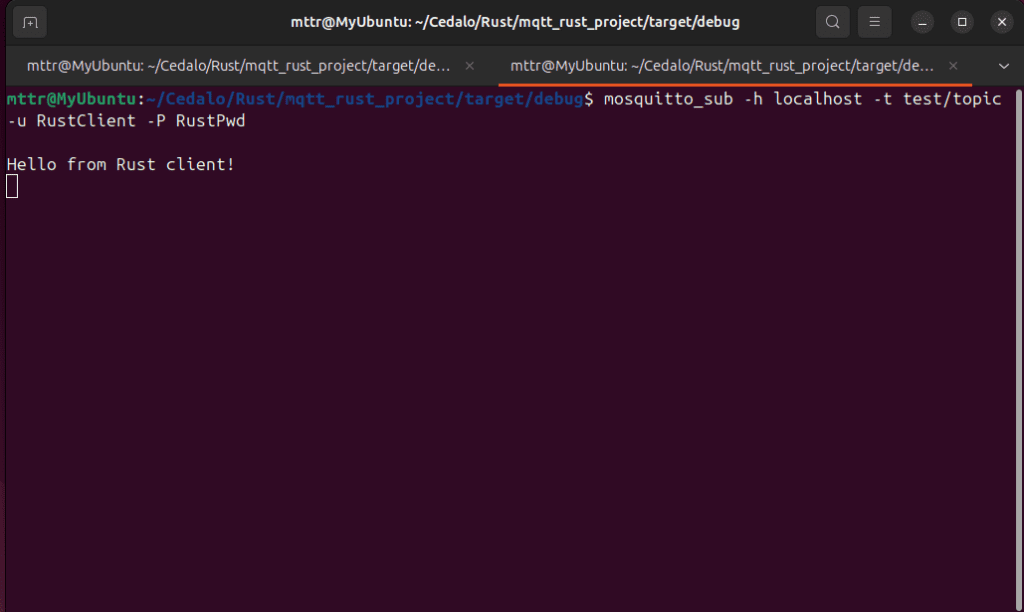
Figure 8 - Subscriber receives the message from the Rust application.
The Rust application is now waiting for incoming messages. Open a new terminal and publish a message using:
mosquitto_pub -h localhost -t test/topic -u RustClient -P RustPwd -m ‘Publishing
from Terminal’
The following output will appear in the application’s terminal:
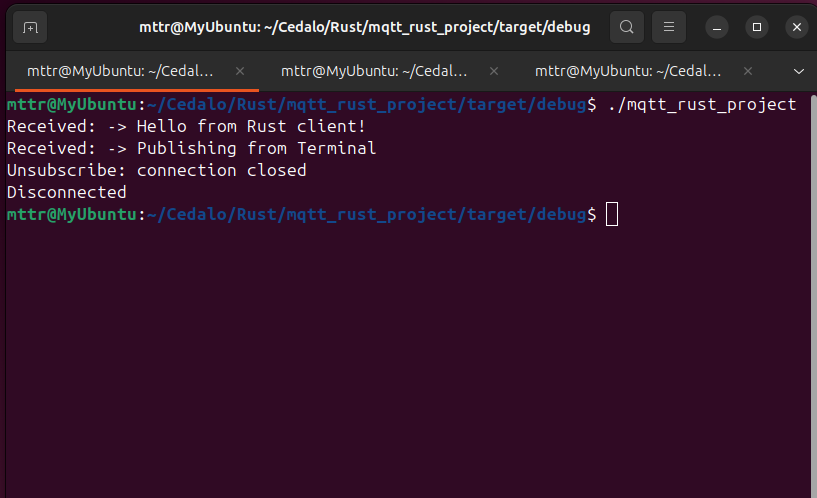
Figure 9 - Log sequence of the Rust application.
In Figure 9, you can observe the application’s behavior. First, it displays the received message the application generated itself. Then, the application receives and processes the message published from the mosquitto_pub utility (Publishing from Terminal).
Finally, after 10 seconds, the application and the subscribing thread terminate, disconnecting from the broker.
Troubleshooting common issues
You may encounter issues during the Rust application development or with broker connections. Here’s how to address them:
1. Errors by cargo build command: If you encounter a build failure when running a cargo build, it may be due to missing dependencies. Typically, installing libssl-dev and cmake packages will resolve the issue. Run the following two commands:
sudo apt install libssl-devsudo apt install cmake2. Connection issues with the MQTT broker: If the client fails to connect, verify the broker’s URI and ensure it’s accessible from the device running the Rust application. Additionally, check that the broker is running and that firewall settings or port conflicts (incorrect or already in use) aren’t blocking connections.
3. Handling Rust package dependencies and installation errors: Sometimes, adding paho_mqtt as a dependency in Cargo.toml may result in version conflicts or missing packages. If issues arise, try running cargo update to ensure up-to-date dependencies.
Conclusion
This article explores how to integrate the Paho MQTT Client Library into a Rust project. It guides you through setting up a Rust environment, selecting the proper MQTT library, configuring the Pro Mosquitto broker, and building a functional MQTT client. By leveraging Rust’s powerful features, such as memory safety and concurrency, alongside the reliable Paho MQTT library, you can create efficient, robust IoT applications that communicate seamlessly over the MQTT protocol.


