
This article provides a step-by-step guide to configuring MQTT over WebSockets for the Mosquitto™ MQTT broker. Additionally, I will walk you through the broker’s installation, setup, and testing, ensuring you feel guided and supported throughout the process.
Why use MQTT over Websockets with Mosquitto broker?
Imagine a scenario where we want to visualize or get the data from the MQTT broker directly into the client web application (web app running in the browser). We might want to create a graphic browser interface for the MQTT broker. Unfortunately, we wouldn’t be able to achieve direct communication between the broker and the web browser using the MQTT protocol itself because web browsers don’t implement (speak) MQTT. However, since the data in the MQTT broker might change frequently and we need a downstream connection (from the broker to the client), it is a perfect use case for WebSockets.
To learn more about WebSockets and how it differs from HTTP, read this WebSockets vs. HTTP guide.
The following scheme shows how one can use WebSockets with a client application in the browser:
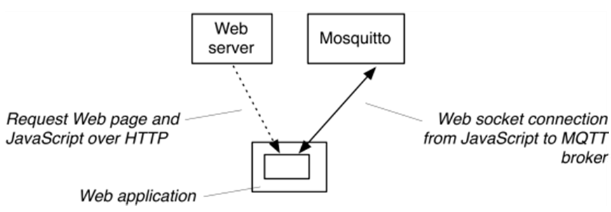
Here, you can see a web server that, upon the user’s request, issues a client web application (you can think of this application as a set of HTML web pages with javascript code for handling the application logic). This application then runs in the browser and opens a WebSocket connection to the Mosquitto™ MQTT broker. After that, the web app can freely and quickly receive and visualize the latest MQTT data from the broker since such data will now be obtained via a WebSocket connection supported by the browser. Moreover, the connection works the other way around, so the broker will receive the WebSocket data sent by the application and translate it into MQTT.
Also, for those looking into the commercial use of an MQTT broker for their IoT project, don’t forget to check out the Pro Edition for Eclipse Mosquitto. If you want to test the product first, please sign up for a free trial here.
All in all, using MQTT over WebSockets provides several advantages, especially when dealing with web applications:
1. Browser Compatibility: Web browsers do not support native MQTT, but they do support WebSockets. By using MQTT over WebSockets, you can leverage the MQTT protocol in web applications.
2. Firewall Traversal: WebSocket connections typically use standard web ports (80 for HTTP and 443 for HTTPS), which are usually open in firewalls, making it easier to traverse network boundaries.
3. Persistent Connections: WebSockets provide a persistent connection that is ideal for real-time communication, reducing the overhead of establishing new connections for each message.
4. Bidirectional Communication: WebSockets enable full-duplex communication, allowing for more interactive applications where the server can push updates to the client.
Moreover, if you want to enable the Sparkplug B specification on the MQTT broker in addition to everything I discussed, refer to this article.
Configuring Mosquitto MQTT broker over WebSockets for Linux (Debian-based and RedHat-based)
Below you will find the steps required to configure Mosquitto MQTT broker over Websockets for Linux (Debian-based) and how to test it. However, if you prefer installing Pro Mosquitto on a Ubuntu Linux distribution, check out this article.
Step 1: Initial installation of dependencies
First of all, you need to make sure that our environment has the necessary build tools to complete the setup:
-
use to keep all of your packages up to date in Debian or a Debian-based Linux distribution: sudo apt-get update
-
use to install all required dependencies such as Mosquitto MQTT broker and a text editor (our choice: nano).
For Linux (Debian-based):
sudo apt-get install -y mosquitto mosquitto-clientsFor Linux (RedHat-based):
sudo yum install -y mosquitto mosquitto-clientsStep 2: Configure Mosquitto to use WebSocket
After installing Mosquitto, you need to configure it to enable WebSockets in Mosquitto. The location of the `mosquitto.conf` file is the same for both Linux (Debian-based) and Linux (RedHat-based):
- `/etc/mosquitto/mosquitto.conf`
Now open mosquitto.conf file with the following command:
sudo nano /etc/mosquitto/mosquitto.confOf course, you can use another text editor like vim or always search for the file on your system and open it manually.
The file will open in your preferred text editor.
You can also find all these commands already in config but commented out - though there might be slight differences. We recommend you simply add the new commands.
Search for the “Listeners” section. In this section, add:
listener 1883
listener 8080
protocol websockets
allow_anonymous true
Notice: Please note that setting allow_anonymous true is a highly insecure option. In a real environment, you should always make sure that your broker uses proper authentication mechanisms. However, since setting up authentication is not the focus of this article, and for simplicity of demonstration, we chose to add this setting.
Save the file and restart the Mosquitto service:
sudo systemctl restart mosquittoStep 3: Test WebSockets for Linux
Open the mosquitto.conf file and add the following content. We need it to see logs whenever we send a connection message.
Search for the “Logging” section. In this section, add the following:
connection_messages true
log_timestamp true
To ensure that you successfully enabled WebSockets in Mosquitto, you can run Mosquitto with the flag “-c,” pointing to the configuration file you just created. Insert the following command into the terminal and click Enter:
mosquitto -c /etc/mosquitto/mosquitto.confAs a result, you should see that the MQTT broker starts with a standard MQTT protocol listener (port 1883) and a WebSocket listener running on port 8080:
1658680400: mosquitto version 2.0.15 starting
1658680400: Config loaded from /etc/mosquitto/mosquitto.conf.
1658680400: Opening ipv4 listen socket on port 1883.
1658680400: Opening ipv6 listen socket on port 1883.
1658680400: Opening websockets listen socket on port 8080.
1658680400: mosquitto version 2.0.15 running.Configuring Mosquitto MQTT broker over WebSockets for MacOS
Below you will find the steps required to configure Mosquitto MQTT broker over Websockets for MacOS and how to test the setup.
Step 1: Install the “Homebrew” packet manager.
Go to the website, https://brew.sh/. Follow the instructions there to install Homebrew.
Step 2: Install Mosquitto
In the terminal window, execute the following command to install Mosquitto:
brew install mosquittoStep 3: Configure Mosquitto to use WebSockets
Now you will need to edit the Mosquitto /opt/homebrew/etc/mosquitto/mosquitto.conf file.
To open the “.config file” with your text editor, execute the following command in your terminal:
open -a textedit /opt/homebrew/etc/mosquitto/mosquitto.confSearch for the “Listeners” section. Within this section, add the following:
listener 1883
listener 8080
protocol websockets
allow_anonymous true
Notice: Please note that setting allow_anonymous true is a highly insecure option. In a real environment, you should always make sure that your broker uses proper authentication mechanisms. However, since setting up authentication is not the focus of this article, and for simplicity of demonstration, we chose to add this setting.
Save the file and restart the Mosquitto service:
brew services restart mosquittoStep 4: Test WebSocket
To test, you can run Mosquitto and point it to the configuration file you have modified.
Run the following:
mosquitto -c /opt/homebrew/etc/mosquitto/mosquitto.confAnd as a result, you should see that the MQTT broker starts with a standard MQTT protocol listener (port 1883) and a web socket listener running on port 8080:
1663084872: mosquitto version 2.0.15 starting
1663084872: Config loaded from /etc/mosquitto/mosquitto.conf.
1663084872: Opening ipv4 listen socket on port 1883.
1663084872: Opening ipv6 listen socket on port 1883.
1663084872: Opening websockets listen socket on port 8080.
1663084872: mosquitto version 2.0.15 running.
Configuring Mosquitto MQTT broker over WebSockets for Windows
Below you will find the steps required to configure Mosquitto MQTT broker over Websockets for Windows.
Step 1: Install Mosquitto
Download the Mosquitto installer from the official website. Then run the installer and follow the instructions to install Mosquitto on Windows.
Step 2: Configure MQTT over WebSockets for Windows
The `mosquitto.conf` can be typically found here: `C:\Program Files\mosquitto\mosquitto.conf`
Open the `mosquitto.conf` file with your preferred text editor and add the following lines to set the Mosquitto WebSocket port to enable WebSockets:
listener 1883
listener 8080
protocol websockets
allow_anonymous true
Notice: Please note that setting allow_anonymous true is a highly insecure option. In a real environment, you should always make sure that your broker uses proper authentication mechanisms. However, since setting up authentication is not the focus of this article, and for simplicity of demonstration, we chose to add this setting.
Save the file and restart the Mosquitto service:
net stop mosquitto
net start mosquitto
Test advanced MQTT broker functionalities with our free trial.
Configuring Mosquitto MQTT broker over WebSockets for Docker
Below you will find the steps required to configure Mosquitto MQTT broker over Websockets for Docker.
Step 1: Create mosquitto.conf
Run the installer and follow the instructions to install Mosquitto in Docker.
For a quick start you may execute the following commands to run the broker:
mkdir /etc/mosquitto
touch /etc/mosquitto/mosquitto.conf
Open `/etc/mosquitto/mosquitto.conf` with your preferred text editor and add the following Mosquitto websocket config:
listener 1883
listener 8080
protocol websockets
allow_anonymous true
Step 2: Pull and run Mosquitto Docker image
docker run -it -d --name mos1 -p 1883:1883 -v /etc/mosquitto/mosquitto.conf:/mosquitto/config/mosquitto.conf eclipse-mosquitto:2To check container logs, use `docker logs mos1` command. To ensure the container is running, execute `docker ps`.
If you want to change Mosquitto configuration after starting the container, just edit the mosquitto.conf file and restart the container using `docker restart mos1` command.
Set up MQTT over WebSockets with SSL/TLS in Mosquitto
To improve security, you can configure WebSockets over TLS. Follow these steps:
1. Get SSL/TLS Certificates: Utilize Certificate Authority (CA) certificates or create your own self-signed certificates using tools like OpenSSL.
2. Modify the Settings File: Access the `mosquitto.conf` file and insert the provided code snippet to set up WebSockets over SSL/TLS:
listener 8081
protocol websockets
cafile /path/to/ca.crt
certfile /path/to/server.crt
keyfile /path/to/server.key
require_certificate true
3. Restart Mosquitto: Restart Mosquitto for the new settings to be applied.
Testing MQTT over WebSockets setup with MQTT Explorer
Now that we have configured the broker to use WebSockets, let’s test it and see if it works. For that, we can use the visual interface of the MQTT Explorer.
First, you need to install the MQTT Explorer. The official website of MQTT Explorer has all the information on installing this program in the Download section.
After you have installed the MQTT Explorer, start Mosquitto as described in the sections above according to your operating system – if it’s not already running. Start the MQTT Explorer application and fill in the following MQTT connection details:
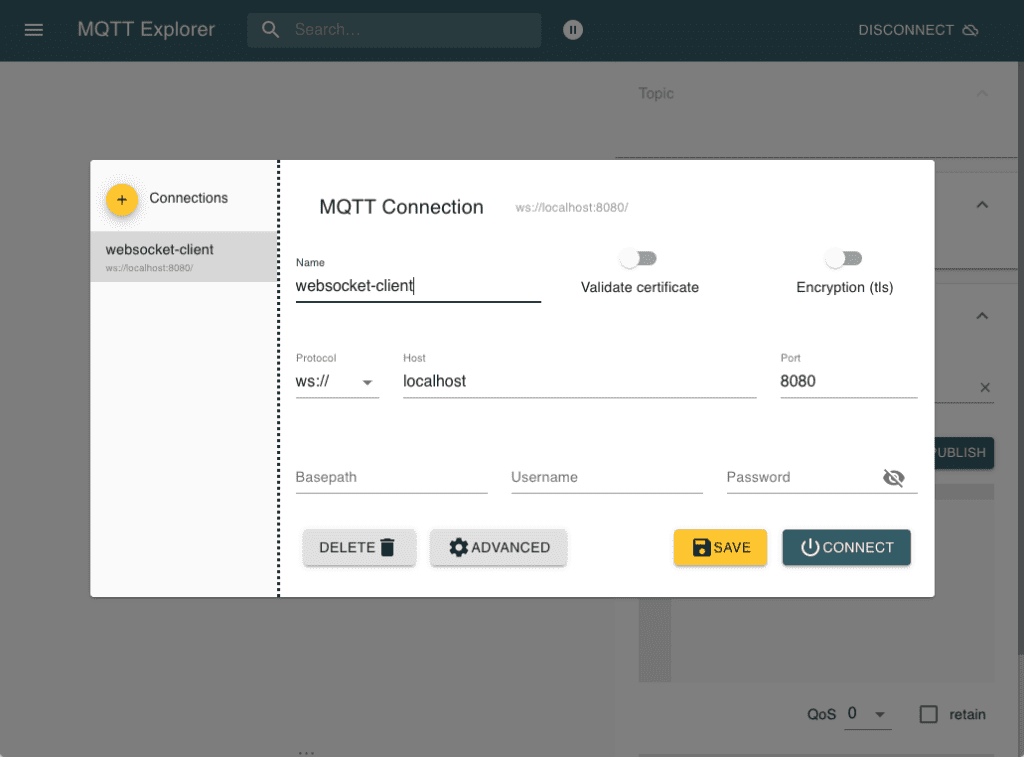
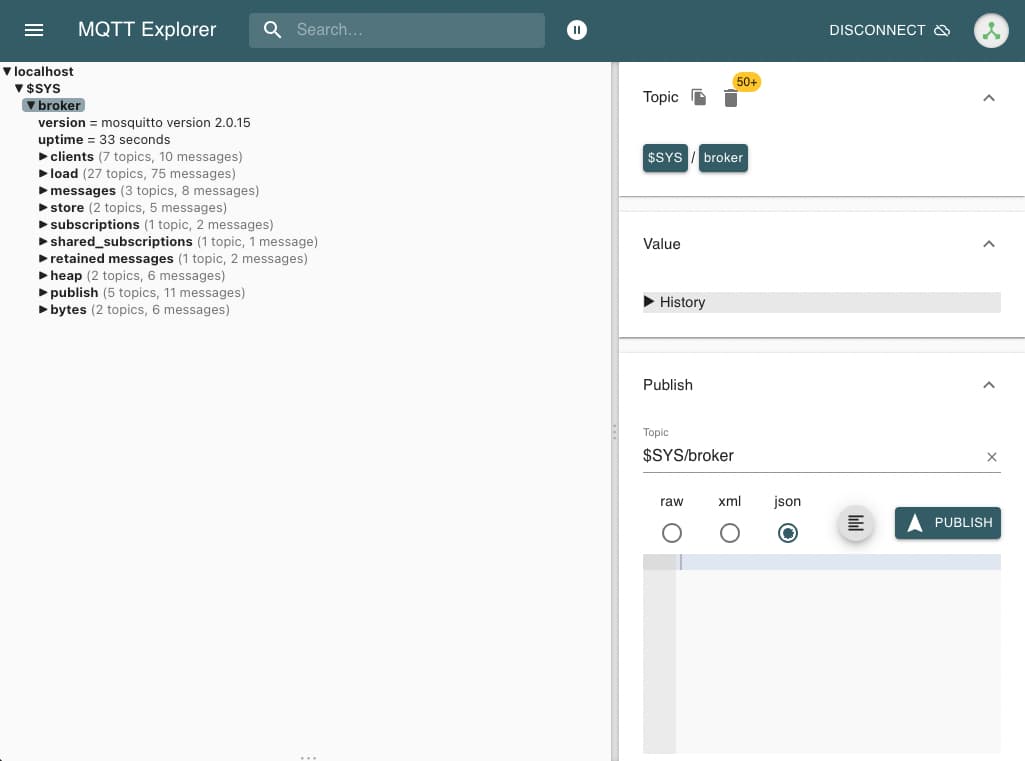
Click the CONNECT button and a window with a subscription on the brokers $SYS topic will appear:
In the terminal window, Mosquitto should show information about the new connection like this:
1663085440: New client connected from 127.0.0.1:46750 as mqtt-explorer-079b58b5 (p2, c1, k60).Now that the connection is established, we can create topics and publish MQTT messages.
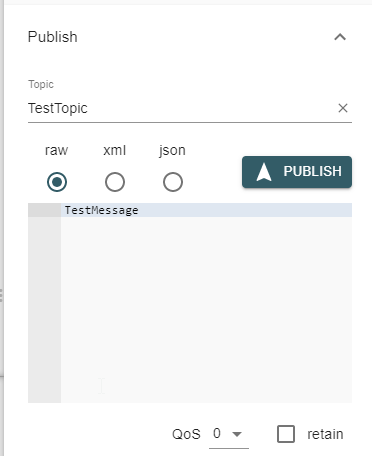
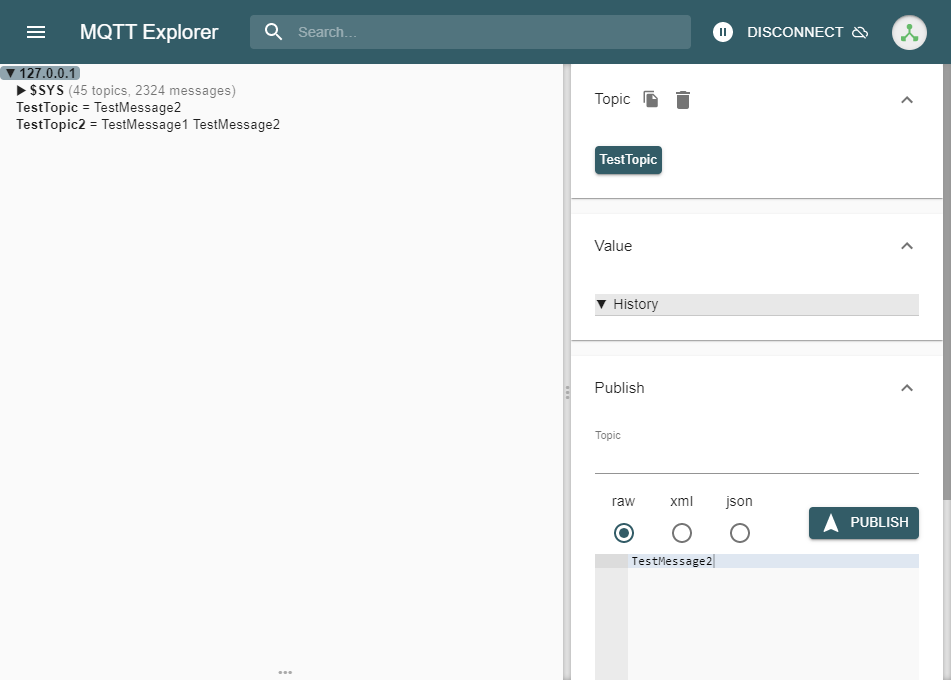
To do this, select the topic field and change it to a topic of your choice, e.g., “TestTopic.”
Select “raw” for plain text messages, type your message into the textbox, and click the PUBLISH button.
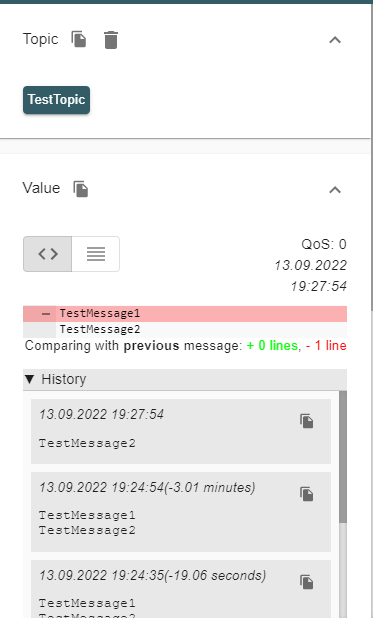
You can see all the published Topics and their values on the left panel.
You will see the added and removed values and post history by clicking on a specific topic.
After pressing the DISCONNECT button or closing the MQTT Explorer application, the connection with the MQTT client is disconnected in the terminal.
1663086849: Client mqtt-explorer-079b58b5 disconnected.Conclusion
After reading this article, you have gained practical knowledge of the installation and configuration of WebSockets for the Mosquitto MQTT broker. As a summary, let us revise the most important. The main takeaway points are:
-
When you need to forward the MQTT data from the broker directly into the browser, it’s as simple as opening a WebSockets connection on the Mosquitto MQTT broker. This convenience empowers web developers to efficiently manage data flow.
-
To enable WebSockets in the Mosquitto MQTT broker, you need to add listener and protocol properties to the config file and restart the broker.


