
Eclipse Mosquitto is one of the world’s most popular open-source MQTT brokers. Among its many installation options, it can also run on Windows. This article will explain how to install and configure a free open-source version of Mosquitto MQTT Broker on Windows, including how to install Mosquitto as a Windows service. Then, I will explain how to run Mosquitto on Windows and test it using the popular command line tools: mosquitto_sub and mosquitto_pub.
How to install Mosquitto Broker on Windows
To install Mosquitto on Windows, select the desired installation file from mosquitto.org (64-bit or 32-bit), download it, and run it.
This file is a Mosquitto Windows 10 and Windows 11 tested package (including Windows for ARM). Compatibility with older Windows versions is possible but not guaranteed.
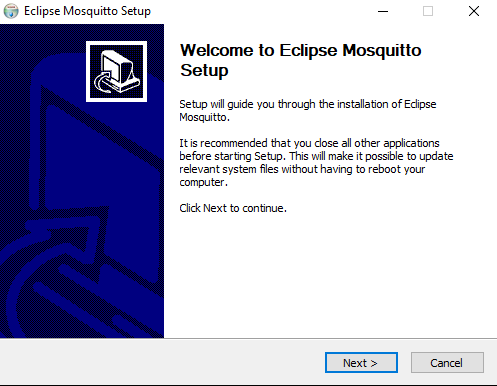
The Eclipse Mosquitto Setup wizard will start. Click Next to continue the installation.
Select the components to install. If you want to start Mosquitto automatically when Windows starts, install the Service component. It will install the broker as a Windows service. See the “How to run Mosquitto MQTT Broker as a Service on Windows” section.
You will also need Visual Studio Runtime because Mosquitto depends on specific libraries and components provided by it. You might not want to install this component if you already have it, but if you are unsure, leave this option as it is and continue to the next step.

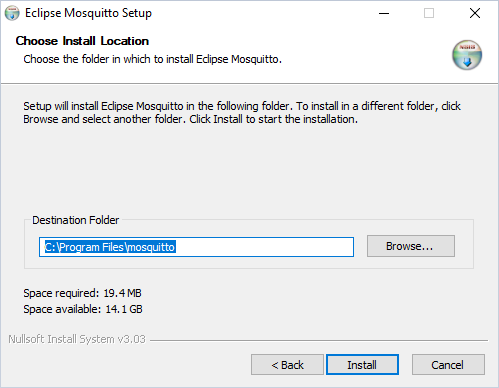
Select the installation folder for Eclipse Mosquitto or leave the default value (C:\Program Files\mosquitto for a 64-bit executable and C:\Program Files (x86)\mosquitto for 32-bit) and click Install.
After the installation process is complete, you will see a corresponding message. All required files for operating Mosquitto will be automatically saved to your chosen installation folder.
Click Finish in the setup wizard. Now, you can start using MQTT Mosquitto Broker on Windows.

If you want to install Mosquitto broker without running the graphical part of the installer, you can do so by running the installer from the command line (also referred to as cmd or Command Prompt) with the /S switch (silent mode):
mosquitto-2.0.15-install-windows-x64.exe /SUse the /D switch to change the installation folder:
mosquitto-2.0.15-install-windows-x64.exe /S /D=:\"Program Files"\mosquittoAs an alternative to cmd, you can use PowerShell. Note that PowerShell uses a slightly different syntax than the command line. For example, running the mosquitto command in cmd (inside of the Mosquitto installation folder) has its equivalent in PowerShell, which is: .\mosquitto. This difference is, however, irrelevant as soon as you add Mosquitto to the system path (more on how to do this below). Then you can use the mosquitto command in both PowerShell and cmd.
After installing Mosquitto broker, you can check how to run it and which command line options it supports. To do this, navigate inside the folder where Mosquitto is installed (installation folder) and run the following command:
mosquitto -h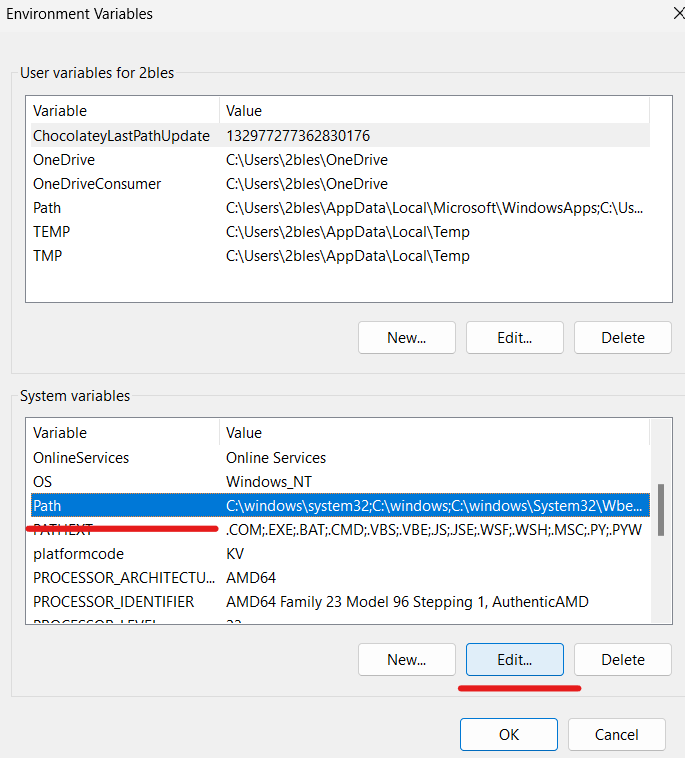
Note: Mosquitto is not automatically globally visible in cmd. So, to work with it using the mosquitto command, you must either be inside of the installation folder or add the installation folder to the PATH environment variable and restart the Command Prompt (see the following section).
Please note: There is a more powerful Mosquitto version - Pro Edition for Eclipse Mosquitto™, which is available as part of the Cedalo MQTT Platform. To test it and it advanced functionality, sign up for a free cloud or on-prem trial here.
Your Mosquitto Windows installation is now complete. The next sections will explore how to add the mosquitto command to the system path, how to run Mosquitto in foreground and background (as a daemon service), and how to test its basic capabilities using a command line MQTT client.
Making Mosquitto command globally available. Adding Mosquitto to system path
You can use Mosquitto directly from the installation folder by navigating to this folder in the Command Prompt and typing mosquitto. However, if you want to use the broker from any location in the command line, you need to add it to your system path (specifically to the PATH environment variable).
To add Mosquitto to your system path, copy the installation folder’s path, which contains mosquitto.exe.
Right-click on My Computer or This PC on your desktop or in File Explorer, and choose Properties.
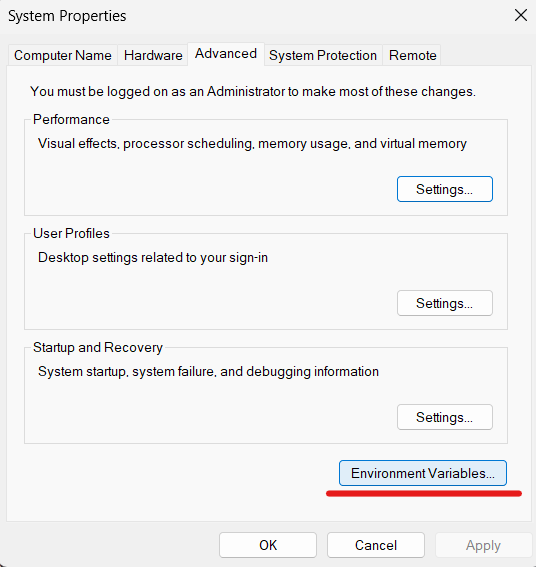
Click on Advanced system settings.
Click on Environment Variables, as you can see in the image below.
In the “System variables” section, find the variable called Path and click Edit.
Now, the “Edit environment variable” window will open. Click on New and insert the path to your Mosquitto installation folder you copied earlier. Click OK:

In case you don’t see the “New” button, then in the “Variable value” box, scroll to the end and add a semicolon (‘;’) in case there isn’t one. Then paste the path to the Mosquitto installation folder and click OK.
Restart your command line application (by closing and opening the cmd window), and you should be able to issue commands like mosquitto -h from any location.
Other sections of this guide assume that you have added Mosquitto to your system path as described above. If you did not, then you must run all the Mosquitto-related commands (mosquitto, mosquitto_passwd, mosquitto_pub, mosquitto_sub) from the folder where you installed the broker.
The next sections will explore how to start the Mosquitto broker in Windows.
How to Run Mosquitto MQTT Broker as a Service on Windows
Most of the commands from this section must be executed with administrative permissions. To do this, you must run Command Prompt as administrator by right-clicking on the command line icon and choosing the “Run as administrator” option.
By default (if the “Service” option was ticked during installation), Mosquitto is installed as a Windows service to run in the background and automatically start on Windows startup. It will also automatically start immediately after the installation. Note that in this case, Mosquitto will use the mosqutto.conf config file from the installation directory.
To check if Mosquitto is running in the background, execute the sc query mosquitto command in cmd. Note that PowerShell sc is not a service control command but an alias for Set-Content. Therefore, in PowerShell, you must use Get-Service -Name mosquitto instead.
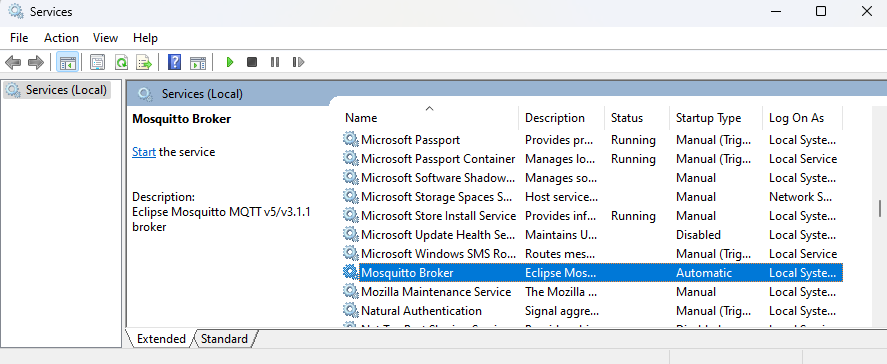
You can also view the status and manage services via a dedicated GUI application. To access the Services application: open Windows search and type services.msc or simply Services and press enter. Then, find the service named Mosquitto Broker. You will see the current state of the services in the “Status” column. In case the status is not “Running…”, right-click on it, and start it as shown below:
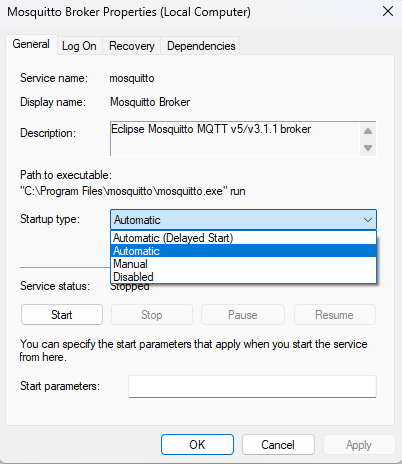
Mosquitto service is configured to start on every Windows startup automatically. You can change this behavior in service properties by right-clicking the “Mosquitto Broker” entry in “services.msc” and selecting “Properties”:
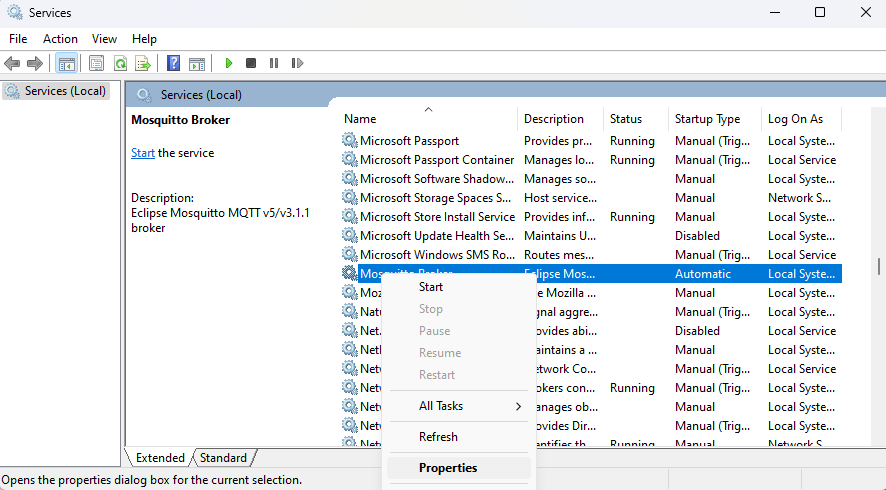
Then, change the “Startup type” field to the desired value (“Manual” will not start the service after the system restart, and “Disabled” will turn the service off completely), and press OK.
Alternatively, you can manage Mosquitto service using sc or net commands from the command line. Note that you will have to open the command line as an administrator. For PowerShell, you will have to use one of Start-Service, Stop-Service, Get-Service, Restart-Service to manage the service.
Example:
Starting the service.
With cmd:
sc start mosquittoWith PowerShell:
Start-Service mosquittoStopping the broker:
With cmd:
sc stop mosquittoWith PowerShell
Stop-Service mosquittoRemoving Mosquitto Windows service:
For cmd enter the following two commands one by one:
sc stop mosquitto
mosquitto uninstall
Alternatively:
sc stop mosquitto
sc delete mosquitto
For PowerShell:
Stop-Service -Name mosquitto
mosquitto uninstall
If you want to install the Mosquitto service again, run the following command:
mosquitto installAnd as I already mentioned, you can also view Mosquitto service status using the following command:
For cmd:
sc query mosquittoFor PowerShell:
Get-Service -Name mosquittoBy default, the Mosquitto broker service will listen on port 1883 unless you change this in mosquitto.conf file located in the installation folder. To check if Mosquitto is running on port 1883, run the following command (works for both cmd and PowerShell):
netstat -an | findstr 1883If the Mosquitto MQTT server has opened an IPv4 and IPv6 listening socket on port 1883, the output of this command will be the following two lines:

How to run Mosquitto in the foreground
There is an alternative way to run Mosquitto which will, however, run it in the foreground rather than in the background as in the case with services.
Open the command line and use mosquitto -v -c <path to mosquitto.conf> command to run the broker in a verbose mode which will allow you to see the debug messages. Using the -c option, we can pass a mosquitto.conf configuration file to the broker. If you don’t specify it, no configuration file will be used. Read more on this in the following section.
Note that the -d option (that allows us to run Mosquitto in the background) is unusable in Windows because there is no daemon process manager. So, on Windows, we use services instead, as described in the section above.
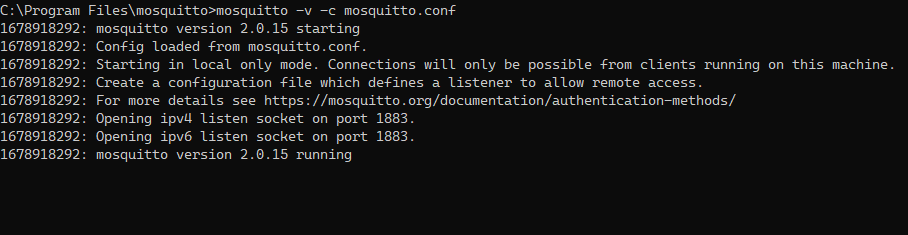
To stop Mosquitto from running in the foreground, press Ctrl + C in the cmd window where the broker is running.
In this article, we use the open-source Eclipse Mosquitto broker. However, the Pro Edition for Eclipse Mosquitto is also available. It provides advanced MQTT broker functionality, such as a rich set of MQTT bridges and metrics exporters, High Availability, OAuth 2.0 / JWT / LDAP Authentication, Audit trail loggins, Persistent Queueing, and more. To test it, sign up for a free Cedalo MQTT Platform trial.
How to Configure the Mosquitto MQTT Broker on Windows
You can configure the operation and features of the Mosquitto broker using the configuration file named mosquitto.conf located in the installation folder. This file is used only for Mosquitto running as a service. If you run Mosquitto from cmd, the mosquitto.conf file is not used, and it has to be manually specified with the -c flag:
mosquitto -c <path to your config file>For example:
mosquitto -c "C:\Program Files\mosquitto\mosquitto.conf"If you want to run Mosquitto as a service and use a non-default configuration file, the easiest way is to install the nssm command line tool. After that, ensure that the broker service is stopped and removed:
For cmd:
sc stop mosquitto
sc delete mosquitto
For PowerShell:
Stop-Service -Name mosquitto
mosquitto uninstall
And finally, execute the following commands (works for both cmd and PowerShell):
nssm install mosquitto "C:\Program Files\mosquitto\mosquitto.exe"
nssm set mosquitto AppParameters -c "<path to your config file>"
For example:
nssm install mosquitto "C:\Program Files\mosquitto\mosquitto.exe"
nssm set mosquitto AppParameters -c "C:\Users\myuser\cedalo\mosquitto.conf"
To prevent unexpected issues avoid spaces in the path to your custom config file.
After that, you can start the service with sc start mosquitto for cmd, Start-Service -Name mosquitto for PowerShell, or just continue using nssm with nssm start mosquitto. Now, Mosquitto will use the custom config file you provided.
Editing mosquitto.conf
You may want to edit the default mosquitto.conf configuration file from the installation directory or create your own and specify the needed settings.
The default mosquitto.conf file in the installation folder contains commented-out lines (lines that begin with the # symbol) with default options. To change them, you need to uncomment the lines you want (by removing the # in front of them) and specify different values. Or you might as well not bother with uncommenting - just add your configuration options anywhere in the file.
If you create your own mosquitto.conf, then start with an empty file and add your options.
Below we will explore some necessary settings of this file.
Authentication settings
To connect to the broker for the first time, you have to configure your authentication settings in the configuration file. There are a few possibilities, some of which we explore below.
You can (but not necessarily should) allow anonymous connections from any host (meaning connections without a username and a password) by adding the following options to your configuration file:
allow_anonymous true
listener 1883 0.0.0.0
This will allow any device on the network to connect to the broker, post messages and subscribe to topics without authentication. However, we recommend allowing only authenticated clients to connect to your broker for security reasons.
To achieve this, first, create a password file containing usernames and PBKDF2 (with SHA-256) hashes of the passwords in the format: username:pbkdf2_password_hash. This would look like the following (take a look at pwfile.example):
roger:$6$clQ4Ocu312S0qWgl$Cv2wUxgEN73c6C6jlBkswqR4AkHsvDLWvtEXZZ8NpsBLgP1WAo/qA+WXcmEN/mjDNgdUwcxRAveqNMs2xUVQYA==
sub_client:$6$U+qg0/32F0g2Fh+n$fBPSkq/rfNyEQ/TkEjRgwGTTVBpvNhKSyGShovH9KHewsvJ731tD5Zx26IHhR5RYCICt0L9qBW0/KK31UkCliw==
pub_client:$6$vxQ89y+7WrsnL2yn$fSPMmEZn9TSrC8s/jaPmxJ9NijWpkP2e7bMJLz78JXR1vW2x8+T3FZ23byJA6xs5Mt+LeOybAHwcUv0OCl40rA==
This can be achieved using mosquitto_passwd command. To create a password file with the initial Mosquitto user, use the following command:
mosquitto_passwd -c <path where you want your password file to be created> <user_name>For example:
mosquitto_passwd -c C:\"Program Files"\mosquitto\passwd test_userThis will create a password file with the initial user test_user.
To add another user to the password file, run the command:
mosquitto_passwd -b C:\"Program Files"\mosquitto\passwd user_name passwordNote that if you want to delete a user from the file, you can use the -D flag and specify the name of the user to be removed:
mosquitto_passwd -D C:\"Program Files"\mosquitto\passwd user_nameAfter you have created a password file with all the needed users, add the following lines to mosquitto.conf:
password_file C:\Program Files\mosquitto\passwd
allow_anonymous false
listener 1883
Don’t forget to change the password_file option to contain the path to your actual password file.
How to Handle Persistent Data and Logs
Mosquitto broker allows you to save the following types of application data among the rest:
- Information and debug logs.
- Broker system data (persistence feature).
To configure the logging of your MQTT Mosquitto Windows installation, you need to add the logging options (located in the Logging section of the default mosquitto.conf).
Add the following parameter to specify which file to store the logs in. Also, it would be best if you made sure this path exists, so manually create a log folder (‘C:\Program Files\mosquitto\log’ in the example below).
log_dest file C:\Program Files\mosquitto\log\mosquitto.logYou can also choose the events to log: debug, error, warning, notice, information, etc. To save logs for all types of events, use the following option:
log_type allIf you want to get comprehensive information on logging in the Mosquitto MQTT broker, please refer to our MQTT Logging tutorial.
To save persistence data, add the following options to the configuration file. Adjust persistence_location as needed. You need to ensure the path in persistence_location exists, so create a data directory manually if there isn’t one (‘C:\Program Files\mosquitto\data\’ in the example).
persistence true
persistence_file mosquitto.db
persistence_location C:\Program Files\mosquitto\data\
autosave_interval 60
Note that persistence data will only be saved to a file on Mosquitto shutdown or at specific intervals controlled by the autosave_interval config option.
Note that you need to restart the broker for the changes made in the configuration file to take effect. Use the command ‘sc stop mosquitto’ to stop the Mosquitto service and then execute ‘sc start mosquitto’ to start it up again.
When Mosquitto runs as a service, all the files it creates will have access permissions set only for the SYSTEM Windows account. To access these files from your user account, you must go into the properties of those files and add your Windows user on the Security tab.
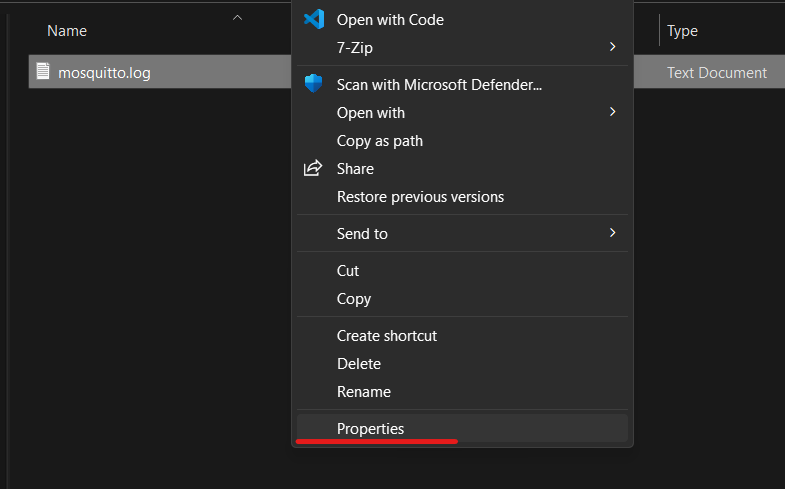
More specifically, right-click on the file and choose Properties:
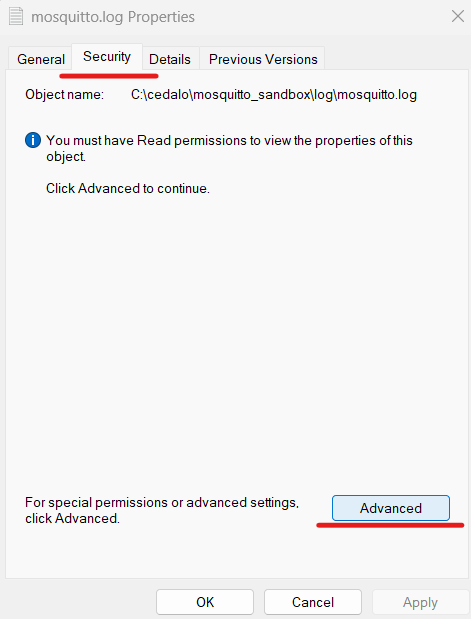
Go to the Security tab and click Advanced:
In the “Advanced Security Settings” tab, click on Continue:
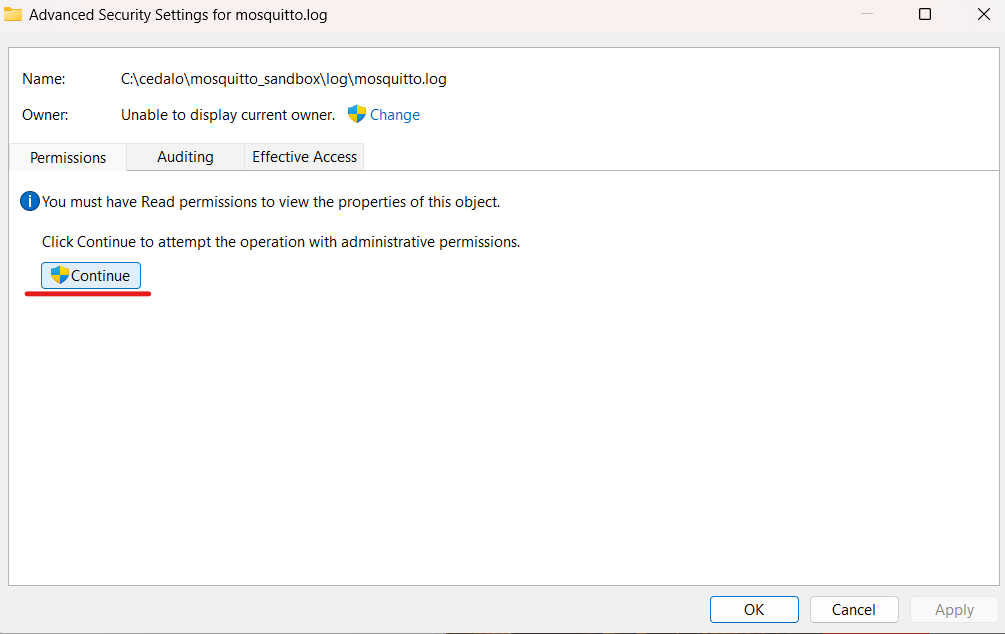
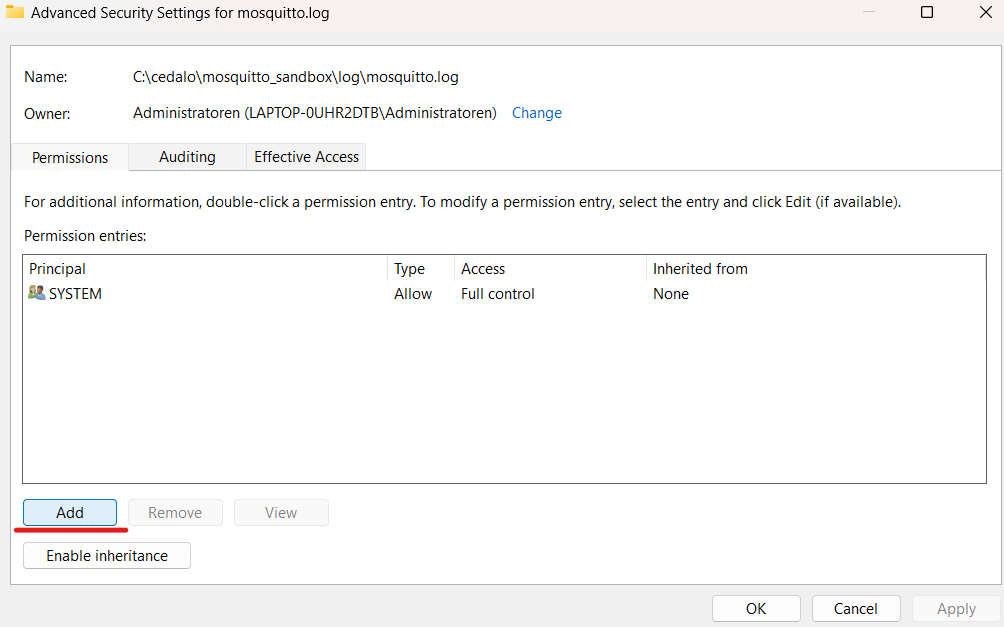
Click on the Add button:
The “Permission Entry” tab will open. Click on Select a principal:

Click Advanced:

Then click on the Find Now button:
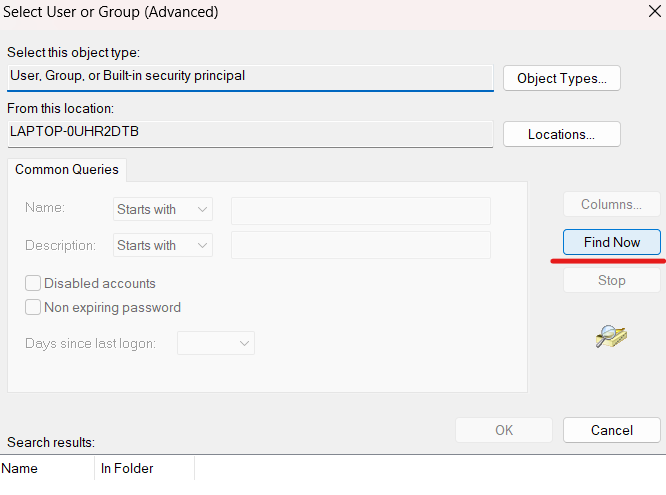
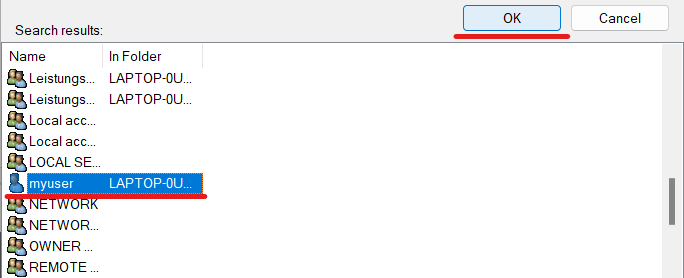
At the bottom of the window, in the Search results section, a list of users, groups, and built-in security principals will appear:

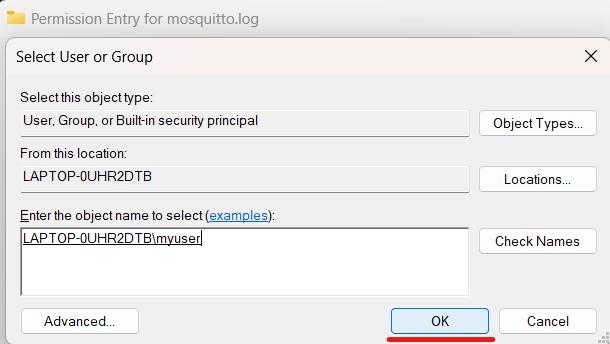
Find the user you are currently logged in as, select it, and click OK:
Click OK again:
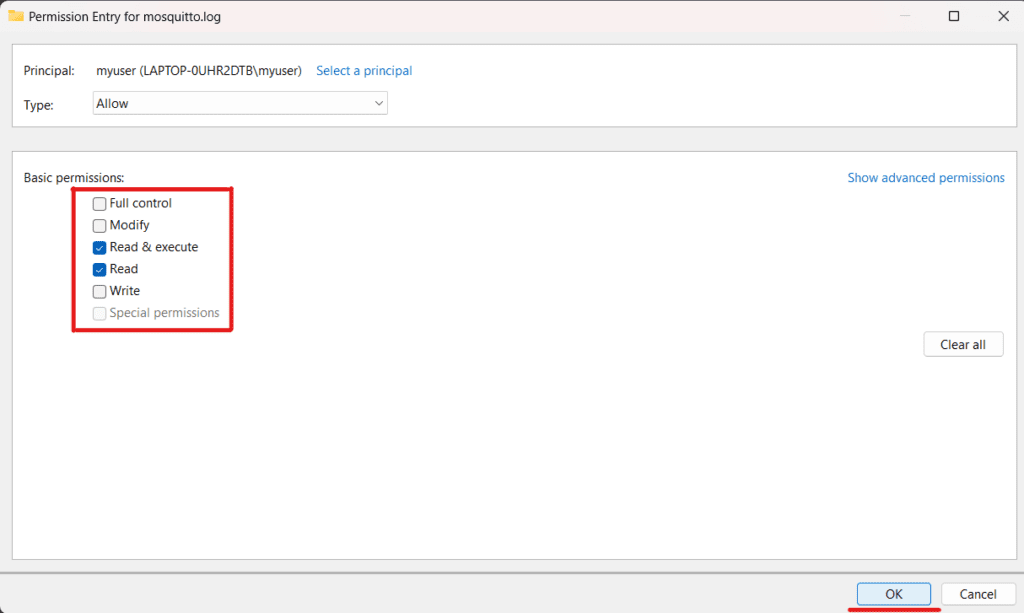
You will be sent back to the Permission Entry tab. Here select the basic permissions you want your user to have and click OK:
After that, in the “Advanced Security Settings” window, click on the OK button again:
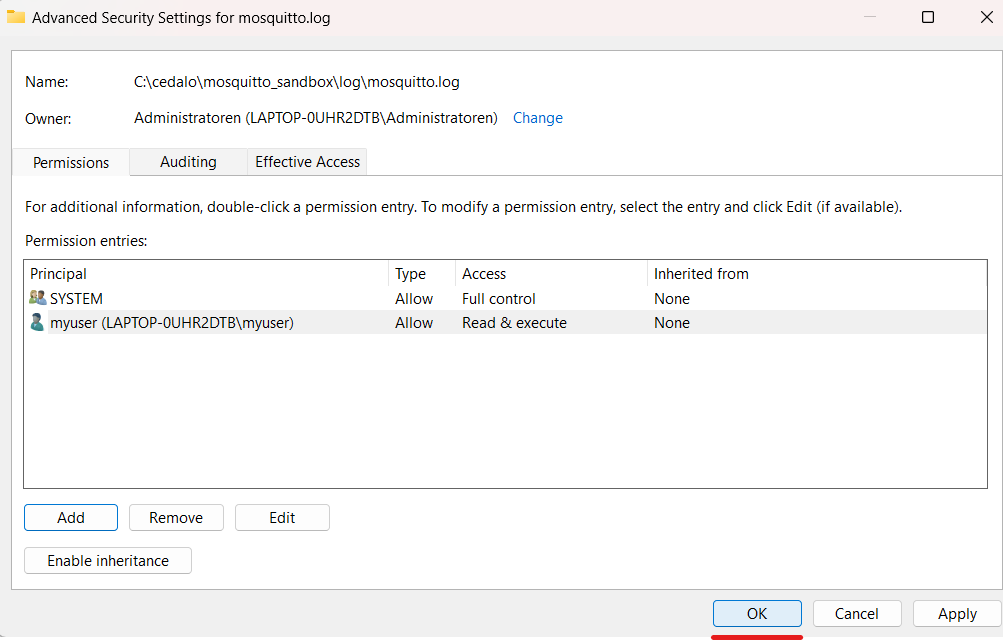
Finally, you should be able to access the file.
Example Mosquitto Configuration File
Summarizing the settings we discussed, you may find an example of the mosquitto.conf file below. Remember to change the paths to suit your environment if you want to use it for your use case.
password_file C:\Program Files\mosquitto\passwd
allow_anonymous false
listener 1883 127.0.0.1
log_dest file C:\Program Files\mosquitto\log\mosquitto.log
log_type all
persistence true
persistence_file mosquitto.db
persistence_location C:\Program Files\mosquitto\data\
autosave_interval 60
There are many other Mosquitto broker settings that you can add to your configuration file. For example, you can configure Mosquitto to listen on multiple ports, configure TLS certificates, limit message size, and more.
You can find a complete list of mosquitto.conf settings here.
How to Test the Installed Mosquitto MQTT Broker on Windows
MQTT Client for Windows
To test Mosquitto MQTT Windows installation, I will use an MQTT client for Windows. The idea is simple: using an MQTT client, I will publish and subscribe to topics to check that basic broker functionality works as expected.
For our setup, we are going to use the mosquitto_sub and mosquitto_pub MQTT clients. These clients are distributed as separate terminal commands shipped together with the broker Windows package. However, you can also use any other MQTT client, such as MQTT Explorer, which provides a friendly graphical user interface.
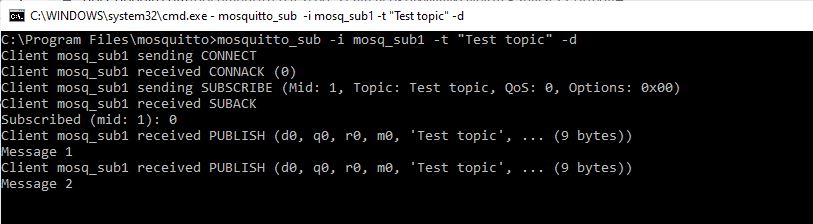
Subscribe to Topics Using mosquitto_sub Windows
Mosquitto_sub Windows MQTT client allows you to subscribe to topics and print the received messages. To receive a message, you should subscribe to a topic before a message is published. In this example, we subscribe and listen to a topic using mosquitto_sub while publishing the messages with mosquitto_pub.
To subscribe to the topic named "Test topic", run the following command:
mosquitto_sub -i mosq_sub1 -t "Test topic" -dThis command uses the following options:
i- Client id. If this parameter is not passed, client ID is generated automatically.t- Name of the topic to subscribe to.d- Enables printing of debug messages.
After that, the MQTT client will be launched, which will notify about new messages on the “Test topic” topic and print them.
Mosquitto_sub uses localhost and 1883 port by default. Use option -h to change the host and option -p to change the port.
mosquitto_sub -i mosq_sub1 -t "Test topic" -h localhost -p 1884 -dIf you use authentication to connect to the broker, specify a username and a password using -u and -P options:
mosquitto_sub -i mosq_sub1 -t "Test topic" -u <username> -P <password> -dPublish Messages with mosquitto_pub Windows
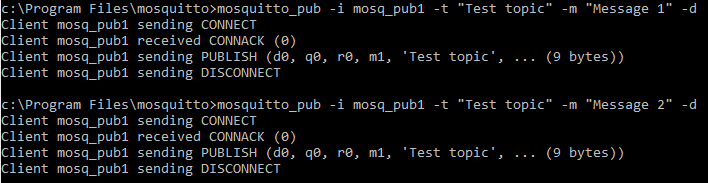
Mosquitto_pub is a simple MQTT client that publishes one message to a topic and exits.
To publish a message, run the following command in a new cmd window:
mosquitto_pub -i mosq_pub1 -t "Test topic" -m "Test message" -dThis command uses the following options:
i- Client id. If this parameter is not passed, the server generates client ID automatically.t- Name of the topic to which the message is published.m- Text payload of the message to be published.d- Enables printing of debug messages.
Below is the output of the command.
By default, messages are sent to the broker at localhost, port 1883. To publish them to a different host, use the -h option. Use the -p parameter to connect to a different port.
mosquitto_pub -i mosq_pub1 -t "Test topic" -m "Test message" -h localhost -p 1884 -dTo specify a username and password for the user authentication, use -u and -P options:
mosquitto_pub -i mosq_pub1 -t "Test topic" -m "Test message" -u <username> -P <password> -dEnsure that the publish topic is the same as the topic you have previously subscribed to (-t “Test topic”). If you did everything correctly, you would see the published messages (“Test message”) in the window where you executed the mosquitto_sub command.
Uninstalling Mosquitto MQTT Server on Windows
If you want to uninstall the Mosquitto Windows service specifically and not the broker application itself, you first need to stop the service using the sc stop mosquitto command. Then run either sc delete mosquitto or mosquitto uninstall.
Otherwise, if you want to delete both service and the application, you can use the “Uninstall.exe” executable, which is located inside the installation folder. After running it, you need to delete the installation folder, and you are done.
To run Mosquitto Uninstall executable from cmd in silent mode, type the following into the Windows Command Prompt from inside the folder where Mosquitto is installed:
Uninstall.exe /STroubleshooting Mosquitto MQTT Server on Windows
Only one user is allowed per socket address
If you receive the error message “Normally only one user is allowed per socket address (protocol/network address/port),” you may already have another application running that is listening on port 1883.
Possible Solution
Run netstat -ano | findstr :1883 (or use a different port instead of 1883 if it was configured) command and check if the specified port is already in use by another program. The occupying process’s process id (PID) will be in the last column. You can copy it and then run taskkill /F /PID <PID> replacing the <PID> with the process id value from netstat. You may also free up the port in any other way after identifying which application occupies it. Then killing the process with taskkill is not necessary.
Can’t Connect to Mosquitto Broker with Local IP Address
When connecting to the Mosquitto broker using a local IP address other than localhost, a connect ECONNREFUSED error occurs.
Possible Solution
You need to edit the configuration file to listen to addresses other than localhost. Add the listener parameter and specify the port on which you want to listen for incoming network connections as well as the desired IP address/hostname:
listener 1883 192.168.1.100 You can specify a hostname instead of the IP address (192.168.1.100 in the example above). This listener option can also be specified multiple times to bind various addresses. If we omit it, Mosquitto will be listening on localhost.
Note that having at least one listener in your config file is always a good idea. This will help avoid some problems down the road.
Additionally, for troubleshooting purposes, you can allow anonymous connections from remote addresses with the following:
allow_anonymous trueHowever, it would be best to be careful with this option as it is not recommended to allow anyone to access the broker because of security considerations. We recommend using this option for testing purposes only.
If you are using the open-source version of Eclipse Mosquitto broker for a commercial project and need advice or help to solve a problem, we offer open-source Mosquitto support. This can help you quickly solve your problems, ensure your system’s stability and security, get quick access to new patches and fixes, and be the first to receive information about new releases.
Summary
In this article, we talked about the open-source MQTT Mosquitto Broker. We learned how to install Mosquitto Windows, configure, and test it. In addition, we considered the most common problems and their solutions when using the broker.
Let’s summarize the main points:
- Use the executable file for Mosquitto MQTT broker Windows installation.
- Add the installation folder to the PATH environment variable to make the ‘mosquitto’ command globally available from the command line.
- By default, Mosquitto will be installed as a Windows service, which can run in the background and automatically start on the operating system boot.
- To configure Mosquitto broker (including authentication settings, logging, etc.), use mosquitto.conf configuration file from the installation folder or provide your own.
- You can test Mosquitto using popular MQTT clients mosquitto_pub and mosquitto_sub, which are bundled into the installation.


