
Running a professional and secure Pro Mosquitto MQTT broker as a core component for IoT solutions requires a reliable setup and configuration. Therefore, using Microsoft Azure’s Infrastructure as a Service (IaaS) ensures the highest security and availability for production environments.
This article outlines how to deploy a straightforward virtual machine to achieve a production-ready Pro Mosquitto MQTT installation. Moreover, this approach ensures guaranteed availability, security, and robust management capabilities for production workloads and user management.
Prerequisites and setup procedure
Setting up a Pro Edition for Eclipse Mosquitto™ using the infrastructure provided via Microsoft Azure is straightforward. This article also shows how to configure automatic renewal of free X509 certificates from Let’s-encrypt, which ensures trusted TLS encryption for connecting to the MQTT broker.
You can divide the procedure into three steps:
- Configure and start up a virtual machine (VM) in the preferred region
- Configure and deploy Pro Mosquitto by requesting a free 30-day on-premises trial period and selecting the single-node Docker deployment option
- Configure and start a reverse proxy with automatic certificate provisioning for trusted TLS encryption
To begin, check for the necessary prerequisites in the following list:
- Basic skills to work with the command line terminal using Ubuntu Linux
- A Pro Mosquitto on-premises license
- Access and permission to create a VM on Microsoft Azure
How to setup Azure for the Mosquitto MQTT broker
Let’s start by creating a VM with the Ubuntu operating system and a static public IP address including a unique domain name.
First, locate the VM service in the Azure portal - you will need a free trial account to access it. Follow the link for relevant information. Note, the portal view in Figure 1 may differ according to your language and settings.
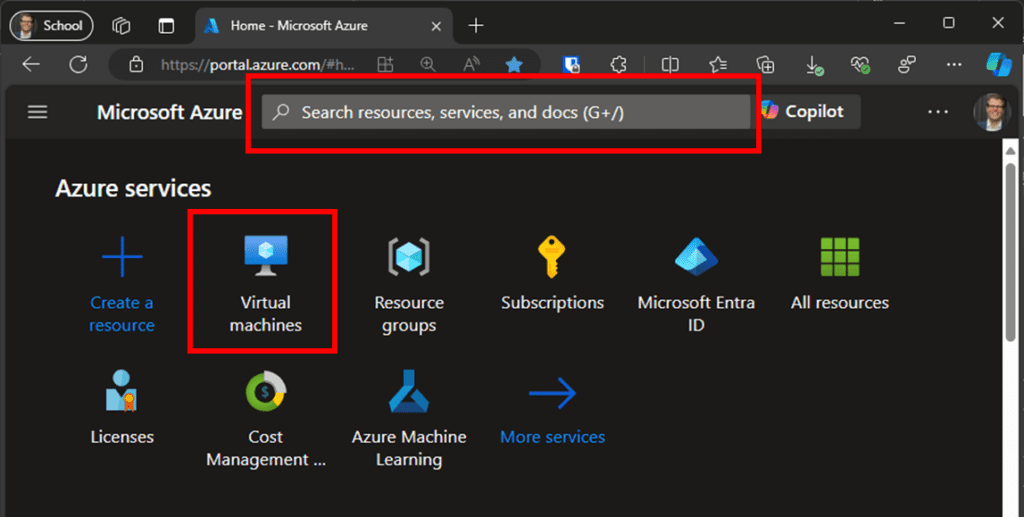
Figure 1 - Screenshot of the Azure landing page. Choose “Virtual Machines” or use the search bar if the option is not visible.
Next, click on the service “Virtual machines,” then click “Create.” The following screen shows the basic options for setting up the VM. To make things easy, enter a name (refer to Figure 3), click “Review + create,” and after automatically validating the settings, click “Create.”
The Azure portal will generate a new RSA key pair. Follow the instructions in Figure 2 to download and save the key pair in a secure place.
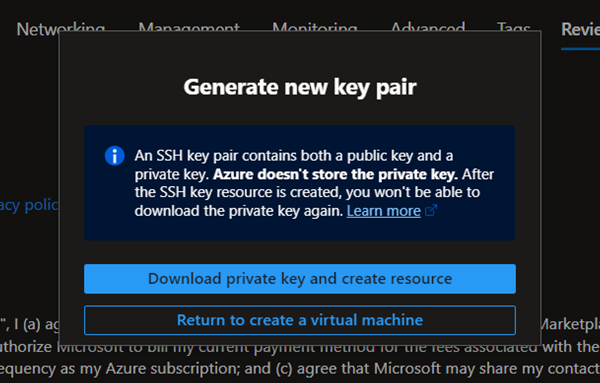
Figure 2 - Screenshot of the instructions to download the automatically generated RSA key pair for accessing the VM.
The process of provisioning and deploying the VM, and any additional services, will run in the background. Once the process finishes, the portal will notify you. Using the default configuration will have the following components:
- Ubuntu Server image
- VM engine with size Standard_B2s (2 v-cpu, 4GB RAM)
- SSD Disk with 30GB
- Network Interface with attached public IPv4
- Virtual network with CIDR 10.0.0.0/24
- Network security group (= firewall) with Port 22 open to the internet
- Access via created public/private RSA key pair and user ‘azureuser’
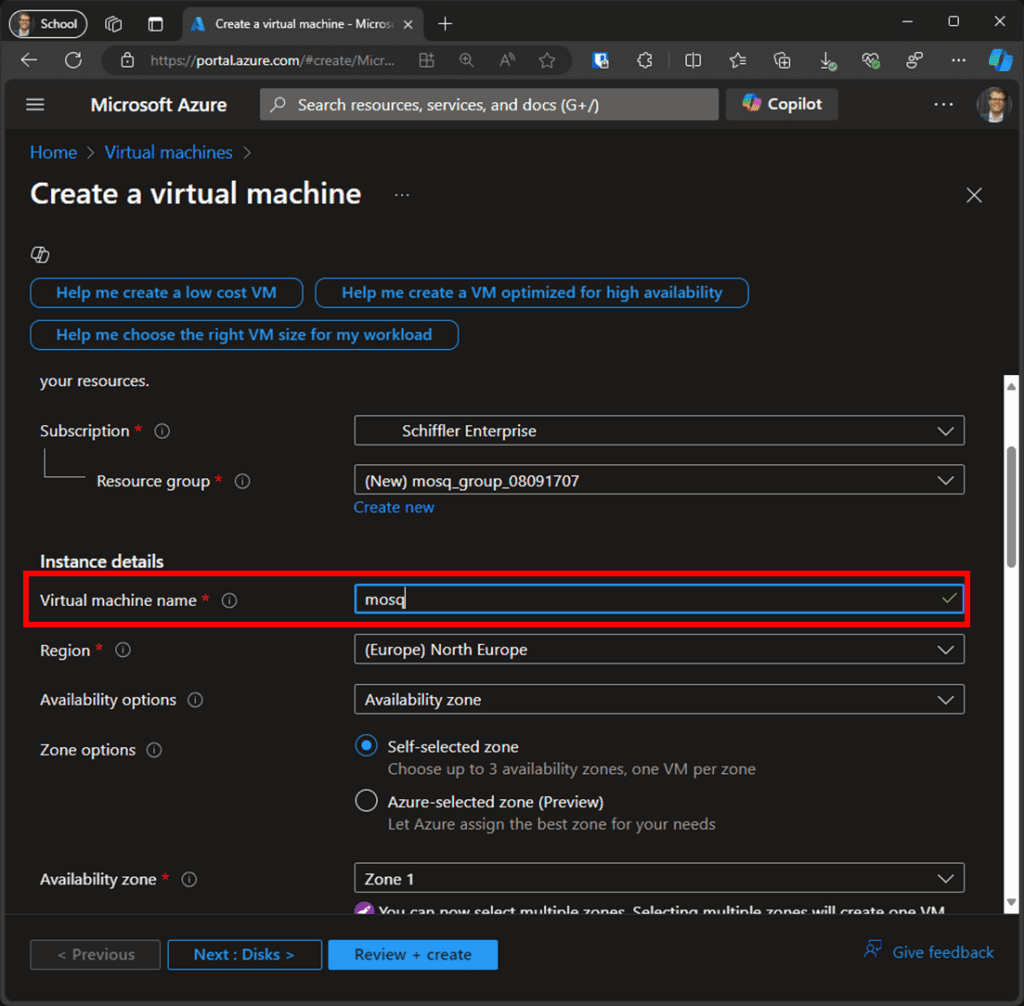
Figure 3 - Screenshot of the view for creating a VM. Be sure to provide at least a name for the VM.
After approximately 2 minutes, a notification saying “Your deployment is complete” will appear on the screen, along with a new button. Click on “Go to resource,” and the next screen will resemble Figure 4.
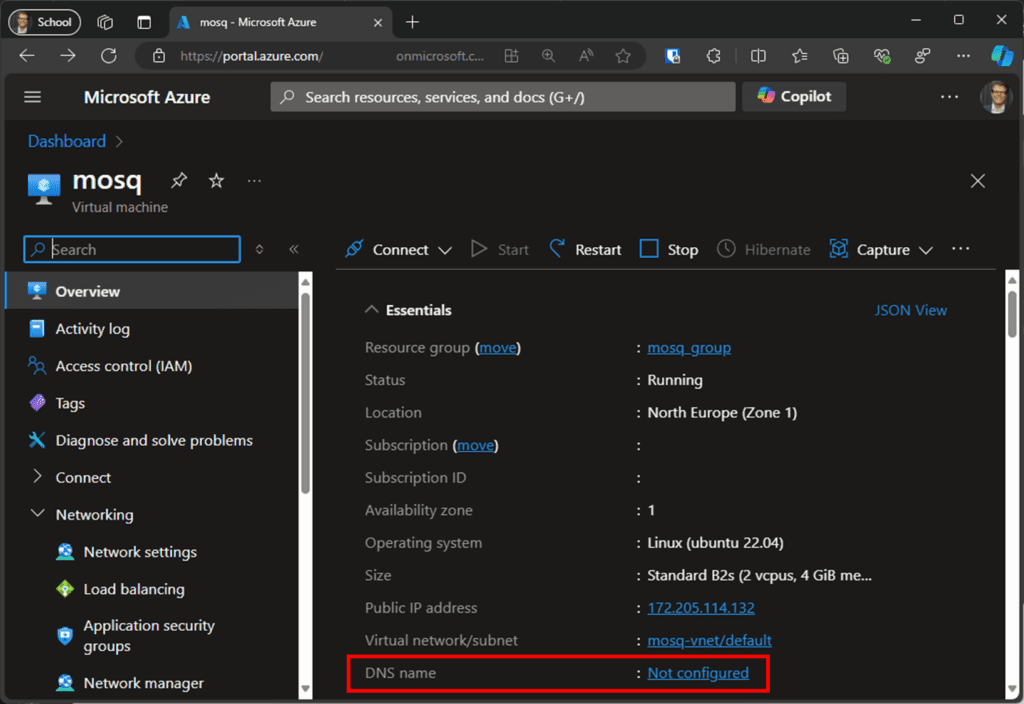
Figure 4 - Overview for creating a VM. The first step is to set a custom DNS name of your choice.
Opening necessary Ports and setting the domain name
With the VM up and running, two adjustments need to be made before deploying Mosquitto. First, assign a DNS name to the public IP address. To do this, click on “DNS name - Not configured” (see Figure 4) in the VM overview tab. Then, enter a name of your choice and click “Save.” As shown in Figure 5, the fixed part of the DNS name depends on the region and service where you place the VM.
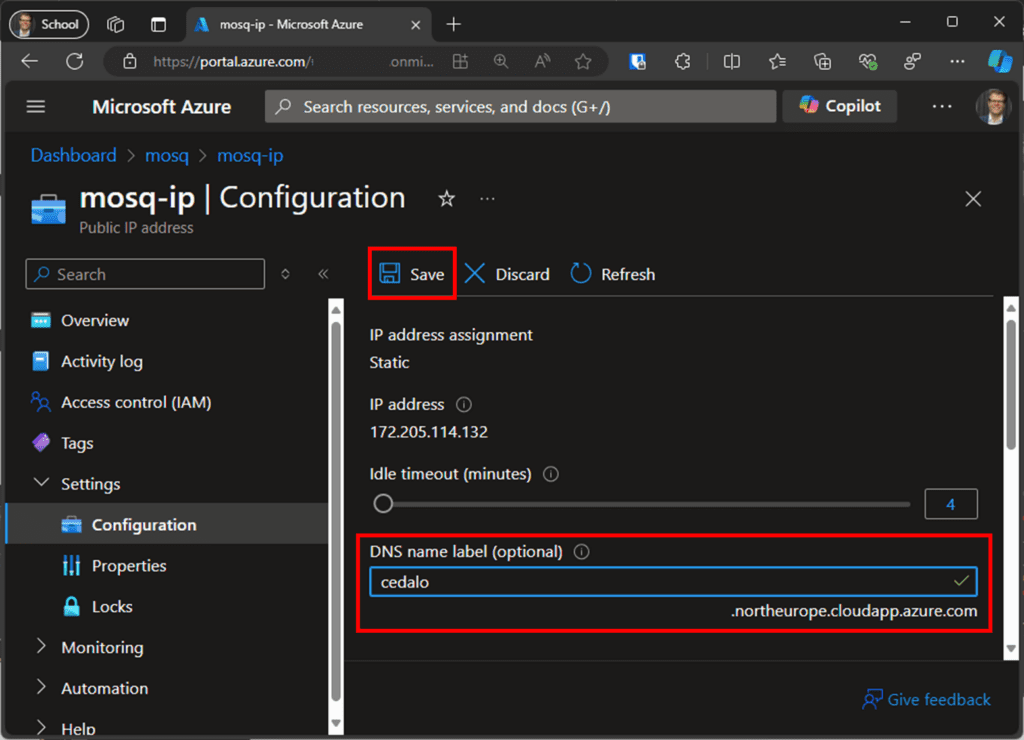
Figure 5 - Screenshot of the public IP address configuration for the DNS name.
The second adjustment for running Pro Mosquitto is to open the additional ports: 8883, 443, and 80, since port 22 for SSH is already open.
Return to the VM overview screen (see Figure 4) and click “Network settings.” Then, select “Network security group” to edit the firewall rules (Figure 6).
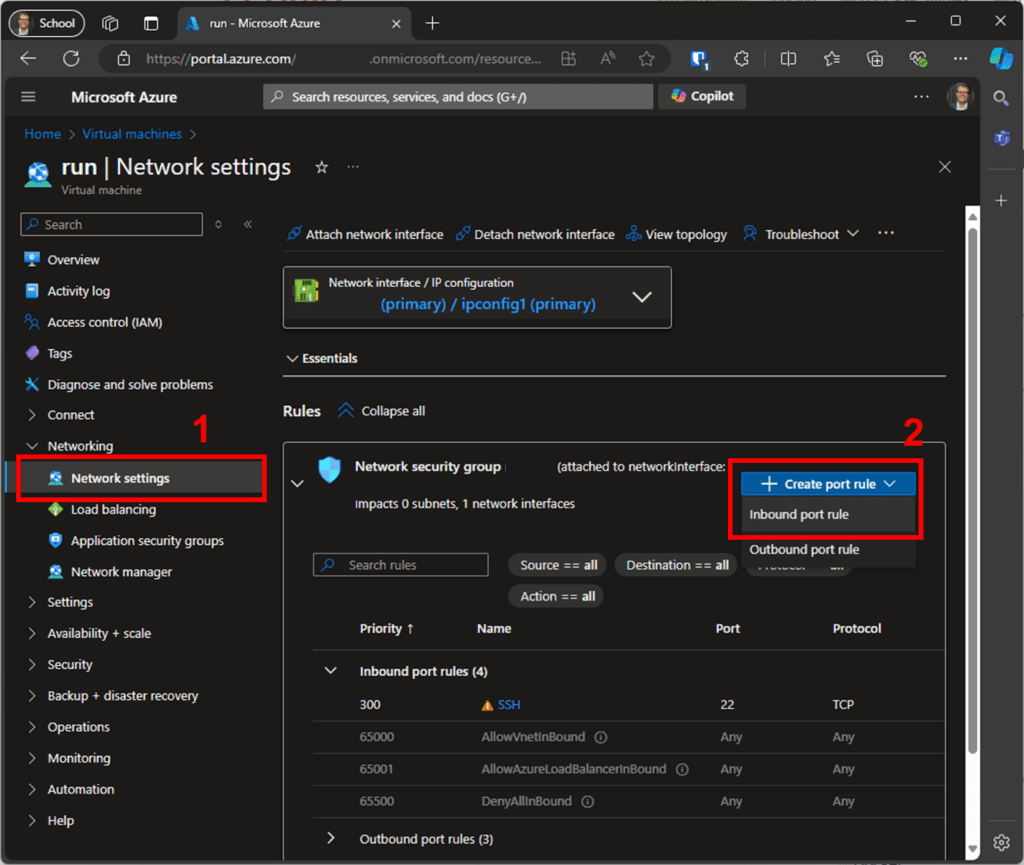
Figure 6 - Screenshot of the “Network settings” view annotating the link to edit the “Network security group” (the firewall).
To add additional inbound firewall rules, choose “Inbound security rules” from the “Network security group” view and click “Add.” Just set the “Destination port ranges” to specify the number needed and click “Add.” Figure 7 shows an example of the input dialog view.
Repeat the steps shown in Figure 7 for the ports 8883 and 80. Ultimately, the inbound rules should allow access to ports 8883, 443, 80, and 22. You can verify this in the “Network security group” overview.
From an infrastructure perspective, the VM, network, and DNS are now ready to start the MQTT broker deployment.
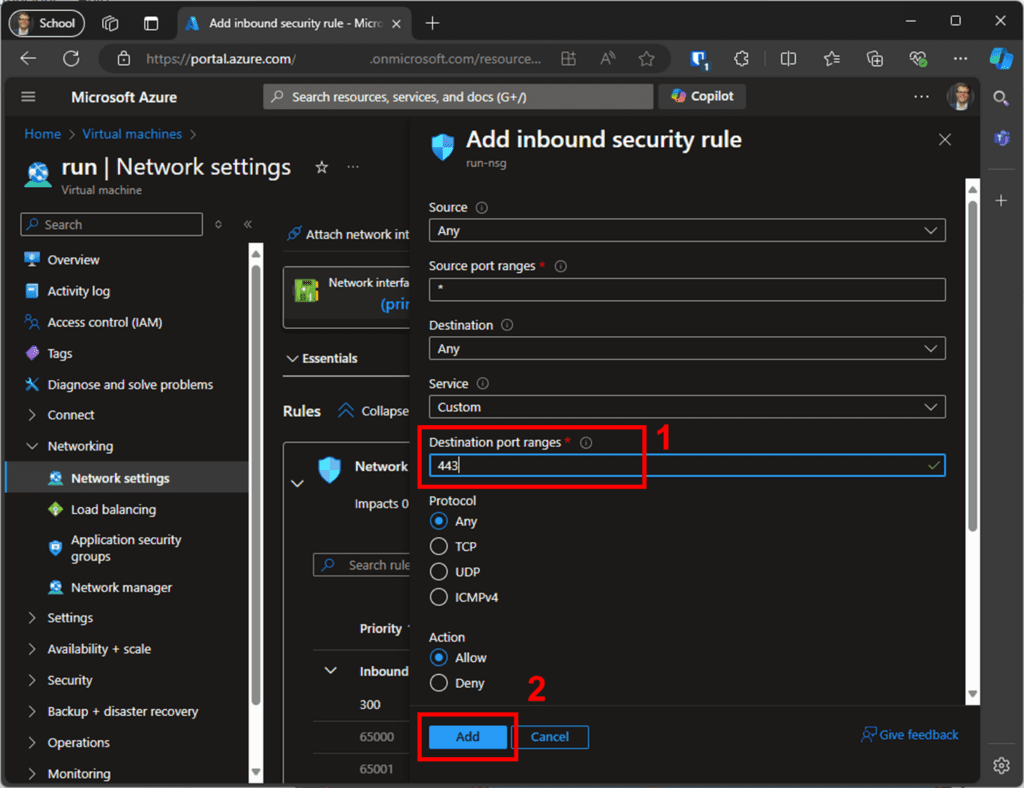
Figure 7 - Screenshot of the dialog for adding a new inbound security rule. Add three additional rules for ports 8883, 443, and 80.
You’ll need to log in to the console via the SSH protocol to deploy the Docker containers. Use the DNS name and the private key saved during the VM creation process to connect to the VM via SSH using your preferred software. Alternatively, go to the VM overview, and under “Connect,” select “SSH using Azure CLI” to start the connection configuration. Figures 8 and 9 illustrate these steps.
After a short moment, the command line window will appear, indicating that you are now logged in. All the following configurations and commands are executed at this prompt (see Figure 10).
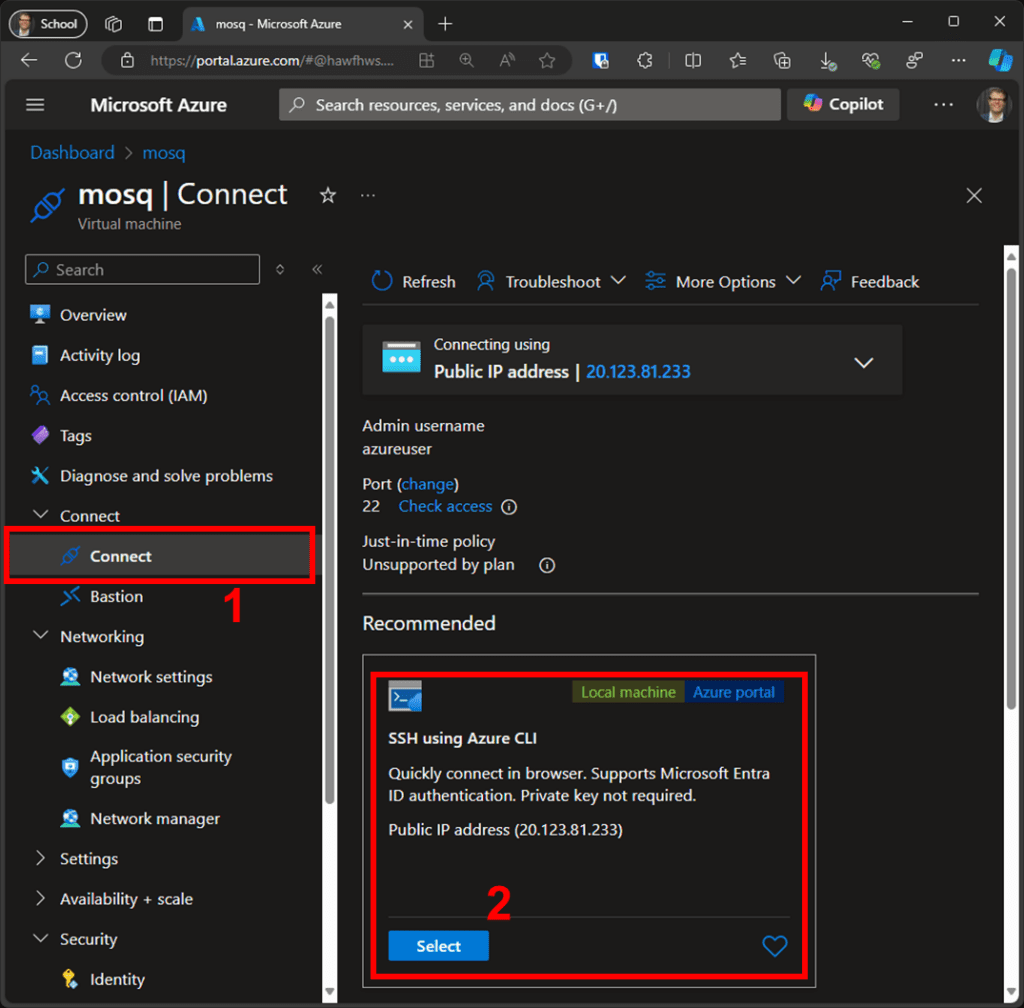
Figure 8 - Screenshot showing how to initiate access to the VM within the internet browser.
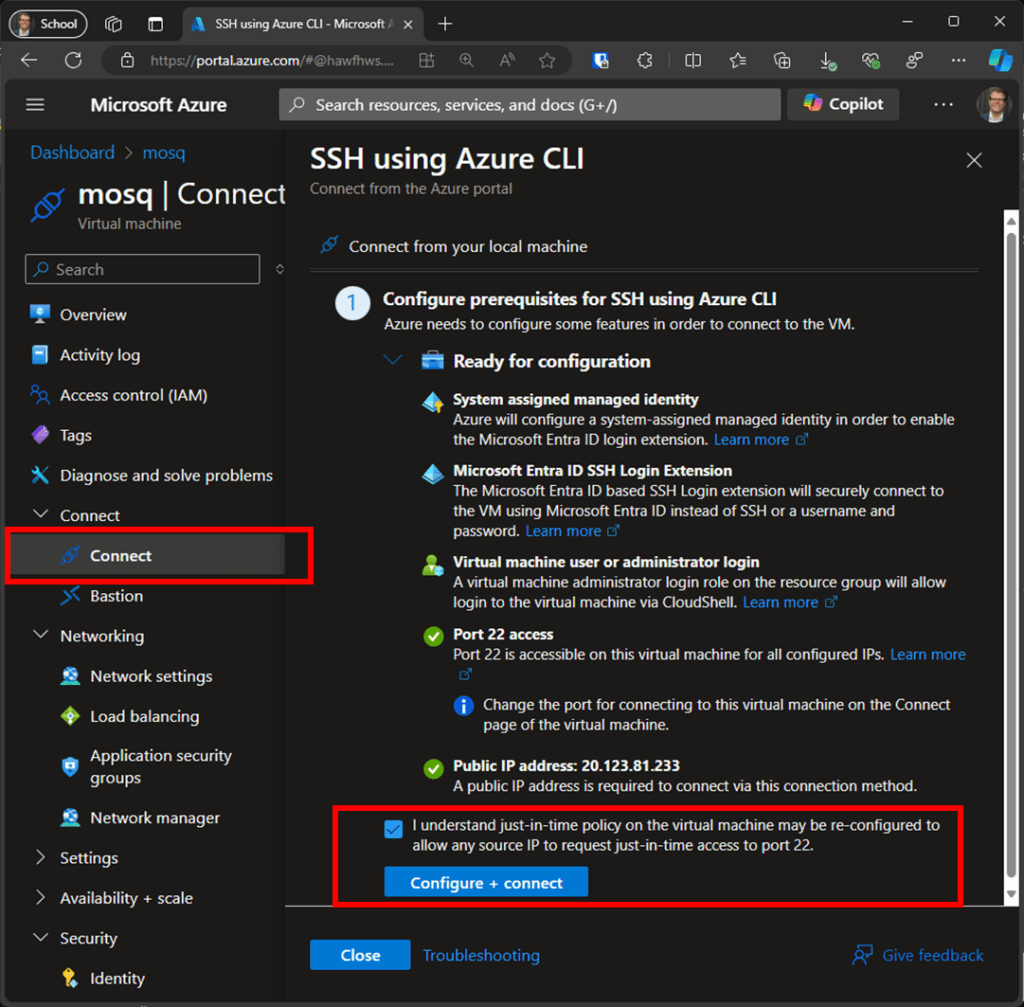
Figure 9 - Screenshot showing the VM’s connect view to configure and establish a connection via the Azure CLI.
How to run Mosquitto MQTT broker on Azure
To ensure your Pro Edition of Eclipse Mosquitto runs securely on the previously created VM, you’ll need the follow:
- Basic Configuration: Install the docker runtime and log in to the container registry from Cedalo. Get the configuration files and start the Docker containers for the Pro Mosquitto broker and Management Center for Mosquitto™.
- SSL/TLS Configuration: Configure and start the automatic HTTPs reverse proxy with a layer 4 extension called “Caddy” to secure the MQTT TCP traffic (MQTTS). This can be seen as an example of realizing this functionality. You may use other alternatives or services from Azure.
Basic Configuration
The basic configuration requires two steps:
Step 1: Docker runtime installation
Enter the following command in the shell (see Figure 10):
sudo snap install dockerThis will install the docker runtime. You can verify whether it is successful with the commands:
sudo docker info
sudo docker compose version
The output should display the installed version (e.g., Docker Compose version v2.20.3).
In order to pull the required docker images, you must log in to the container registry from Cedalo. Execute the following command and provide the credentials from the Trial request.
sudo docker login registry.cedalo.comFinally, the output should show “Login successful.”
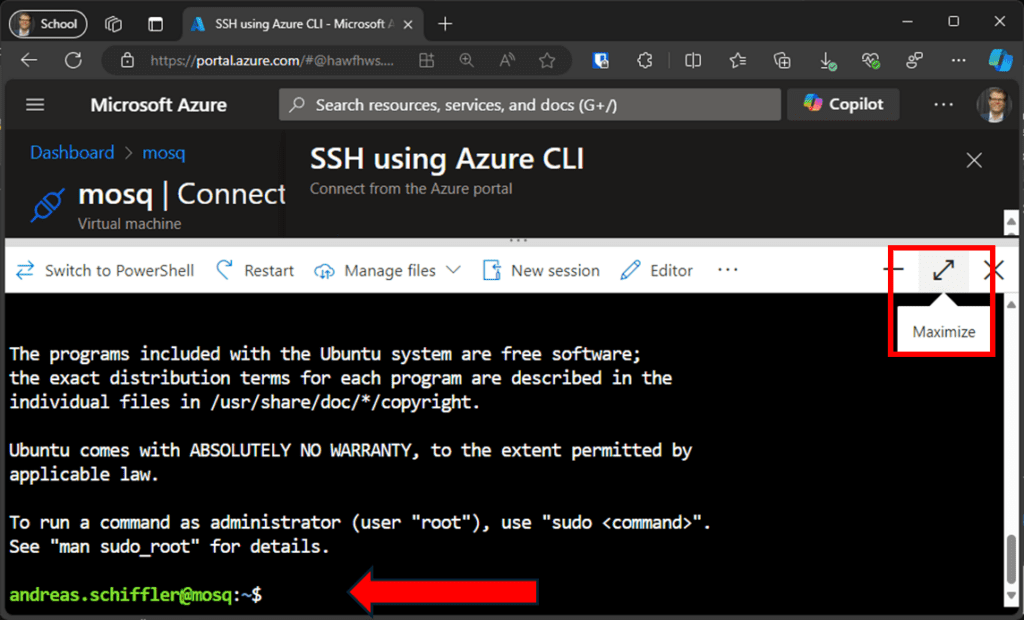
Figure 10 - Screenshot of the command shell logged in to the VM, where all commands are executed directly in the internet browser tab.
Step 2: Docker Deployment of the Pro Edition of Mosquitto Broker and the MMC
After requesting a 30-day Pro Mosquitto trial period, you will receive a link to download and extract the files:
cd && wget <LINK FROM CEDALO> && unzip <ARCHIVE_NAME>.zipThen, change to the created directory. (Let’s assume the archive name is mosquitto-2.9-mmc-2.9.zip):
cd mosquitto-2.9-mmc-2.9If the command fails with “unzip command not found,” install “unzip” with the command:
sudo apt update && sudo apt install unzipAfterward, make a small adjustment by closing the port 8883 exposed by the Docker deployment. Open the docker-compose.yml file with the editor.
nano docker-compose.ymlThen, locate the line with 8883:8883 and comment it out. The result will look like this.
<SNIP>
   ports:
     - 1883:1883 # MQTT no TLS
     # - 8883:8883QTT
<SNIP>
Finally, complete the setup with your personal license key. Execute the following command to open the terminal file editor nano and create the license file:
nano management-center/config/license.licCopy your license key to the clipboard and paste the content in the editor, then save it by pressing Ctrl+O, hit return, and close the editor with Ctrl+X.
To verify the correct location and content, execute the command:
cat management-center/config/license.licThis should print out your license key on the shell.
After creating the license file, log in to the Docker registry and install the Docker environment. Then, you can start the Docker containers. To do so, execute the command:
sudo docker compose upIf everything appears fine and no errors are written on the log output, stop the containers again using the key combination: Ctrl+C. In case of issues, refer to the “Possible Issues” section, make adjustments, and run the command again.
Once resolved, start the containers again in background mode with the command:
sudo docker compose up -dYou can still observe the log output with the command:
sudo docker compose logs -fAt this point, the Pro Mosquitto MQTT broker and the MMC are running but are not accessible from the public internet with enabled TLS transport encryption.
Automatic SSL/TLS Configuration
In this crucial final step of the setup, you’ll install and configure a reverse proxy to enable TLS termination. The reverse proxy used is called Caddy, which automatically issues or renews valid certificates.
First, install the “Golang” environment to get the layer 4 extension running for the reverse proxy, which encrypts the TCP stream from and to the broker. Execute the commands one by one to install Golang:
cd
wget https://go.dev/dl/go1.22.6.linux-amd64.tar.gz
sudo tar -C /usr/local -xzf go1.22.6.linux-amd64.tar.gz
export PATH=$PATH:/usr/local/go/bin
You may also add the additional path /usr/local/go/bin to your bash initialization script (aka .bashrc) to permanently include the go binary path.
You can verify its success with:
go versionIt should print out the installed version.
Then, get the Caddy software and build it using the layer 4 extension. Execute the three commands one by one:
wget https://github.com/caddyserver/xcaddy/releases/download/v0.4.2/xcaddy_0.4.2_linux_amd64.tar.gz


tar xzf xcaddy_0.4.2_linux_amd64.tar.gz
./xcaddy build --with github.com/mholt/caddy-l4
The last command will take approximately 2 minutes to build the Caddy reverse proxy.
Again, you can verify if it works using the command:
./caddy versionMoreover, the configuration of the reverse proxy is handled through a single file. To create it, execute:
nano CaddyfileFirst, copy the following content to the clipboard, ensuring that you replace the example DNS name cedalo.northeurope.cloudapp.azure.com with the correct DNS name (your specific case from the VM creation section).
{
    layer4 {
            :8883 {
                    route {
                            tls
                            proxy 127.0.0.1:1883
                    }
            }
    }
}
cedalo.northeurope.cloudapp.azure.com {
    reverse_proxy 127.0.0.1:8088
}
Then, paste the content above into the file, and save and close as you did before with the license.lic file.
Hence, execute the command to ensure the correct formatting for the Caddyfile:
./caddy fmt –-overwriteFor this purpose, verify the correct location and content by running:
./caddy validateThis should print “valid configuration” at the end.
Finally, start the reverse proxy with the command:
sudo ./caddy runThe reverse proxy will start acquiring a valid certificate for the DNS name you specified in the Caddyfile. However, this may not work immediately after start up due to several common reasons:
- Incorrect DNS name
- DNS name record not set yet (DNS A record) – it may take a few minutes
- Port 80 of the VM is not accessible from the internet
In such cases, the log output will resemble Figure 12. Look for the message: “could not get certificate from issuer.”

Figure 12 - Screenshot of Caddy logs when the certificate cannot be obtained.
Therefore, if everything is correct, the output will look like Figure 13. Look for the message: “certificate obtained successfully.” As long as the Caddy reverse proxy runs, it will automatically keep the certificate valid and renew it before expiration without additional costs.

Figure 13 - Screenshot of Caddy logs showing successful certificate acquisition.
Finally, hit Ctrl+C to stop the Caddy reverse proxy and start it again in background mode with the command:
sudo ./caddy startThen, you can access the MMC on https://cedalo.northeurope.cloudapp.azure.com with the login: cedalo and password: mmcisawesome (see docker-compose.yml file).
Testing the Mosquitto broker on Azure setup
The first test is to see if the containers and the Caddy reverse proxy are running.
Execute the following command to verify if the MMC and broker are TLS terminated and the Caddy is running:
curl "http://localhost:2019/reverse_proxy/upstreams"As a result, the output should print information about the upstreams (eg. 127.0.0.1:8088). This command utilizes the reverse proxy’s admin API.
Run the following to check that the containers for MMC and Mosquitto MQTT broker are running
sudo docker psThe state should be ‘Up’ and the image origin should be ‘registry.cedalo.com/mosquitto’.
Check the container logs for possible issues:
sudo docker compose logs -fAccess the MMC (https://cedalo.northeurope.cloudapp.azure.com example) with the initial credentials: username- cedalo and password- mmcisawesome . Create a client for the broker access and assign the ‘client’ role for testing, which provides all rights to all topics. Refer to this link for details.
Additionally, you can test the access via TLS encrypted transport over internet with the command line MQTT client:
mosquitto_pub -h <YOUR-DNS-NAME> -p 8883 -u <CLIENT> -P <PASS> -t hello -m worldUsing port 8883 will trigger the client application to utilize TLS encryption. Replace <YOUR-DNS-NAME> with the name of your VM and <CLIENT>, <PASS> with the set values in MMC.
Hint: Install the command line MQTT client tool with:
sudo apt install mosquitto-clientsOn another terminal or any instance, you can subscribe to the topics:
mosquitto_sub -h <YOUR DNS NAME> -p 8883 -u <CLIENT> -P <PASS> -t "#" -vAlternatively, refer to this article on how to use Python with MQTT for a more in-depth broker test.
Troubleshooting common issues
Certainly, issues may arise during the setup and deployment. According to the tutorial above, the configuration can be divided into three phases: VM creation, Docker deployment, and TLS reverse proxy configuration.
The following table outlines common issues and their possible solutions.
| Phase | Behavior | Solution / Hints |
|---|---|---|
| VM creation | No access to the VM | – Is the address / DNS name correct?– Is port 22 open to the public internet?– Did you use the correct private key file for connection via SSH?– If using a local SSH client: – Ensure the outbound traffic to port 22 and the internet is not blocked.– Check if you can ping the VM. |
| Docker deployment | docker-compose command not found | Install the docker runtime as shown above via the snap install command. |
| Docker-compose prints out file not found | Ensure that the “docker-compose.yml” file exists, and you start the command in the same directory. | |
| Docker logs of MMC or broker show “file not found” or similar | Ensure that the license.lic and mosquitto.conf files exist in the correct location and the directories exist as written above. | |
| Docker logs show “license expired” or “no license found” | Register for a free trial and ensure that you place a valid license in the license.lic file. | |
| TLS reverse proxy | Go command not found | Install the Golang environment and ensure that the binary “go” is on PATH. |
| The build process fails with the xcaddy command | – Ensure the VM has access to the internet.– Type the build command correctly. | |
| Command caddy not found | Change to the directory where you have executed the xcaddy build command. | |
| Certificates cannot be obtained | – Ensure port 80 is open.– Ensure the DNS name is correctly set for the public IP address of the VM (DNS A record). | |
| General | The MMC cannot be accessed via browser | – Ensure that the docker containers run in the background.– Check the address, it should start with “https.” |
| Timeout for MQTT client connections | – Ensure that the docker containers run in the background.– Ensure the caddy reverse proxy runs with the local admin API (see above). |
Conclusion
With this setup, you can realize a production-ready, secure, and reliable MQTT broker running on Azure as a virtual machine within 15 minutes. The user-friendly and powerful MMC allows you to precisely configure access to topics for different clients. Moreover, the Docker runtime ensures that the Pro Edition for Eclipse Mosquitto keeps running with up-to-date versions. Finally, the so-called automatic HTTPs feature from the Caddy reverse proxy ensures encrypted data transport with valid and trusted certificates at all times.


