
Eclipse Paho, like the Eclipse Mosquitto MQTT broker, is also an open-source project. It offers MQTT clients support for various programming languages and is considered the standard for MQTT client functionality.
The project name, “Paho,” meaning “communicate with everyone,” was chosen by its creators to highlight its multi-language capability.
In this tutorial, I will demonstrate how to use the Paho MQTT Python client with the Pro Edition for Eclipse Mosquitto™ MQTT broker. You do not require any additional prerequisites – simply test it in your internet browser window. Continue reading to find an example code snippet at the end of the tutorial.
How to install the Paho MQTT Python client
To use the Python implementation of the Paho MQTT client, you’ll need a Python execution environment in place. There are different approaches to setting this up.
You can start a ready-to-use environment by clicking this link to follow the approach I want to share. Doing so will launch the Jupyter Notebook in your internet browser with a Python MQTT example code. In the following sections, I will guide you through each step of the process.
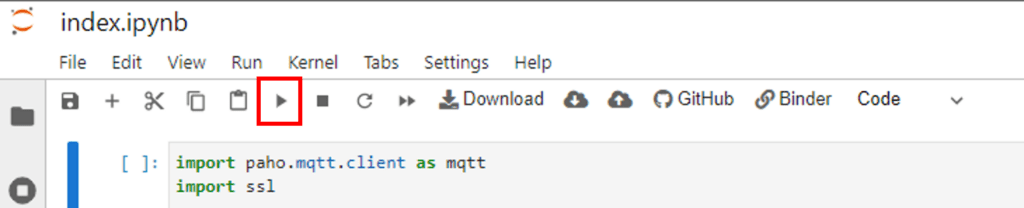
This environment is straightforward to use. Click “play,” as shown below, and the selected Python code lines (marked with the blue vertical bar on the left) will run in your browser window.
Another nice feature of the Jupyter Python environment is that when pressing “ctrl+I” for Windows or “command+I” for Mac (or right-clicking “Show Contextual Help”), you can get information about the specific function call depending on your cursor location.
JupyterLab environment to execute Python code
If you plan to prepare or use your Python environment, install the Paho MQTT client using the Python package tool. For more information, check out this reference.
pip install paho-mqtt
As the picture above shows, Python’s default environment installation always imports and uses the SSL package (import ssl).
Get your ready-to-use and secure MQTT broker
Create the Paho MQTT Python client object
After following the steps in the previous sections, you should have a Python environment and an MQTT server set up and ready to use. Make sure to create at least one client with the following credentials, as shown here:
Client id: “myPy”
Username: “user”
Password: “password”
Now, let’s create a client object with the name client in Python.
import paho.mqtt.client as mqtt
import ssl

version = '5' # or '3'
mytransport = 'websockets' # or 'tcp'

if version == '5':
    client = mqtt.Client(client_id="myPy",
                         transport=mytransport,
                         protocol=mqtt.MQTTv5)
if version == '3':
    client = mqtt.Client(client_id="myPy",
                         transport=mytransport,
                         protocol=mqtt.MQTTv311,
                         clean_session=True)
The following two sections will provide an additional explanation for the code snippet above.
MQTT protocol version and the introduction of expiry intervals
MQTT is a standard communication protocol that currently has two versions: 3.1.1 and 5.0. During the Paho MQTT Python configuration process, you can set which version to use by specifying the protocol parameter and choosing either the MQTTv311 or MQTTv5 value from the Paho MQTT client library (as shown in the code above).
Note: Version 5.0 was introduced in 2018 and released in March 2019, so it is yet to be part of the ISO standard.
Despite this, the MQTT protocol has undergone significant improvements from version 3.1.1 to 5.0. One noteworthy improvement is how the protocol handles session expiry. This change can be advantageous for TLS encryption because it reduces traffic overhead by reusing session data when deploying MQTT version 5.0. For more details, you can refer to the MQTT TLS article.
Suppose the default clean_session flag is set to true (see the code snippet above) in version 3.1.1. In this case, the data of every session (including outstanding messages, subscriptions, and TLS handshakes) clears if the keepalive period (the default value is 60 seconds) is up. This happens when there is no communication between a client and a broker. Check out this blog post to learn more about the CONNECT and CONNACK parameters required for establishing an MQTT connection.
With MQTT version 5.0, the clean_session flag is split into two flags:
- A clean start flag, indicating that the session should start without using existing session data
- A SessionExpiryInterval flag defines how long to retain the session after a disconnect (see later in the “Configure callbacks and connect a client to your broker” section).
Setting the clean_start flag to 1 and SessionExpiryInterval to 0 is equivalent to setting clean_session to 1 in MQTT v3.1.1.
The MessageExpiryInterval, explained in the “Publish messages with the Paho MQTT client in Python” section, enables the use of an expiry interval for the so-called Last Will messages published with the retain flag set to 1 (“last will”). After the MessageExpiryInterval, the lastWillMessage will be dismissed. You can find more information about implementing the lastWill parameter for the Mosquitto broker, here. Additionally, Pro Mosquitto fully supports the MessageExpiryInterval, which has been available since version 5.0. It enables the implementation of application-specific settings and boosts functionality.
Examples of “last will” usage
Here is an example to better understand how to use “last will” messages.
Imagine that your IoT infrastructure includes thousands of connected IoT clients like cars, trucks, or other assets with a high probability of going offline for minutes or even weeks. In such cases, messages (e.g., about traffic jams) must have a short expiry interval. After a client reconnects, it may take up to several weeks (after going offline) to deliver other notices or updates.
The SessionExpiryInterval setting is helpful for choosing between reducing traffic overhead and increasing information security. Imagine an IoT device with low computing performance, energy consumption, and traffic volume. Such a device may have an unstable or irregular network connection and require reconnection.
With a very short SessionExpiryInterval on every reconnection, you may need to execute a TLS handshake and certificate exchange. This would be the most secure setting to prevent issues such as data tampering or leaks.
For further improvements to the IoT protocol, refer to the documentation here. The Paho MQTT Python client supports the use of all named properties.
Choosing an MQTT transport layer for the Paho MQTT Python client
You must choose a transport layer as the second step for creating a Paho MQTT Python client object.
Pro Mosquitto supports both WebSocket and TCP transport layers, which is an advantage of hosted MQTT brokers. WebSockets use the HTTP protocol and offer benefits such as being firewall-friendly, and compatible with almost any internet connection. However, the TCP protocol performs better because the communication uses a lower layer — the TCP layer. For more details on setting up MQTT over WebSockets, refer to this article.
For this demo, I use a publicly available Python environment from mybinder.org, which requires WebSockets to communicate with the MQTT broker.
Configure client authentication
To enable TLS for an MQTT broker and access it, you must set two parameters for the client object in Python: the username/password and the TLS settings.
Below is a code snippet to help you with the process:
client.username_pw_set("user", "password")
client.tls_set(certfile=None,
               keyfile=None,
               cert_reqs=ssl.CERT_REQUIRED)
The first method calls the username_pw_set parameter. It’s straightforward and sets the username and password you chose in the “Get your ready-to-use and secure MQTT broker” step above.
The second method is tls_set, which ensures the communication is encrypted. Setting the parameter cert_reqs to ssl.CERT_REQUIRED. ensures that the connection is only established if the MQTT server provides a valid server certificate. This is because you are using the hosted MQTT broker version from Cedalo.
If your device does not support the CA from the Cedalo server, you can download the selfsigned .pem file here. Use client.tls_set(ca_certs="<path>/pemfile.pem") to set the correct CA path.
As an alternative to username/password, you can use certificate-based authentication and authorization (if your broker supports this). In this case, you must add the parameters certfile and keyfile to the path of the corresponding files (client certificate and private key). For more information, refer to the certificate-based authentication and authorization section of the MQTT TLS configuration guide.
Configure callbacks and connect a client to your broker
Now, you are almost ready to connect to the broker. However, you must first define at least one callback that handles incoming MQTT messages on subscribed topics. To do this, the client library has the option to define callback functions. In this example, the callback functions are defined in a separate file with the name mycallbacks.
The code to help you set the essential callbacks is as follows:
import mycallbacks
client.on_message = mycallbacks.on_message;
client.on_connect = mycallbacks.on_connect;
client.on_publish = mycallbacks.on_publish;
client.on_subscribe = mycallbacks.on_subscribe;
The callback function on_message is defined as follows and publishes the information about the received message. The other optional callbacks in this example print out verbose information.
def on_message(client, userdata, message, properties=None):
    print(" Received message " + str(message.payload)
        + " on topic '" + message.topic
        + "' with QoS " + str(message.qos))
Now, you are ready to connect to the broker. Keep in mind that the connect method call differs depending on the MQTT protocol version. Please refer to the ‘MQTT protocol versions’ section above for details. Nevertheless, you have to set the communication port according to the chosen transport layer. For WebSocket, use port 443; and for TCP, use port 8883. Once you establish a successful connection to the broker, the prepared example will print out the callback message (see the picture with the area marked in red).
broker = 'YOUR-BROKER-ADDRESS' # eg. choosen-name-xxxx.cedalo.cloud
myport = 443
if version == '5':
    from paho.mqtt.properties import Properties
    from paho.mqtt.packettypes import PacketTypes
    properties=Properties(PacketTypes.CONNECT)
    properties.SessionExpiryInterval=30*60 # in seconds
    client.connect(broker,
                   port=myport,
                   clean_start=mqtt.MQTT_CLEAN_START_FIRST_ONLY,
                   properties=properties,
                   keepalive=60);

elif version == '3':
    client.connect(broker,port=myport,keepalive=60);

client.loop_start();
Python code in JupyterLab showing the successful Python MQTT broker connection
The code should run smoothly up to this point. However, possible issues may arise when attempting to connect. The table below outlines how to troubleshoot possible connection failures.
| Print out / error | Possible Remedy |
|---|---|
| Name or service not known | The broker’s name/address is probably incorrect. Use the name/URL from the “Getting Started” email. |
| Timed out | Either the broker did not respond or you used the wrong port number. Check the transport (WebSocket vs.TCP) and port number. If you are unsure about the firewall and connection, choose WebSocket and port number 443. |
| Connection Refused OR Authentication failed | Check the client credentials: ID, username, password, and whether the client credentials are set up in the broker. |
If you experience further issues within the web-based Python environment, restarting the kernel is recommended. To do so, select kernel in the menu, then ->Restart kernel, and start the code execution again from the top.
Finally, the client method loop_start() ensures the connection maintains the “online” status. This allows you to publish MQTT messages and subscribe to topics, as shown in the following sections. The MQTT subscribe blog post explains how MQTT subscribe works and provides relevant Mosquitto examples.
Subscribe to topics with the Paho MQTT client
With the steps above complete, you can now easily subscribe to topics on the broker to which the client has access. To enable the subscription, call the client method __subscribe__ to subscribe to the required topic and set the optional _quality of service_ parameter. Check out the MQTT QoS article to learn more about it.
mytopic = 'topic/important'
client.subscribe(mytopic,2);
Let’s use the same topic to publish messages so you can see how to receive them.
Publish messages with the Paho MQTT client in Python
To publish messages on topics, you need to call the method to publish on the specific topic. You must also define the payload and the optional quality of service parameter. The following code lines show the case for MQTT version 5.0, which includes the option to specify the MessageExpiryInterval as mentioned in the section “Create the Paho MQTT Python client object” above.
from paho.mqtt.properties import Properties
from paho.mqtt.packettypes import PacketTypes
properties=Properties(PacketTypes.PUBLISH)
properties.MessageExpiryInterval=30 # in seconds

client.publish(mytopic,'Cedalo Mosquitto is awesome',2,properties=properties);
Here are some sample outputs from the browser-based Python environment.
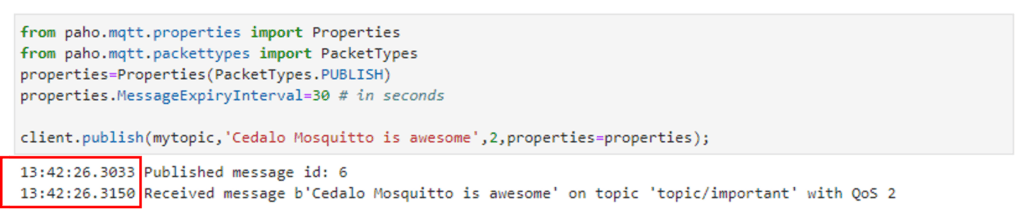
Python code to publish an MQTT message and showing the output
Thanks to the connected callback functions, you will see the printout for publishing and receiving. The time difference, marked red in the figure above, is around ten milliseconds, indicating a round trip time for the messages.
In conclusion, any client implementation will only use one connection instance, reuse it, and if not needed anymore, disconnect it by calling disconnect().
How to publish messages using the utility function
You can use the paho.mqtt.publish or paho.mqtt.subscribe modules in Python for simple message exchange with the MQTT broker. These modules provide single function calls which are intended to be one liners as a single shot execution. The purpose of using these functions is to publish notifications or events which occur relatively seldom. Also, users can immediately receive specific information by subscribing on a specific topic for the retained message.
Three main functions are available. Calling these functions include the procedure to connect, authenticate, publish/subscribe and disconnect.
1. ‘publish.single’
This function connects to an MQTT broker, sends a message to a specified topic, and then disconnects smoothly. Most connection parameters are optional. For reference you can find the full documentation here.
As a simple example, you can run the following python code:
import paho.mqtt.publish as publish
publish.single('encyclopedia/temperature', payload='hot')
This publish.single call function uses many default values. The most relevant parameters are:
- hostname=localhost
- port=1883
- auth=None
- qos=0
A more complex example could be:
publish.single('test', payload='hi',
    qos=2, client_id='test',
    tls={'ca_certs':'/etc/ca-certificates/update.d/ca_certs'},
    port=8883,
    hostname='cedalo.cloud',
    auth={'username':'test','password':'test'}
)
In this case, the example uses TLS encryption for the information transport, authentication with username (= client id) and password, and sets the quality of service level to 2. It passes the parameters for the TLS encryption as a dictionary, which must include at least the path to the ca_certs. You refer to the complete documentation here.
2. ‘publish.multiple’
To publish more than one message in a single shot, you can use the helper function publish.multiple.
The msgs parameter represents a list of MQTT messages that need to be published. The messages need to have the topic, qos, and retain value individually set, as well as the payload. Therefore, you first need to define a list of message definitions:
msgs =Then, the list mgs is passed as an argument to the helper function together with the connection parameters (see the references for all details):
publish.multiple(msgs, hostname="localhost",
    port=1883, client_id="",
    keepalive=60,will=None,
    auth=None, tls=None,
    protocol=mqtt.MQTTv31
)
The implementation and intent of the publish.single and publish.multiple methods is to provide a convenient and simple one-liner way of publishing information. Executing these functions will establish a connection to the broker, take care of transport encryption (if configured), send the messages, disconnect correctly, and exit.
This method to publish messages is not for use in long running programs that send high frequency sensor data, or periodic cases. Instead, using it for sending notifications when data processing is complete, publishing infrequent sensor readings (e.g., every hour), or reporting the state of instances/services (e.g., online/offline) are good examples of using these helper functions.
3. ‘subscribe.simple’
In a similar way as before, you can subscribe to topics and receive messages. This is very useful for situations where the task is: “Give me the latest sensor reading.” Suppose a temperature sensor publishes its readings as retained messages on the ‘mysensors/temperature’ topic. You can perform this task using the following simple code:
import paho.mqtt.subscribe as subscribe


msg = subscribe.simple('mysensors/temperature', msg_count=1, retained=True,
    hostname='localhost',
    port=8883,
    auth={'username':'user','password':'pass'}
)


print(f"Topic: {msg.topic}\nPayload: {msg.payload}")
The subscribe.simple call function in the code snippet above connects to the broker, subscribes to the specific topic, receives the retained message and finally disconnects and returns the MQTT message object for further processing. Note: the first argument can be either a single topic represented as a string or a list of topics. You can find further details on this helper function in the reference here.
Remember, this kind of message exchange is not for periodic information retrieval or online monitoring of sensor values, or something similar. In such cases, the connection which is established between client and broker must be kept alive and the callback functions must be in place to handle message processing. You can achieve this scenario by using the subscribe.callback function, or alternatively, the full-fledged MQTT client code from this previous section in the article.
4. ‘subscribe.callback’
This helper function allows you to subscribe to one or more topics and invoke the provided callback function for each message. For example:
import paho.mqtt.subscribe as subscribe


def process_message(client, userdata, msg):
    userdata += 1
    print(f'Received message no. {userdata}\nTopic: {msg.topic}\nPayload: {msg.payload}\n')


subscribe.callback(callback=process_message,
    topics='mysensors/temperature',
    hostname='localhost',
    port=8883,
    auth={'username':'user','password':'pass'},
    userdata={"msg_count": 0}
)


print("This code will never execute because subscribe.callback is blocking")
Notice, instead of passing the topic as the first positional argument, it is now a second keyword argument (i.e. topics='mysensors/temperature'). This clarification is necessary because the first positional argument of subscribe.callback is actually the callback function itself, and the second positional argument specifies the topics. This means that to switch to positional arguments, you would call the function as follows:
subscribe.callback(process_message, 'mysensors/temperature') # other arguments such as hostname and port may follow as keyword argsThe callback function shares the same signature as Client.on_message, which is also covered in this article. It takes 3 arguments:
- client - the client instance created for the connection.
- userdata - private data storage used to share state across callback invocations. Will be None unless explicitly passed to subscribe.callback as an argument.
- message - the received message.
Importantly, the subscribe.callback function never returns unless client.disconnect is explicitly called within a callback. For example:
import paho.mqtt.subscribe as subscribe


MSG_NUM_LIMIT = 10


def process_message(client, userdata, msg):
    userdata += 1
    print(f'Received message no. {userdata}\nTopic: {msg.topic}\nPayload: {msg.payload}\n')
    if userdata > MSG_NUM_LIMIT:
        client.disconnect()


subscribe.callback(callback=process_message,
    topics='mysensors/temperature',
    hostname='localhost',
    port=8883,
    auth={'username':'user','password':'pass'},
    userdata={"msg_count": 0}
)


print("This code will be executed after MSG_NUM_LIMIT has been exceeded")
Note that above code examples don’t cover error handling. However, in a real application it would be useful to wrap each publish and subscribe helper functions into try-except blocks to catch and gracefully handle any connection errors.
Wrap up
This article utilizes the Eclipse Paho MQTT client for Python to publish and receive messages from the Mosquitto MQTT broker. If you want to implement MQTT with a different programming language, check out our guide on Using the Paho MQTT Client in Rust.
Moreover, I demonstrate and explain the core differences between MQTT protocol versions 3.1.1 and 5.0 as part of the prepared Python environment. Furthermore, I use the Management Center as a GUI to administer client access and monitor the Pro Edition for Eclipse Mosquitto broker.
You can use the code snippets on GitHub for your upcoming projects that utilize the Python Paho client and Mosquitto.
An example connection could look like this:
import paho.mqtt.client as mqtt
import ssl
from datetime import datetime as dt
def on_connect(client, userdata, flags, reason_code, properties=None):
    client.subscribe(topic="RXB")
def on_message(client, userdata, message, properties=None):
    print(
        f"{dt.now()} Received message {message.payload} on topic '{message.topic}' with QoS {message.qos}"
    )
def on_subscribe(client, userdata, mid, qos, properties=None):
    print(f"{dt.now()} Subscribed with QoS {qos}")
client = mqtt.Client(client_id="clientid", protocol=mqtt.MQTTv311, clean_session=True)
client.on_connect = on_connect
client.on_message = on_message
client.on_subscribe = on_subscribe
client.username_pw_set(username="username", password="password")
client.tls_set(ca_certs="cacerts/isrgrootx1.pem")
client.connect(host="example.cedalo.cloud", port=8883, keepalive=60)
client.loop_forever()


