
If you’re not using TLS encryption on your MQTT broker, you’re putting your data at risk. Here’s how to handle data security and set up TLS encryption on your Mosquitto™ MQTT broker. Follow this guide to configure a professional, secure, and performant MQTT broker.
MQTT over TLS configuration prerequisites
- You have a running Docker runtime available, either as a docker desktop or Docker CLI for your operating system (for install instructions, see here).
- The helper plugin docker compose (or docker-compose, deprecated) is available.
- To acquire production-ready certificates, you can expose your Docker containers to the internet on ports 80, 443, and 8883.
- You can create (or already have) a DNS A record entry (e.g., example.com) that points to the exposed IP address (see the previous point).
- Install a PKI infrastructure or OpenSSL CLI to issue client certificates.
- Optional, but recommended: Pro Edition for Eclipse Mosquitto (with MQTT High Availability, REST API, MQTT integrations, Audit trail logging, Persistent Queueing and other advanced features).
I recommend utilizing a virtual machine from one of your favorite IaaS providers for a production-capable setup.
Enable MQTT TLS/SSL for Mosquitto MQTT broker and Mosquitto Management Center
Step 1: Set up Mosquitto and Management Center for MQTT TLS example
Let’s assume you’re using a Linux-based system for the following steps. For Windows and Mac, replace the image tag 2-linux with 2-win or 2-mac (see as a reference also here).
Use the installer to get the needed files
docker run -it -v ~/cedalo_platform:/cedalo cedalo/installer:2-linuxIn the following dialog, select which components to install. Install at least Mosquitto web interface and Eclipse Mosquitto:
? Select what to install › - Space to select. Return to submit
◉   Management Center for Eclipse Mosquitto
◉   Eclipse Streamsheets
◉   Eclipse Mosquitto 2.1
◯   Eclipse Mosquitto 1.6
Once the installation process in your home directory is complete, you’ll notice a new folder, cedalo_platform. This folder contains various files, including the configuration file of the MQTT broker, indicating a successful installation.
The structure is as follows:
~/cedalo_platform
├── docker-compose.yml  # Docker Compose file
├── mosquitto           #
│   ├── config          # Configurations for Mosquitto
│   ├── data            # Data directory for Mosquitto
├── start.sh            # Start script
├── stop.sh             # Stop script
├── streamsheets        #
│   ├── init.json       # Configuration for Streamsheets
├── update.sh           # Update script
Then, start Eclipse Mosquitto and Management Center by:
cd ~/cedalo_platform
sh start.sh
See as a reference also here.
Remarks and possible issues:
- If the command fails with messages like “docker-compose not found,” change the command
docker-composetodocker compose(without the dash) in the scripts start.sh and stop.sh, and try again. If it fails again, ensure you have correctly installed the docker environment with the available or enabled Docker compose plugin. - By default, running the start script will expose the ports:
- 8088, Management Center unsecured (opening the port on the internet is not recommended).
- 1883, Eclipse Mosquitto unsecured (opening the port on the internet is not recommended).
Further exposed ports depend on the variant of the docker-compose.yml file that you use (Pro Edition vs. Free). Refer to the file itself and look under the term ‘expose.’
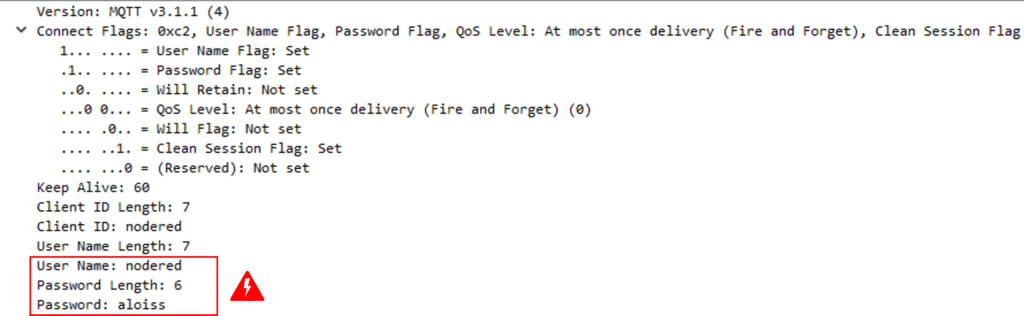
When connecting an MQTT client to the broker over the “insecure” port 1883, all data will be readable as text (if one captures the network traffic). One can demonstrate this process by using a tool like Wireshark (read our How to use Wireshark for MQTT Analysis to learn how to use this tool with MQTT). The following figure shows the connection sequence and one packet detail, where the password is shown in the last line. For this reason, I recommend using an encrypted connection to avoid data tampering and unallowed data injection.

Step 2: Run caddy reverse proxy to obtain valid MQTT TLS certificates
Using TLS for MQTT communication introduces an additional layer above the TCP/IP layers. This MQTT TLS layer ensures encryption between the sender and receiver by asymmetric encryption. In short, you will need a (valid) MQTT TLS certificate to make certain that publishers and subscribers can trust your MQTT broker when sending and receiving data.
Upon the first view, introducing an additional layer in the network communication has some performance costs. Still, most of the extra overhead lies in the initial TLS handshake when connecting to the broker. Therefore, client implementations should reduce the number of connections to make. Also, one should use the TLS session resumption to reduce the time needed to negotiate the TLS connection.
If you choose to use Pro Edition for Mosquitto hosted (check MQTT broker pricing), Cedalo will take care of valid certificates for you. Multiple options will be available. In addition, you can request valid certificates for on-premises use. Test Pro Mosquitto cloud or on-premises versions by signing up for a trial here.
One option is to utilize the caddy server to acquire certificates automatically using a built-in ACME client. I will show how to do it in the following sections.
Preparations and setup of the reverse proxy
As I explained before, the approach is to use the automatic setup to acquire valid certificates. Therefore, before you move forward, please review the steps below:
- Ensure ports 80, 8883, and 443 are open to the internet.
- Ensure that a DNS lookup on “example.com” (replace with your domain) is pointing to the correct IP address (the public address that exposed ports of containers bind to).
- Open a new terminal/console because one cannot terminate the command in step 1.
Create a directory to store the reverse proxy data (especially the certificates):
cd ~/cedalo_platform
mkdir revproxy
If you see this message:
mkdir: cannot create directory ‘revproxy’: Permission deniedchange the ownership of the whole directory cedalo_platform to your user, with:
sudo chown -R MYUSERNAME: ~/cedalo_platformRun the caddy reverse proxy as a secure route to Management Center
After we have performed all preparations, we can start the reverse proxy as an additional docker container. To do so and troubleshoot it if issues occur, follow the steps below.
With the following code lines, you will start the reverse proxy:
docker run -it --rm --name myproxy \
 --network="cedalo-platform" \
 -p 80:80 \
 -p 443:443 \
 -v ~/cedalo_platform/revproxy:/data \
 caddy caddy reverse-proxy -from "example.com" -to "management-center:8088"
As an intermediate check, you can point your browser to https://example.com, and log in to the Management Center for Mosquitto™ with the default credentials (cedalo / mmcisawesome, change the variables CEDALO_MC_USERNAME and CEDALO_MC_PASSWORD in the docker-compose.yml file as you like, then stop and start the containers as in Step 1).
Explanation and possible issues
Step 1 starts the containers and creates an internal docker network named “cedalo_platform.” The caddy server in step 2 is also running on the same network.
-p 80:80Port 80 is exposed and open to the internet to acquire valid certificates with the ACME client.
-p 443:443Management Center port 443 (https) is exposed to answer requests and serve securely.
-v ~/cedalo_platform/revproxy:/dataThe data – especially the certificates used by the caddy server - will be stored on the local disk in the directory ~/cedalo_platform/revproxy.
caddy caddy reverse-proxy -from "example.com" -to "management-center:8088"This container entry point command will ensure the communication to Management Center is secured and accessible via https://example.com.
-itThe docker runtime attaches the actual terminal to the started docker container. You can check it for possible errors. Later, you can replace this parameter with -d to run the container in the background.
Possible Issues:
If there is an error like “can not obtain certificates,” make sure that port 80 of the running caddy server is reachable on the internet by following the DNS lookup ‘example.com’ (your domain name).
Step 3: Configure MQTT broker to use a secured listener for MQTT connections
Now, you must also secure the route to the MQTT server. In principle, you can use the caddy server I showed before and configure it to reverse proxy the TCP upstream to your Mosquitto broker (on port 1883). Or you can configure the broker to terminate the TLS. The first case has the advantage because the broker must not care about the TLS encryption – which can result in a few performance benefits. However, on the other hand, to make the “certificate-based authentication/authorization” functionality work, it is not sufficient to configure the reverse proxy correctly. You muss pass the client’s certificate to your broker by setting the header header “SSL-client-cert”). Therefore, we chose the solution of configuring the broker to handle the TLS encryption.
Check out this configuring Python in MQTT blog post to learn how to set up client authentication for a Paho MQTT Python client.
The following steps need the most attention to ensure the correct configuration.
Please follow these steps:
- Stop the containers from step 1.
- Modify the
docker-compose.ymlfile. - Modify the Mosquitto config file.
- Start the containers (see step 1).
Let’s start.
Adjust the configuration files for the docker deployment and set the MQTT TLS port
It’s essential to stop the running containers from step 1. To do it, change to the corresponding terminal and stop the containers by pressing Ctrl+C. This action is necessary to avoid any conflicts during the configuration process.
Now, add a volume mount to the Mosquitto container. This volume holds the valid certificates that the reverse proxy (caddy server) also uses and automatically manages. Remember to replace example.com with your domain name.
Adjust the docker-compose.yml file by adding a volume mount.
services:
  mosquitto:
    volumes:
      - ./revproxy/caddy/certificates/acme-v02.api.letsencrypt.org-directory/
	example.com:/mosquitto/certs
Do not replace any other line in the file - add the line to services.mosquitto.volumes section.
Before proceeding, you may check if it worked using this command:
ls -l ./revproxy/caddy/certificates/acme-v02.api.letsencrypt.org-directory/example.comEnsure that the location contains at least a *.crt and a *.key file for your domain name (of course, replace example.com with your value).
Adjust the configuration files for Mosquitto to enable MQTT TLS security
The Mosquitto broker can now serve an additional listener and use the TLS port for this.
Open and append the file ~/cedalo_platform/mosquitto/config/mosquitto.conf with these lines:
listener 8883
certfile /mosquitto/certs/example.com.crt
keyfile /mosquitto/certs/example.com.key
For more details on configuration options, see this reference.
Check if port 8883 is exposed
Open the docker-composer.yml file again and check – or correct – if you can see port 8883 under the service.mosquitto.ports section.
services:
  mosquitto:
    image: registry.cedalo.com/mosquitto/mosquitto:2.1
    ports:
      - 1883:1883
      - 8883:8883
Start the containers again (see Step 1):
cd ~/cedalo_platform
sh start.sh
The Mosquitto container may fail to start, showing an output similar to this:
Error: Unable to load server certificate "/mosquitto/certs/example.com.crt". Check certfile.
OpenSSL Error: error:02001002:system library:fopen:No such file or directory
To correct this, make sure that:
- The file names are correct (example.com vs. your domain name).
- The files reside in the right location as configured in the
mosquitto.conffile for the parameters certfile and keyfile (check thedocker-compose.ymlfile).
Step 4: Test the TLS over the MQTT connection
Before testing your MQTT Mosquitto TLS configuration, let’s summarize what we have already done.
By now, you have at least three running docker containers:
- The Eclipse Mosquitto MQTT broker
- The Management Center
- The Caddy server to enable a secure reverse proxy for Management Center
Besides that, at least ports 443 and 8883 are now open to the internet and are reachable via the domain name example.com.
You can test the setup using your favorite MQTT client software (python, node-red, arduino nano 33 iot, etc.)
Create a user
Point your browser to https://example.com login (for credentials, see step 1) and create a user to access the MQTT server. To do so, follow the instructions in this document.
For the next steps, assume you have created a user with username ‘cedalo_user’ and password ‘default’.
Use your favorite MQTT client software to connect to:
- mqtts://example.com (port 8883)
- username: cedalo_user
- password: default
- use_tls: true
- verify_security: true (checks for valid certificates of the broker)
Review the MQTT Subscribe and Publish comprehensive guide to better understand how it works.
However, suppose you plan to run the client software on an embedded IoT device, for instance. As a consequence, you must supply the certificate authority in your client application; for this example, I would recommend Let’s Encrypt R3. See this article as an example of adding the certificate to the firmware.
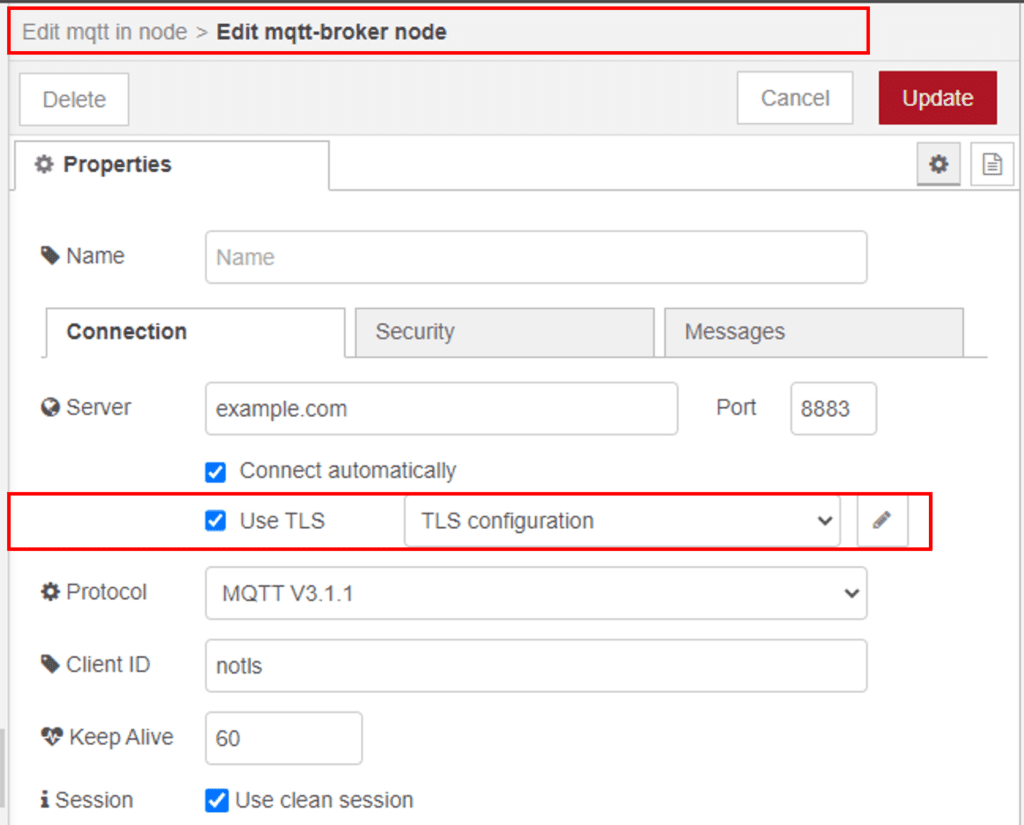
In node-red running on Windows or a Raspberry Pi, the corresponding dialogues look like this or similar and will work immediately.
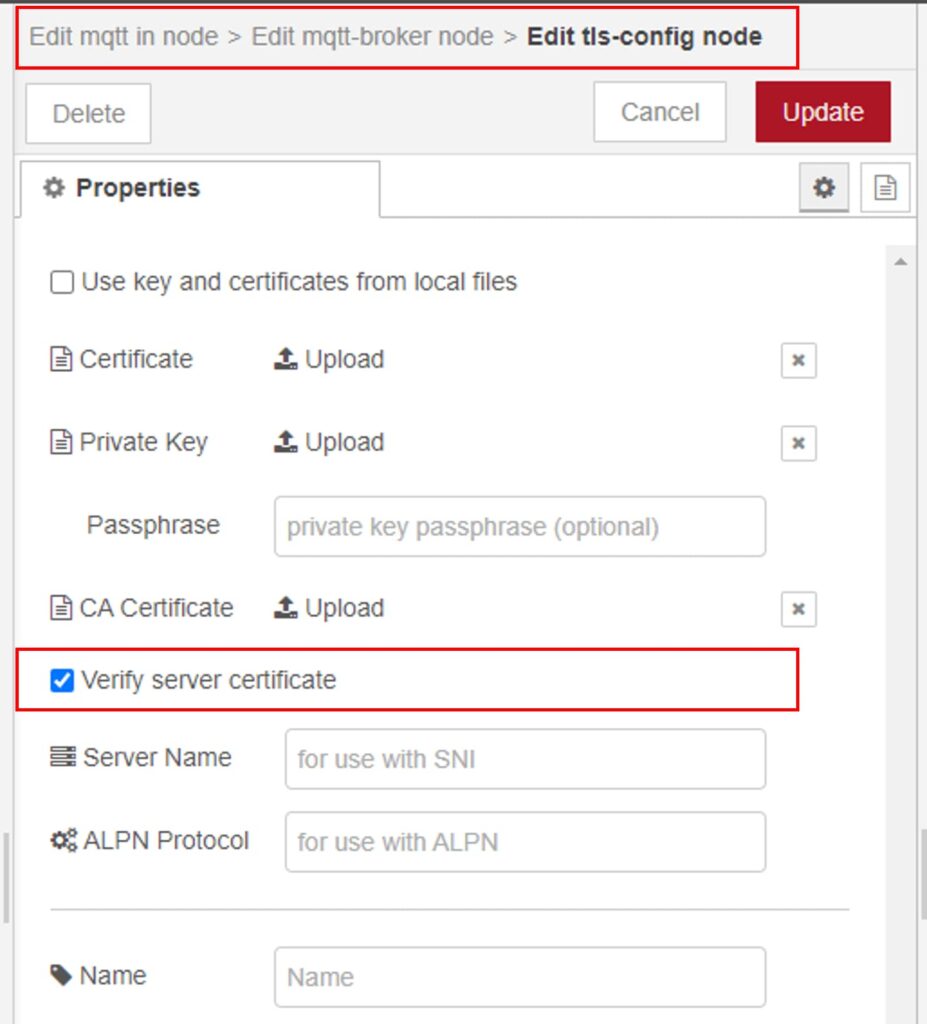
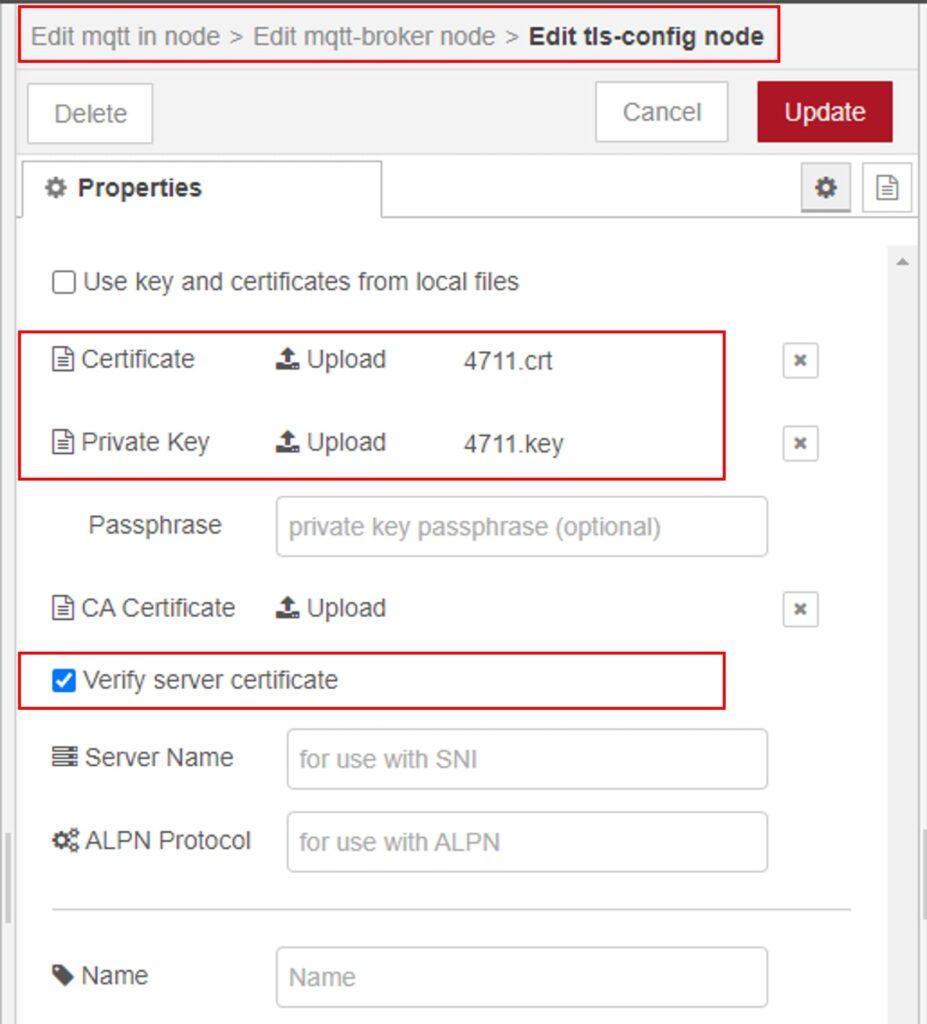
In the broker configuration, check the option “use TLS.” After clicking the edit pencil icon in the subsequent dialogue, check the option “verify server certificate.” This action will enable TLS and ensure an active connection to the broker only if the latter provides a valid certificate.
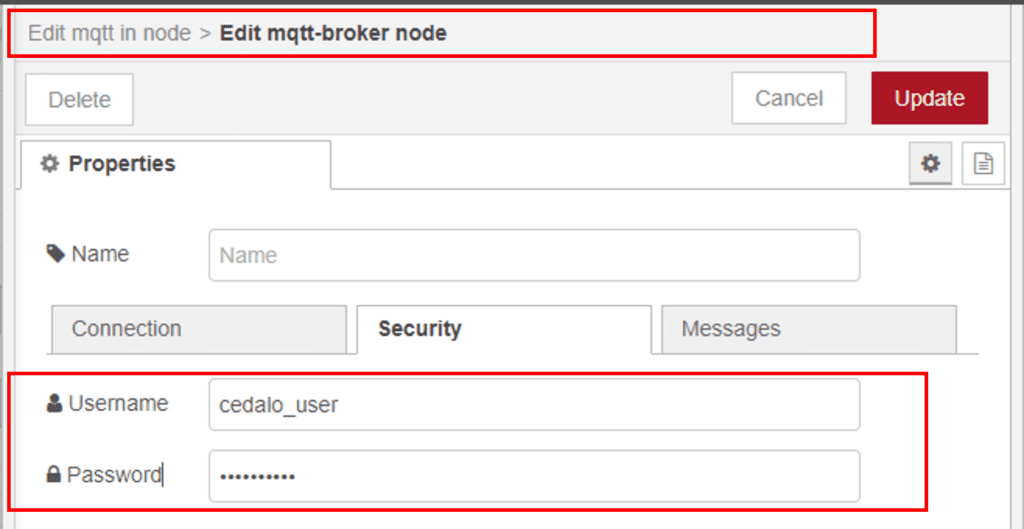
Enter the username and password under the “security” section/tab:
Suppose you are now monitoring the network traffic by using Wireshark. Then you will see that the connection initialization sequence between the client and broker starts with a negotiation about the TLS parameters. All subsequent data is now encrypted end-to-end for client-broker connection.

This action, of course, puts additional overhead on the connection. Still, as mentioned above, this impact will be minimal if your client application reuses the existing connection for all subsequent subscriptions or publications.
Using of client certificate-based authentication and authorization within Mosquitto TLS setup
We now have a secured and performant MQTT broker and Management Center.
I am using the latter to set up authentication (username/password) and role-based authorization on specific broker topics, such as access control lists (ACL).
The following steps are optional. They show how to use (client-) certificates to enable authentication with the help of unique certificate details (instead of username/password and authorization). The below picture describes the setup process.
For more details on securing authentication, explore this article on MQTT client authentication using JWT.
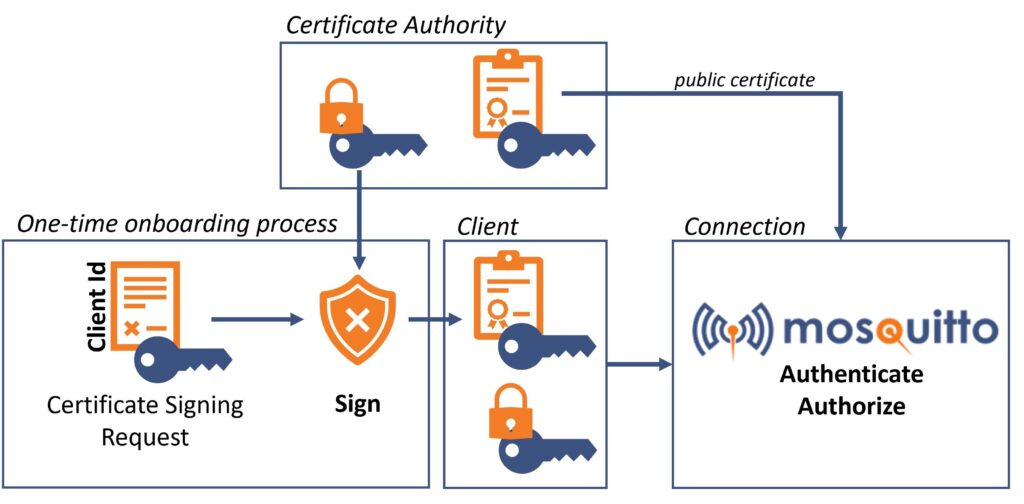
Set up and use a Certificate Authority to generate client certificates
As mentioned in the introduction, you will need your certificate authority – in short, CA – to issue client certificates. Big companies or universities have the infrastructure to administer and maintain certificates. In the context of IoT, you will need to automate this process thoroughly. For example, if you want to produce ready-to-use IoT-sensors, you must securely store certificates/keys on your products during production.
Create our own CA. Then create a directory:
mkdir ~/cedalo_platform/mycaNow use the command line application OpenSSL to create a key and a certificate, which then represents your CA:
openssl req -new -newkey rsa:2048 -days 365 -nodes -x509 \
-keyout ~/cedalo_platform/myca/root_ca.key \
-out ~/cedalo_platform/myca/root_ca.crt
The next step is to onboard your client by creating a certificate signing request (CSR). For reference, see the picture above.
openssl req -new -newkey rsa:2048 -nodes \
-keyout 4711.key \
-out 4711.csr \
-subj "/CN=4711"
We will later use the last line as the username for the Mosquitto broker. Here we choose a unique value, e.g., a serial number – 4711. This command will create a file, a client key, and a CSR.
Now our CA needs to sign (= create) the client certificate and log a unique certificate serial number.
openssl x509 -req -CA myca/root_ca.crt \
-CAkey myca/root_ca.key -CAcreateserial \
-in 4711.csr -out 4711.crt
The created file 4711.crt together with the client key 4711.key will get transferred to the client.
Adjust the Mosquitto configuration to work with client certificates
The last step is making the CA certificate available for the Mosquitto broker. Therefore, we must modify the docker-compose.yml file again and add the line - ./myca:/mosquitto/ca in the section services.mosquitto.volumes
services:
  mosquitto:
    volumes:
      - ./myca:/mosquitto/ca
In the Mosquitto config file, one must extend the added additional listener by the last three lines that you can see below:
listener 8883
certfile /mosquitto/certs/demo.vlab.education.crt
keyfile /mosquitto/certs/demo.vlab.education.key

cafile /mosquitto/ca/root_ca.crt
require_certificate true
use_identity_as_username true
Now restart your containers (see Step 1) and look at the logs. In this step, you can only encounter one issue: the Mosquitto broker cannot find the cafile. To fix it, check if the volume mounts and the cafile is available on the disk.
Create user, group, and ACL by using the Management Center for a sample use case
When a sample is ready, assume you have a scenario with multiple similar sensors (= clients) that must connect to the MQTT broker. You need at least one client for the testing.
Use Management Center for Mosquitto™ to create two groups: “myDevices” and an ACL one. To do this, check out the picture below and refer to this document.
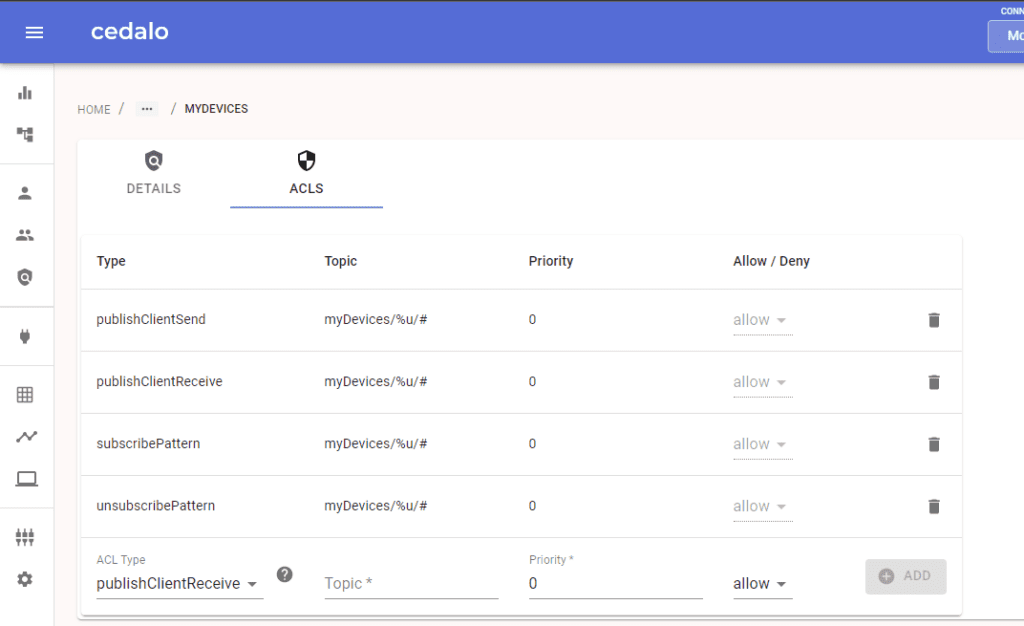
To give each client an individual topic, you can use the user wildcard %u in the topic definition (Mosquitto version 2.1 needed). For example, you can use myDevices/%u/# . This makes use of the configuration setting use_identity_as_username true.
Then create users (= your example sensors) where you set the username according to the value/serial number we used during the onboarding (= creation of the CSR).
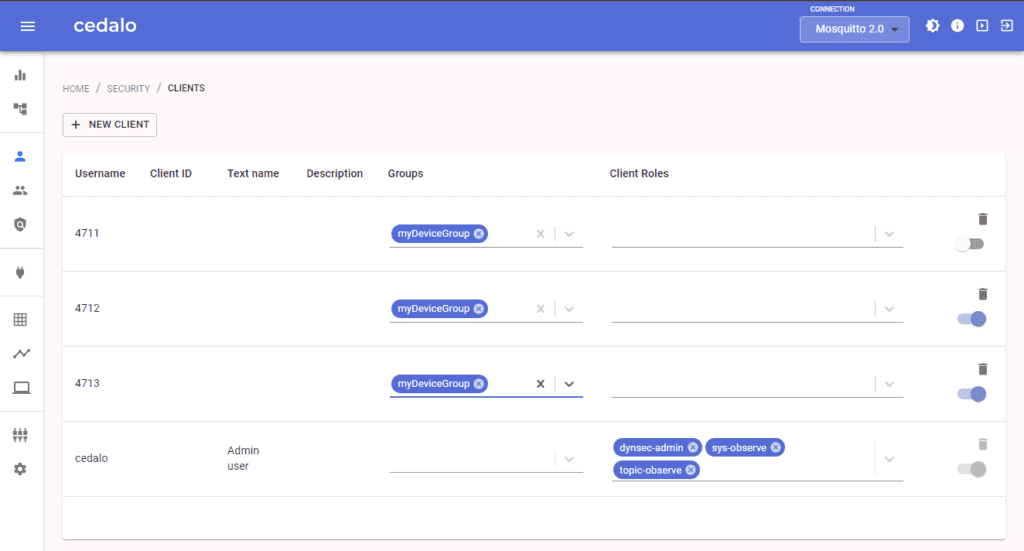
The picture above shows the three created clients (4711, 4712, 4713) and the set “myDevices” group.
Test the MQTT Mosquitto TLS example use case with the node-red MQTT client
You can use your favorite MQTT client implementation, but be aware that it has to support these functionalities:
- TLS connection → MQTTS
- Verify the broker certificate available on port 8883 (optional)
- Provide and use the client-specific certificate and key (4711.crt / 4711.key)
- TLS session resumption (optional)
Using node-red with the built-in MQTT client will fulfill the requirements. In addition to the testing shown in Step 3, you must upload the certificate and key to the client. The picture below shows the settings for the TLS server and client certificate.
If you successfully connected to the broker, this is what you will see in its logs (Mosquitto, in my case):
New client connected from 84.128.156.232:51039 as
nodered (p4, c1, k60, u'4711').
Client nodered_48a0fabfae75ff2b negotiated
TLSv1.3 cipher TLS_AES_256_GCM_SHA384
Where u'4711' denotes that the connected client has the username “4711” which, in that particular case, is derived from the client certificate.
In case if the above action wasn’t successful, the output would include the ‘verify failed’ statement:
OpenSSL Error: error:1417C086:SSL routines:tls_process_client_certificate:certificate verify failedIt denotes that the provided client certificate is not valid for our CA setup.
If successful, your client can now publish/subscribe to the client-specific topic ‘myDevices/4711/test’.
Wrap up
Securing data transfer between clients and an MQTT broker is mandatory, especially for public networks. To set up MQTT broker connections, TLS is the means of choice. In this article, I demonstrated how to enable TLS for MQTT on-premises. You can use the hosted version of Pro Edition for Eclipse Mosquitto to have this ready to use without taking care of reverse proxies or certificates (check out this blog post to learn how an MQTT connection works).
Additionally, for production-scaled sensor/client networks, you can use certificate-based authentication/authorization that is set up by manually creating certificates.
Ultimately, you have Docker containers on a virtual machine or your Windows PC. To go even further, consider configuring the reverse proxy started as a separate container. You should include this container in the docker-compose.yml file, where you can manage both Management Center and Mosquitto broker.


