
The demand for real-time communication has become critical in the evolving landscape of mobile applications. Whether it’s instant messaging, live updates, or sensor data streaming, the need for fast and efficient data exchange is undeniable. Here is where MQTT emerges as a powerful solution. MQTT’s efficiency lies in its minimal overhead and ability to handle unreliable networks. This is ideal for resource-constrained devices and ensuring low-latency communication in dynamic mobile application environments.
This guide shows how to exploit the capabilities of MQTT in Android development, using MQTT Paho libraries. By the end, you will have the knowledge and tools to integrate MQTT seamlessly into your Android projects.
Combining Mosquitto and Android
To demonstrate the integration between Android and Mosquitto, I will create a small Android application that enables testing basic MQTT functionalities, like publishing and subscribing.
The application will interact with an MQTT client (hosted by a PC) via the broker. The Mosquitto broker will act as an intermediary between the two clients, enabling them to exchange MQTT data by facilitating publishing and subscribing operations. Figure 1 below shows the setup of the project.
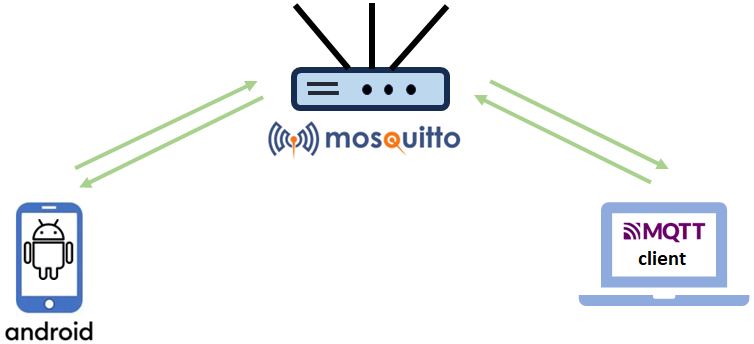
Figure 1 – Project setup: a Mosquitto Broker, an MQTT client, and the Android application.
The application consists of two different Android activities:
- The first allows the authentication process
- The second allows basic MQTT operations, like publish, subscribe, unsubscribe, and disconnect.
For this project, I will use the on-premises version of Pro Mosquitto broker, which will run on a Docker container - for which can find the setup guide details here.
If you’re looking to enable MQTT communication in cross-platform mobile apps for Android and iOS, refer to this React Native-Mosquitto integration article.
Mosquitto and Android: the project setup
The process of setting up the project environment will involve installing and running Android Studio and the Pro Mosquitto MQTT broker.
Getting Android Studio
Android Studio is the official and most used development environment for Android. It supports different programming languages such as Java, Kotlin, and C++. This project will utilize Kotlin, currently the preferred Google language for Android application development.
First, download and install Android Studio.
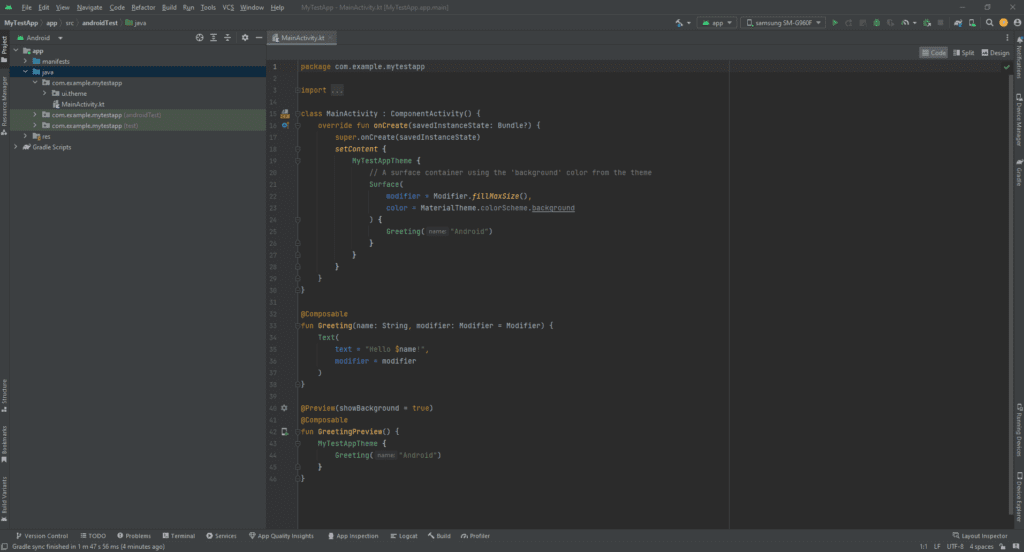
Figure 2 – The Android Studio IDE.
The graphical user interface design provides a view of the project resources on the left side, and the code editor for writing the Kotlin program in the center. In the top right corner of the interface is a debugging options bar with some relevant settings.
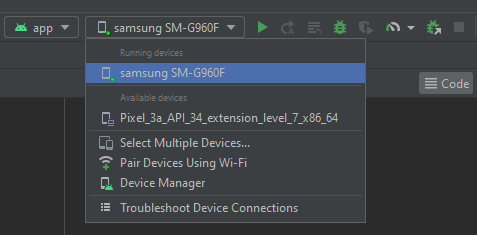
Figure 3 – Debugging menu bar.
Apart from the classical start/stop program execution and debugging buttons, Android Studio specifies a target hardware to test the application under development. The target hardware can be a physical Android phone or a virtual emulated device.
In the “Coding the Android application” section, I will show how to use Android Studio to create a new project and to utilize the debugging features.
Getting Mosquitto
To use the Pro Edition for Eclipse Mosquitto broker in your Android project, sign up for the Cedalo MQTT Platform trial. This trial gives you access to the Pro Mosquitto broker and the Management Center for Mosquitto™ web UI, offering a complete solution for managing and deploying MQTT brokers. The platform offers both cloud and on-premises options, enabling you to select the setup that best suits your project’s needs. If you want to know about the advantages of using the pro version, you can refer to this comparison.
In this article, I am working with the on-premises trial version as it gives complete control over the broker and makes it easy to tweak and test settings directly on your machine. It also unlocks access to advanced features such as HA (high availability) clustering, monitoring metrics, auditing, integrations with various databases etc.
The trial provides a preconfigured Docker-based single-node setup, perfect for experimenting with the broker in a local, self-contained environment. You can find additional setup instructions in the official documentation.
After signing up, you will receive a confirmation email containing a link to access the Cedalo MQTT Platform. The link will redirect you to the Platform’s homepage after logging in:
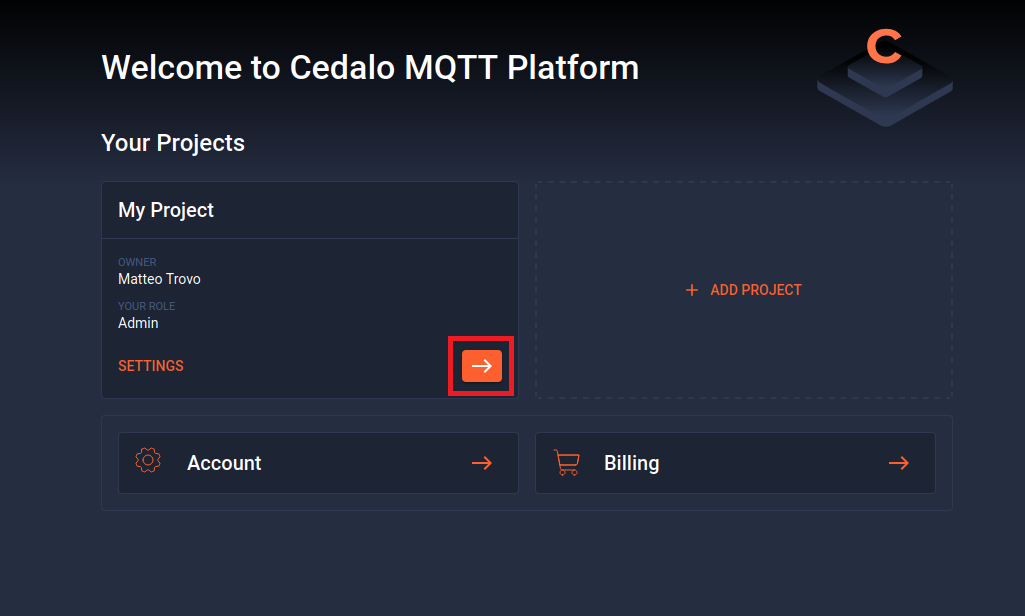
Figure 4 - Start screen of the Cedalo MQTT Platform.
At this point, you can either work with an existing project or set up a new one. To open the project, click the arrow icon highlighted in red in Figure 4. After that select the on-premises Pro Mosquitto Trial broker. Scroll down to the Download Area, where you can get your single-node setup by clicking the download button for the corresponding item, as shown in Figure 5.
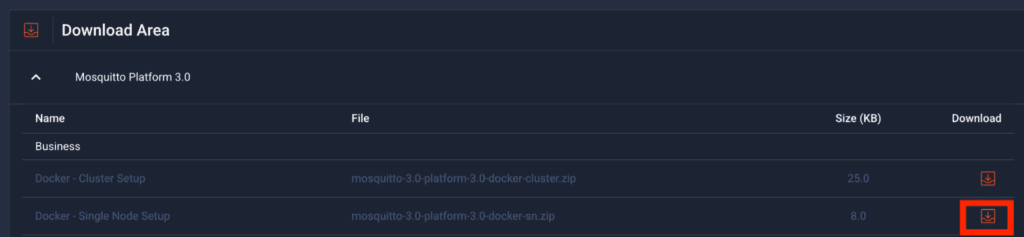
Figure 5 - Downloading docker single node setup.
After downloading the archive, you are ready to use the Pro Mosquitto broker with Docker. This comprehensive guide walks you through the setup instructions.
Configuring the Mosquitto MQTT broker
The Pro Mosquitto configuration is straightforward since it will only consist of a client creation. Access the Management Center for Mosquitto web UI by logging in through the Cedalo Platform at: http://localhost:8088/.
Click the client icon on the left bar to open the client configuration menu, then on the “New Client” button to open the client creation panel.
Next, create a client with the username “Android,” set the password to “android_pwd,” and click on save. Then set the specific role to “client.”
With the configuration now complete, the next chapter shows how to integrate MQTT into the Android application.
Coding the Android application
This tutorial assumes the user is familiar with Android development. Therefore, I will only provide details for parts of the application creation process. I will only show relevant snippets of the application code to help users get the MQTT integration running.
Starting with Android Studio, create a new project by selecting the “Empty Activity” template.
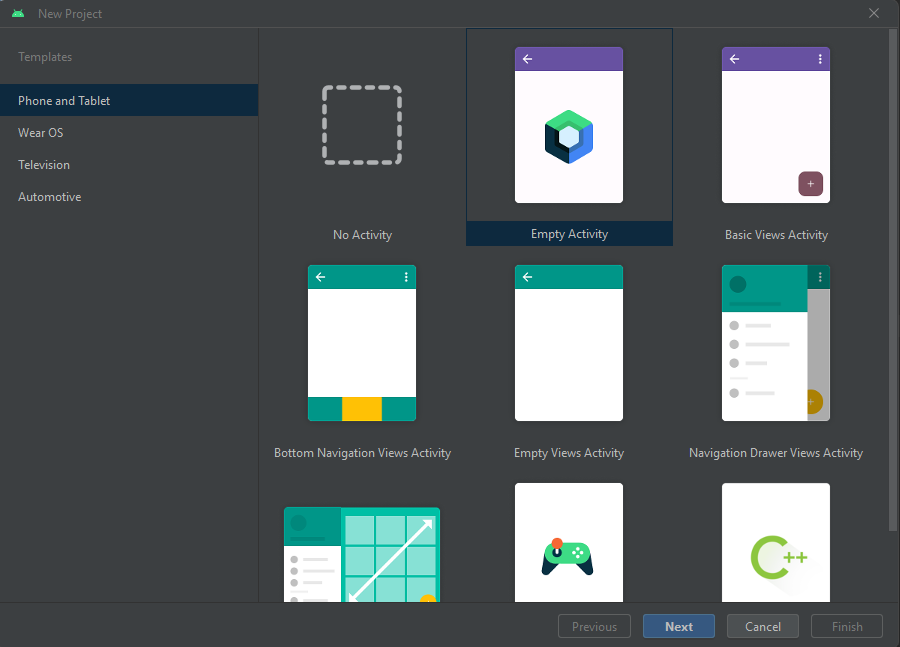
Figure 6 – New project creation.
The application will use two activities, the one already existing for user authentication and the second (to create) for the publishing and subscribing functionality.
This project uses the Paho Library, one of the most prominent MQTT libraries available for different platforms and languages.
Integrating the MQTT Libraries
Integrating the MQTT Paho libraries into Android Studio is a straightforward process. However, a short explanation can help execute this task without issues.
It’s also worth mentioning that this procedure is currently valid for Android Studio Giraffe 2022.3.1. The process can vary for older Android Studio versions, especially concerning the correct syntax for integrating repositories and packages.
First of all, it is necessary to add the following two dependencies into the project gradle file:
implementation("org.eclipse.paho:org.eclipse.paho.client.mqttv3:1.1.0")
implementation("org.eclipse.paho:org.eclipse.paho.android.service:1.1.1")
In the gradle settings (settings.gradle.kts), add a reference to the original repository:
dependencyResolutionManagement {
   repositoriesMode.set(RepositoriesMode.FAIL_ON_PROJECT_REPOS)
   repositories {
       google()
       mavenCentral()
       maven {url = uri("https://repo.eclipse.org/content/repositories/paho-releases/") }
Finally, update the AndroidManifest.xml file by adding the Paho library services,
<service android:name="org.eclipse.paho.android.service.MqttService"></service>and the required permission the application must have to allow the MQTT service to run:
<uses-permission android:name="android.permission.WAKE_LOCK" />
<uses-permission android:name="android.permission.ACCESS_NETWORK_STATE" />
<uses-permission android:name="android.permission.INTERNET" />
<uses-permission android:name="android.permission.READ_PHONE_STATE" />
After performing these steps, the Paho libraries integration is complete.
Start the MQTT communication: the connect function
After integrating the MQTT Paho library, let’s proceed with organizing the relevant code in different Kotlin functions.
It’s worth mentioning that the functions will use a globally defined MqttAndroidClient object with the name mqttClient, instantiated inside the connect function. This object will carry the MQTT client instantiation. The first function to implement is the mqttConnect, which performs the client connection toward the broker.
The function requires the broker address, the client username, and the client password as arguments. The username and password will be handled through a MqttConnectOptions object.
Finally, the connect method of the object mqttClient performs the connection. Two mqttClient methods are overridden, allowing the execution of some specific code based on the connection’s success or failure.
fun mqttConnect(applicationContext: Context, brokeraddr: String, clientuser: String, clientpwd: String) {
   // ClientId is a unique id used to identify a client
   val clientId = MqttClient.generateClientId()


   // Create an MqttAndroidClient instance
   mqttClient = MqttAndroidClient ( applicationContext, "tcp://$brokeraddr", clientId )


   // ConnectOption is used to specify username and password
   val connOptions = MqttConnectOptions()
   connOptions.userName = clientuser
   connOptions.password = clientpwd.toCharArray()


   try {
       // Perform connection
       mqttClient.connect(connOptions, null, object : IMqttActionListener {
           override fun onSuccess(asyncActionToken: IMqttToken)                        {
               // Add here code executed in case of successful connection
           }override fun onFailure(asyncActionToken: IMqttToken, exception: Throwable) {
               // Add here code executed in case of failed connection
               Log.d(“MqttClient”, “Connection failed”)
           }
       })
   } catch (e: MqttException) {
       // Get stack trace
       e.printStackTrace()
   }
}
Exchange data: MQTT Publish and Subscribe
Now that the application can connect, let’s take care of the publishing and subscribing functionalities. I will implement the following functions:
- Listener for received messages
- Subscribe
- Publish
- Unsubscribe
First, set up a listener for incoming messages. The mqttSetReceivedListener function allows configuring a callback that will be called every time a message is received over a subscribed topic. In my example, the callback will extract the payload of the received message and paste it into a textbox object.
fun mqttSetReceiveListener() {
   mqttClient.setCallback(object : MqttCallback {
       override fun connectionLost(cause: Throwable) {
           // Connection Lost
       }
       override fun messageArrived(topic: String, message: MqttMessage) {
            // A message has been received
            val data = String(message.payload, charset("UTF-8"))
            // Place the message into a specific TextBox object
            editTextRcvMsg.editText!!.setText(data)
       }
       override fun deliveryComplete(token: IMqttDeliveryToken) {
           // Delivery complete
       }
   })
}
After programming the listener, define the subscribe function mqttSubscribe. This function allows you to subscribe to a specific topic. Use the subscribe method of the mqttClient object to implement this functionality. The function will get the topic and quality of service as arguments.
fun mqttSubscribe(topic: String, qos: Int) {
   try {
       mqttClient.subscribe(topic, qos, null, object : IMqttActionListener {
           override fun onSuccess(asyncActionToken: IMqttToken) {
               // Successful subscribe
           }override fun onFailure(asyncActionToken: IMqttToken, exception: Throwable) {
               // Failed subscribe
           }
       })
   } catch (e: MqttException) {
       // Check error
   }
}
The next function to implement is the publish function, mqttPublish, which sends a message to a specific topic.
The arguments of this function are the message payload, the target topic, and the quality of service level. This function transforms the message string into the binary data and uses the publish method of the mqttClient to transmit this data to the broker.
fun mqttPublish(topic: String, msg: String, qos: Int) {
   try {
       val mqttMessage = MqttMessage(msg.toByteArray(charset("UTF-8")))
       mqttMessage.qos = qos
       mqttMessage.isRetained = false
       // Publish the message
       mqttClient.publish(topic, mqttMessage)
   } catch (e: Exception) {
       // Check exception
   }
}
As you can see from the code snippet, the isRetained flag is set to false. This means the broker will not store this message for delivery to new subscribers; instead, only currently connected subscribers will receive it. If you want to learn more about how retained messages work in MQTT, refer to the following article.
Lastly, implement the unsubscribe function. This allows you to remove a specific topic from the subscribed topic list. To unsubscribe from a topic, use the unsubscribe method of the mqttClient object.
fun mqttUnsubscribe(topic: String) {
   try {
       // Unsubscribe from topic
       mqttClient.unsubscribe(topic, null, object : IMqttActionListener {
           override fun onSuccess(asyncActionToken: IMqttToken) {
               // Successful unsubscribe
           }override fun onFailure(asyncActionToken: IMqttToken, exception: Throwable) {
               // Failed unsubscribe
           }
       })
   } catch (e: MqttException) {
       // Check exception
   }
}
Understanding QoS levels in MQTT
In the previous chapter, I used Kotlin’s subscribe() and publish() methods to exchange messages with the broker. You may have noticed that both methods accept a so-called Quality of Service (QoS) parameter, which directly influences the reliability of message delivery. This chapter examines this QoS setting and its impact on the communication between your Android app and the broker.
MQTT defines three Quality of Service levels:
- QoS 0 – At most once: The message is sent once without any confirmation. This means if the connection is disrupted, the message may be lost. This level is the fastest (most performant) because the broker doesn’t need to perform any additional work for each message. However, at the same time, it is the least reliable.
- QoS 1 – At least once: The broker ensures message delivery by repeatedly sending it to the client until it receives a confirmation. This means that if a confirmation is lost in transit, the client may receive the same message more than once. This level is a compromise between the reliability of the communication and the overhead associated with confirming each delivery.
- QoS 2 – Exactly once: This level guarantees that each message is always delivered a single time. It involves a more complex handshake process between the broker and the client, making it the most reliable but the slowest of the three.
When calling publish() or subscribe() in your Android code, you specify the QoS level depending on your reliability needs. Here are a few guidelines:
- Use QoS 0 for frequent, non-critical data such as environmental sensor readings.
- Use QoS 1 when you must receive messages, but duplicates are acceptable, for example when sending logging events.
- Use QoS 2 only for important actions or state updates sensitive to repetitions, such as triggering actuators or updating device configurations.
Balancing reliability and performance through the appropriate QoS setting helps ensure your Android MQTT client behaves predictably and efficiently.
Close the connection: the MQTT disconnect function
At this point, the application can connect, publish, subscribe and unsubscribe. However, the possibility of closing the connection is still missing. To achieve this, you need to include the disconnect function.
The Paho libraries offer a disconnect method for this purpose.
fun mqttDisconnect() {
   try {
       mqttClient.disconnect(null, object : IMqttActionListener {
           override fun onSuccess(asyncActionToken: IMqttToken) {
               //Successful disconnection
           }
           override fun onFailure(asyncActionToken: IMqttToken, exception: Throwable) {
               //Failed disconnection
           }
       })
   } catch (e: MqttException) {
       // Check exception
   }
}
Testing the Android application
With the Android application complete, I can proceed with testing the main functions described.
To begin testing, first ensure that Pro Mosquitto is running and that you configure the Android client. Next, start the Android application, select the test device, and click the play button (Figure 7). The smartphone will start the application.

Figure 7 – Start the application by clicking the play button (red square).
As shown in Figure 8, enter the broker address, username, and password on the Android application from the client creation process in Pro Mosquitto.
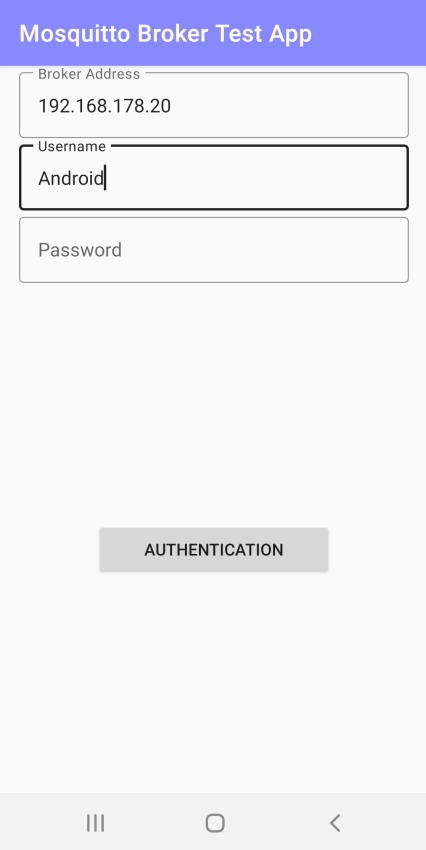
Figure 8 – The first application screen allows you to enter the broker address, username, and password.
After inserting the necessary information, click the Authentication button to connect to the Pro Mosquitto broker. The button click will trigger the mqttConnect function.
Upon a successful connection, the application will switch to the second activity, allowing the testing of the publish and subscribe functionality. To test the publish function for this scope, set up a receiving subscriber client on your local PC. The client application used is based on the MQTT.js library, which requires installation of Node.js.
In a Windows PowerShell, start the subscriber using the following command:
npx mqtt subscribe -h 192.168.178.20 -t /topic/test -u Android -P android_pwd
With the Publish button (mqttPublish function), you can publish the message from the application, specifying the topic and the message, as in Figure 9.
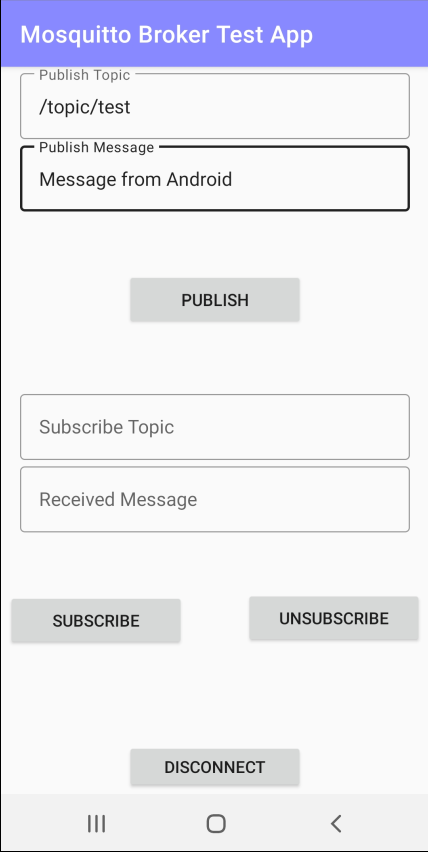
Figure 9 – Message publishing.
The subscriber client receives the message (Figure 10).

Figure 10 – The subscriber receives “Message from Android”.
After testing the publish operation, you can test the subscribe function.
Specify the topic and click on the subscribe button (mqttSubscribe function) to let the application subscribe to the topic. Then, perform a publish test from the PC using the command:
npx mqtt publish -h 192.168.178.20 -t /topic/test -u Android -P android_pwd -m Message from PC
The application will receive the message (Figure 11).
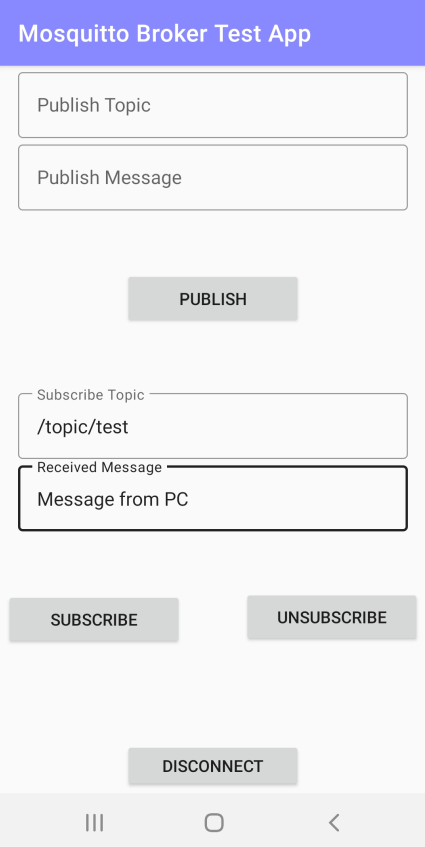
Figure 11 – The application receives the message “Message from PC”.
Finally, click the unsubscribe button to unsubscribe from the topic (mqttUnsubscribe function). This time, repeating the same publish command from the PC client will not cause the application to receive the message.
As a final step, you can close the connection by clicking the disconnect button (mqttDisconnect function).
Securing your Mosquitto MQTT-Android app
Now that your Android app can successfully publish and subscribe to MQTT topics, the next step is ensuring this communication is secure. This chapter outlines the steps required to protect your MQTT connection using TLS and enforce good security practices in your Android implementation.
Use TLS/SSL for encrypted communication
When you connect your Android app to an MQTT broker, it is important to protect the data that travels across the network. Unencrypted connections expose your messages to interception or tampering, especially on public Wi-Fi or mobile networks.
Transport Layer Security (TLS) is the current standard for encrypted communication. It replaced Secure Socket Layer (SSL), which is no longer considered safe. However, the terms “TLS” and “SSL” are used interchangeably.
With TLS enabled, your MQTT messages are encrypted, and the broker’s identity is verified using digital certificates. This protects against various common security threats, such as eavesdropping or man-in-the-middle attacks.
Pro Mosquitto supports TLS out of the box. Refer to the Pro Mosquitto TLS setup article to easily set up the broker for secure communication.
Follow the steps below to securely connect your Android app to an MQTT broker using TLS. This is particularly important for production environments:
1. Use a secure URI
Always use the ssl:// URI protocol prefix and a port for which TLS is enabled . The default TLS port for MQTT brokers is typically 8883:
val serverUri = "ssl://your.broker.com:8883"
val mqttClient = MqttAndroidClient(applicationContext
, serverUri, clientId)
2. Handle self-signed certificates
If your broker uses a certificate issued by a trusted Certificate Authority instead of a self-signed certificate, you can skip directly to step 3. Android will automatically trust the certificate using its built-in system trust store. However, if your broker does use a self-signed certificate, Android won’t trust it by default, in which case you must bundle the CA certificate with your app (e.g., place it in res/raw/my_ca.crt) and load it using the following code:
import java.security.cert.Certificate
import java.security.cert.CertificateFactory

...

val cf = CertificateFactory.getInstance("X.509")
val caInput = context.resources.openRawResource(R.raw.my_ca)
val ca: Certificate = caInput.use {
	cf.generateCertificate(it)
}
Then, create a custom TrustManager to trust this certificate:
import java.security.KeyStore
import java.security.SecureRandom
import javax.net.ssl.SSLContext
import javax.net.ssl.TrustManagerFactory

...
val keyStore = KeyStore.getInstance(KeyStore.getDefaultType()).apply {
	load(null, null)
	setCertificateEntry("ca", ca)
}

val tmf = TrustManagerFactory.getInstance(TrustManagerFactory.getDefaultAlgorithm()).apply {
	init(keyStore)
}

val sslContext = SSLContext.getInstance("TLS").apply {
	init(null, tmf.trustManagers, SecureRandom())
}

val sslSocketFactory = sslContext.socketFactory
3. Configure the socket
The MqttAndroidClient class used to represent our Android application as an MQTT client supports TLS settings via the socketFactory property. For custom certificates, use the SocketFactory instance (sslSocketFactory) created above. If you use a trusted certificate authority, omit socketFactory initialization.
val options = MqttConnectOptions().apply {
	socketFactory = sslSocketFactory
	// Optional:
	// userName = "yourUsername"
	// password = "yourPassword".toCharArray()
}

mqttClient.connect(options, null, object : IMqttActionListener {
	override fun onSuccess(asyncActionToken: IMqttToken?) {
    	Log.i("MQTT", "Connected successfully with TLS.")
	}

	override fun onFailure(asyncActionToken: IMqttToken?, exception: Throwable?) {
    	Log.e("MQTT", "Connection failed", exception)
	}
})
Best practices for Mosquitto MQTT app security on Android
Beyond enabling encryption, a few extra precautions help strengthen your application’s overall security:
- Enforce authentication: Always connect using a valid username and a strong password. Avoid anonymous access or weak default credentials.
- Protect credentials on the device: Never hardcode secrets in your app. Store them securely, for example, using
EncryptedSharedPreferencesor theAndroid Keystore. - Use unique client IDs: Avoid generic or repeated client identifiers. Generate unique IDs to prevent session collisions or hijacking.
- Restrict topic access: Define Access Control Lists (ACLs) on the broker to limit each client’s access to only the topics it needs.
- Handle reconnects carefully: Implement secure reconnect logic to avoid publishing sensitive data until you fully re-establish and authenticate the connection. Reconnections can be detected using the
MqttCallbackExtendedextension’sconnectCompletecallback, through the boolean flag “reconnect.” When the connection is offline, publish operations will either throw an exception/raise an error or be added to an offline buffer, depending on theDisconnectedBufferOptions. In such cases, it is theoretically possible that sensitive data ends up being logged or persisted to an unencrypted storage. To prevent this, avoid this situation entirely.
Handling MQTT events in code
In asynchronous systems such as MQTT, callbacks react to specific events without blocking the main thread. A particular event such as, a new message arriving, a connection failing, or a delivery completing, can tigger a callback function.
MqttCallback: Connection state and message flow events
Earlier in the setup, I assigned a callback to handle incoming messages. This callback is part of the MqttCallback class, which lets you monitor the MQTT connection’s ongoing state and message-related events.
The MqttCallback interface includes three core methods:
connectionLost(cause - Throwable): Invoked when the connection to the broker is unexpectedly lost.messageArrived(topic - String, message - MqttMessage): Called whenever a new message is received on a subscribed topic.deliveryComplete(token -IMqttDeliveryToken): Called when a delivery of a message to the broker completes.
mqttClient.setCallback(object : MqttCallback {
	override fun connectionLost(cause: Throwable) {
    	Log.e("MQTT", "Connection lost", cause)
    	// Reconnection will be handled separately
	}

	override fun messageArrived(topic: String, message: MqttMessage) {
    	Log.d("MQTT", "Message received: $topic -> ${message.toString()}")
	}

	override fun deliveryComplete(token: IMqttDeliveryToken?) {
    	if (token?.exception != null) {
        	Log.e("MQTT", "Message delivery failed", token.exception)
    	} else {
        	Log.d("MQTT", "Message delivered successfully")
    	}
	}
})
IMqttActionListener: Per-operation callbacks
In contrast, the IMqttActionListener object provides callbacks to handle the result of a specific MQTT operation, such as connecting, subscribing, or publishing.
For example, when initiating a connection, you can use IMqttActionListener to react to success or failure:
try {
	mqttClient.connect(connOptions, null, object : IMqttActionListener {
    	override fun onSuccess(asyncActionToken: IMqttToken) {
        	Log.d("MQTT", "Successfully connected to broker")
    	}

    	override fun onFailure(asyncActionToken: IMqttToken, exception: Throwable) {
        	Log.e("MQTT", "Failed to connect to broker", exception)
    	}
	})
} catch (e: MqttException) {
	Log.e("MQTT", "Exception while attempting connection", e)
}
These callbacks are transient and are passed directly to method calls. This means that such callbacks are only active for the duration of the connect() call. You can use similar listener objects to set up callbacks for other methods such as subscribe() and publish().
Reconnecting to the MQTT broker
To ensure your app recovers gracefully from unexpected network disruptions, you need to enable automatic reconnection when creating your MQTT connection options. This is done via the isAutomaticReconnect attribute as shown below:
...
val connOptions = MqttConnectOptions()
connOptions.userName = clientuser
connOptions.password = clientpwd.toCharArray()
connOptions.isAutomaticReconnect = true;
...
With this setup, the client will automatically attempt to reconnect to the broker when a connection is lost. You can use the connectionLost() callback to log the event or notify the user. At the same time, you can utilize the messageArrived() and deliveryComplete() methods to ensure that the message flow continues smoothly once restoring the connection.
Debugging and troubleshooting the Mosquitto MQTT-Android app
Even with a correct MQTT implementation, issues from authentication problems to silent message loss can still arise at runtime. This chapter focuses on essential tools and strategies to help you quickly identify and resolve such problems in your Android MQTT application.
Logcat filtering for the Mosquitto Android app
Logcat is one of the most powerful tools available for debugging Android applications. It provides a live stream of system and application logs, allowing you to monitor internal events as they happen.
For MQTT development, Logcat provides you with a centralized place for tracing logs generated by your application. You would then typically program your application to log connection attempts, callback triggers, and failures (and/or successes) to Logcat when publishing, subscribing, or reconnecting.
You can generate logs in your Android app using the Log class at every place in the code that you want to be able to observe. The Log class provides different methods for various log levels:
Log.v()– Verbose (lowest log level, used to log extremely detailed low-level information)Log.d()– Debug (useful for development)Log.i()– Info (general runtime information)Log.w()– Warning (potential issues)Log.e()– Error (severe problems)
Note: Both verbose and debug log statements should be removed in production builds, as they are not meant to be exposed to the end users. They simply unnecessarily spend CPU cycles when executed in production and may potentially expose sensitive system information.
As an example of using LogCat’s logging functions, when connecting to the MQTT broker, you might have a log statement such as:
Log.d("MQTT", "Connecting to broker...")The first parameter in each log function is the tag, which acts as a filter label. The second parameter is the actual message.
In the example above, “MQTT” is the tag. Consistent tags like this make identifying and filtering specific logs in the output easier. When debugging, you can instruct the log system (by tools or filters) to only show entries with that tag, helping you isolate logs related to a specific component or feature.
Below is a complete example of using Logcat when connecting to a broker. First, add the “Connecting to broker…” log message from above, before invoking the connect() method. Then, add additional logs into the onSuccess and onFailure callbacks that connect() accepts, as shown in the following code snippet.
Log.d("MQTT", "Connecting to broker...")
// Perform connection
mqttClient.connect(connOptions, null, object : IMqttActionListener {
   override fun onSuccess(asyncActionToken: IMqttToken)
   {
       Log.d("MQTT", "Successfully connected to the broker.")
   }override fun onFailure(asyncActionToken: IMqttToken, exception: Throwable) {
       Log.e("MQTT", "Connection to the broker failed.")
   }
})
Now, open Logcat from the bottom panel in Android Studio.
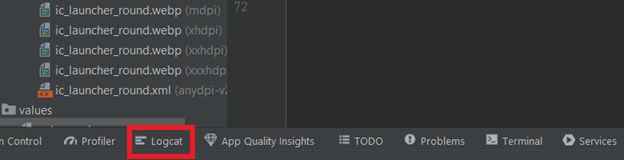
Figure 12 - Button to access Logcat in the Android Studio.
Then, type the custom tag (i.e., “MQTT”) in the search bar to only display the relevant entries. Once the application starts and connects to the broker, you can visualize the following logs, proving that LogCat is correctly receiving our application’s logs:
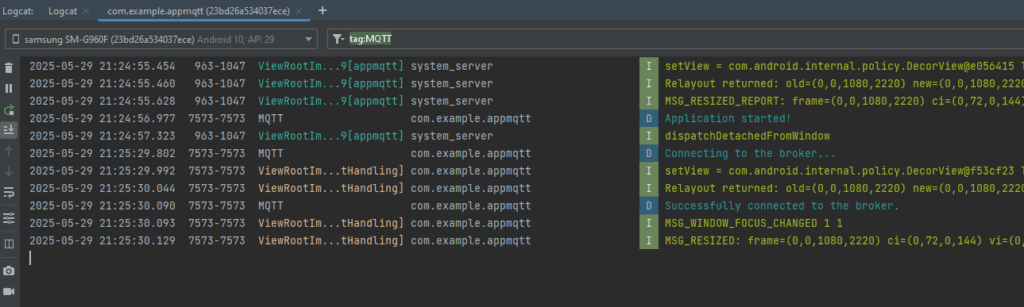
Figure 13 - Logcat logs.
Once LogCat is active and you have log statements in all the appropriate places, you can follow the full lifecycle of your MQTT client: connecting, reconnecting, subscribing, publishing, and receiving messages.
If something fails, for example, a message isn’t delivered or a connection is dropped, you will often find a corresponding log entry that might give you a hint about the problem. This can help you quickly determine whether the issue lies in your app’s logic, network connectivity, or broker configuration.
MQTT broker logs for the Mosquitto Android app
While Logcat shows the client-side picture, broker logs reveal what is happening on the server. If you use the Pro Mosquitto broker, its logs are useful for tracking down failed connections, rejected credentials, or configuration mismatches. When a client connection is refused, the broker might log reasons such as “Not authorized” or “TLS handshake failed.” You might also find details about Access Control List (ACL) violations or listener errors. These insights are often crucial for resolving problems that are invisible from the client side alone. You can refer to this guide to understand how to configure and analyze Mosquitto logs.
A notable thing to pay attention to when setting up your broker logs is the log level. Remember to strike a balance between the usefulness and the amount of logs being generated. Lower log levels such as “debug” generate much more log records, so blindly setting your log level to “debug” may lead to broker performance issues and fill up your server storage quickly.
Diagnosing common Mosquitto Android app issues
| Issue | Symptoms | Checklist |
|---|---|---|
| Authentication errors | Connection refusal or termination. | – Are you using the correct username and password? – Are credentials passed correctly in MqttConnectOptions? – Does the client account you are using to connect to the broker have sufficient access rights to the target topic? – Does the client account require a specific client ID to be set? Check ACL on the broker (dynamic security plugin). – Does the broker require a client certificate (i.e. mTLS is used with ‘require_certificate true’ flag in mosquitto.conf)? |
| Message loss | Messages never reach the subscriber. | – Do the publisher and subscriber use the exact topic string? – Was the message published during a reconnection gap? – Again, check whether the client account has sufficient rights to publish on the target topic. – Are you using QoS 0 where a higher QoS is needed (for example, in an environment with unstable network conditions)? – If a subscriber has been reconnected, were subscriptions restored (which would be the case when using persistent sessions)? |
Conclusion
By connecting to Mosquitto broker using the described MQTT integration code, you can achieve real-time MQTT communication in our Android application.
The combination of MQTT Paho libraries and Mosquitto establishes a robust foundation for scalable Android applications, whether you are delving into IoT or enhancing real-time communication features. Your Android app is now part of the ever-expanding network of smart, responsive, and connected applications. This integration transforms your app and opens doors for further innovation in mobile connectivity.
With the help of this guide, you can:
- Develop an Android application with MQTT capabilities using Kotlin and Android Studio.
- Implement secure communication channels with TLS for encryption and server identity verification.
- Handle MQTT events via appropriate callback methods.
- Troubleshoot common issues using tools like Logcat and broker logs.
With these skills, you can start building responsive Android applications that leverage the power of MQTT. Simply sign up for the Cedalo MQTT Platform trial to access to the Pro Edition for Eclipse Mosquitto broker and the Management Center for Mosquitto™ web UI for your Android project.
Possible extensions
Once your basic MQTT setup is working, you can enhance your project with new capabilities:
- Integrate with cloud platforms like Firebase for cloud-based messaging, analytics, and authentication.
- Connect to home automation platforms like Home Assistant or openHAB using MQTT as a transport layer.
- Send data to IoT platforms to visualize or process telemetry from mobile or embedded devices.
Further resources
To dive deeper into MQTT and Android development, consider exploring the following official resources:
- Eclipse Paho Android Library GitHub Repository
- How to make your first Android application in Kotlin
- Open source Mosquitto documentation
- Pro Mosquitto documentation
These resources can help you go beyond the basics and build secure, scalable MQTT applications for Android.


