
Picture getting back home from a vacation. What would cheer you up after a long road trip? A cup of freshly brewed coffee! And you can have it ready and waiting as soon as you open the entrance door. For this, you simply launch your coffee maker using a smart home app. It takes just a few clicks to make it happen and have a cup ready upon your arrival. However, underneath this lies a complex MQTT publish-subscribe communication between your smartphone and the coffee maker in your smart home system.
The same principle applies to other Internet of Things (IoTs) devices such as security systems, factory equipment, wearable health monitors, etc. What does this look like? I’ll explain it in this article. So, buckle up to learn about the MQTT publish-subscribe model and how remote IoT devices use it to exchange information.
MQTT publish-subscribe model explained
All in all, the concept of the MQTT publish-subscribe pattern, or simply MQTT pub-sub, consists of three parties:
- Publisher - a client (device) that posts information on a self-chosen topic.
- MQTT broker - a party that receives packets from publishers, checks for settings, and then forwards them to subscribers. Learn more about all the steps the broker must complete.
- Subscriber - a client (device) that is interested in the information on a certain topic.
At first glance, everything looks clear since one client publishes, and the other client receives. However, the publisher does not send information directly to the subscriber. 😳
In MQTT, clients talk to each other through an MQTT broker, which you can learn about in the MQTT client and broker connection blog.

So, referring back to the coffee maker example, the MQTT communication looks as follows:
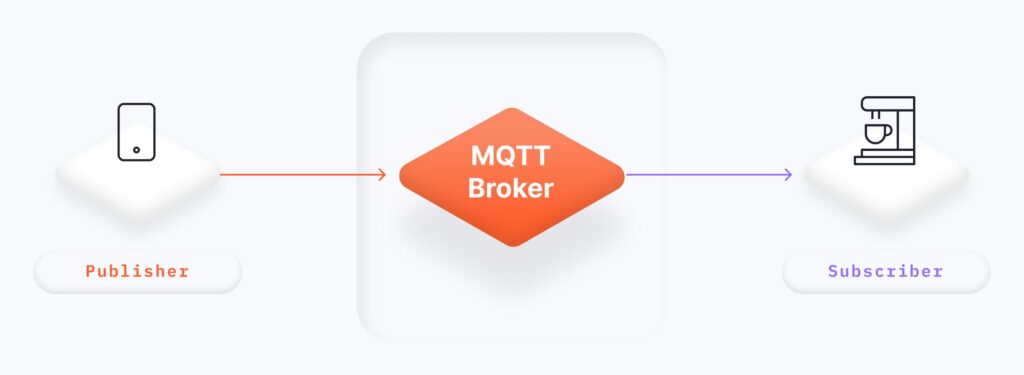
MQTT client: Smartphone (publisher) -> MQTT broker -> MQTT client: Coffee maker (subscriber)
At the same time, your smartphone can act as a subscriber by receiving temperature data from sensors in your home. In this case, the MQTT pub-sub connection looks as follows:
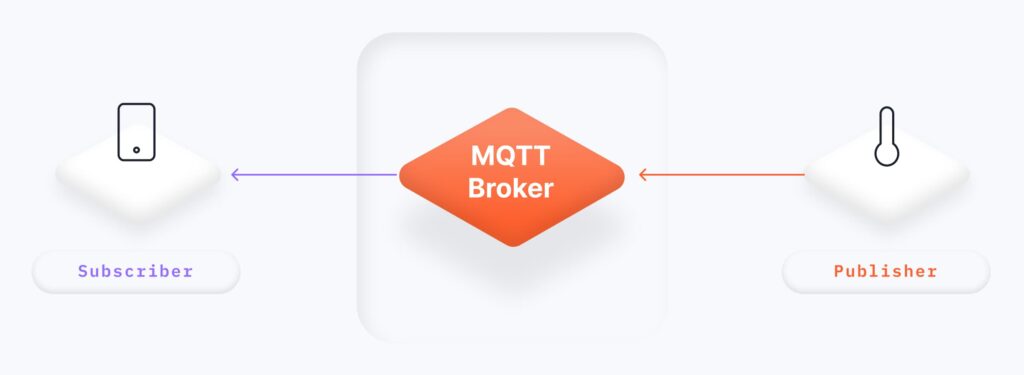
MQTT client: Smartphone (subscriber) -> MQTT broker -> MQTT client: Temperature sensor (publisher)
An IoT system usually contains multiple devices, but how do you know which one is a publisher or subscriber? This is where the MQTT broker comes into play.
MQTT pub-sub message flow
A publisher sends notifications (also called MQTT messages) on a specific topic to an MQTT broker, which forwards them to a client or clients subscribed to that topic. Each topic can only have one publisher but multiple subscribers.
What are MQTT topics?
Now, let’s delve into MQTT topics. These are essentially strings, with the caveat that only UTF-8 characters are allowed, excluding certain characters like <, >, and $. MQTT topics play a crucial role as they enable the MQTT broker to identify the appropriate publishers and subscribers for message transmission.
- The client wanting to send messages publishes them on a specific topic.
- The client subscribes to a certain topic and starts receiving messages published on it.
MQTT topics can consist of one or several levels, each separated by a forward slash. For example:
myhome/kitchen/coffeemaker
myhome/kitchen/sensor/temperature
MQTT topics prerequisites
- An MQTT topic must contain at least one character.
- An MQTT topic is case-sensitive, meaning
myhome/kitchen/coffeemakerandmyhome/Kitchen/Coffeemakerare different topics. - Clients can use wildcards (special characters) in an MQTT topic to subscribe to multiple MQTT topics, which I’ll discuss in more detail later.
To learn more about MQTT topics and wildcards, check out this guide.
What are MQTT messages?
An MQTT message is the data sent from the publisher and received by the subscriber. The MQTT message format can be:
- Fixed header. E.g.,
CONNACK - Fixed header and variable header. E.g.,
PUBACK - Fixed header, variable header, and payload. E.g.,
PUBLISH
Note: The fixed header consists of two fields: the control field and the variable length message field. I won’t focus on this, but for information on the MQTT protocol message structure, check out this Understanding an MQTT Packet guide.
But what happens when a publisher sends a message to a topic with no subscribing clients? In the MQTT pub-sub model, the MQTT broker is responsible for resolving this matter. Let’s take a closer look at how the broker handles this.
MQTT broker in MQTT publish and subscribe model
The MQTT broker is a hub for communication between clients. It obtains messages from publishers and distributes them to clients based on the topics to which they are subscribed. This keeps the workload in balance and maintains the linear growth of the connection count if the number of clients increases.
However, when choosing an MQTT broker, it’s not the number of clients you should consider but the traffic load, e.g., the volume of data the clients send per second. A hundred clients sending messages with large data (Payload) every few seconds would create a larger workload than a thousand clients sending smaller messages every minute.
The Mosquitto™ MQTT broker is the most downloadable and efficient broker worldwide. With it, you can set up MQTT communication between apps, sensors, and versatile devices. The open-source version of the Mosquitto broker is also a good choice for pet projects.
For commercial purposes, it’s better to use an even more reliable and secure version of this popular MQTT broker – Pro Edition for Mosquitto. It embodies the best you can get with Mosquitto, plus MQTT High Availability, optimized performance, multiple MQTT integrations (with InfluxDB, Google pub/sub, MongoDB, Kafka, etc.), the Audit Trail logging feature, Persistent Queueing, Kubernetes deployment and OpenShift deployment possibilities, powerful MQTT broker management center interface, etc.
I’ll use Mosquitto open-source below to demonstrate the MQTT publish and subscribe examples.
However, if you’re interested in exploring the advanced features of the Pro Edition, you can easily do so by signing up for a free Cedalo MQTT Platform trial. This allows you to experience the benefits of the Pro Edition without any commitment.
Now, let’s see MQTT pub-sub in action.
MQTT subscribe to a topic
I will start with subscription since the MQTT broker must forward messages to clients that are subscribed to a topic or topics. To establish an MQTT connection between a client (both subscriber and publisher) and a broker, the client sends a CONNECT request and receives a CONNACK response packet. The MQTT Connection Beginners Guide covers this in more detail.

Once establishing the connection, the client sends the broker a MQTT SUBSCRIBE packet with the topics of interest. The packet contains two fields:
packetId- Unique packet identifier set by the client library and the MQTT broker.subscription- a topic and a Quality of Service (QoS) level to subscribe to. The MQTTSUBSCRIBEpacket can include multiple subscriptions.
For more information into the essence of MQTT packets, check out this article here.
MQTT subscribe example
The table below shows the packet data for the MQTT subscribe example:
| Field | Value |
|---|---|
| packetID | 0014 |
| qos1 | 0 |
| topic 1 | kitchen/sensor/temperature |
| qos2 | 1 |
| topic 2 | kitchen/sensor/humidity |
| qos3 | 2 |
| topic 3 | kitchen/coffeemaker |
MQTT Quality of Service for messages
The pub-sub message delivery process in MQTT has three Quality of Service (QoS) levels:
- QoS 0 - the default quality of service level that does not guarantee the delivery of the message. The publisher sends the message to the MQTT broker no more than once, and the broker does not acknowledge receipt. Use this level if you can accept message loss.
- QoS 1 - the quality of service level that guarantees the delivery of the message. The publisher sends the message more than once until the MQTT broker acknowledges receipt. Use this level when the message must be delivered and you don’t have a problem with the subscriber receiving the message more than once.
- QoS 2 - the quality of service level that guarantees message delivery exactly once. The publisher sends and stores the message until a double handshake between the sender and receiver has been accomplished to acknowledge receipt. You can use this level when the message must be processed without duplicating.
MQTT subscribe wildcards
In Mosquitto, two wild cards are available to enable the client’s subscription to multiple MQTT topics:
+(plus sign) - to match a single level of hierarchy.#(number sign) - to match all hierarchy levels.
+/sensor/temperature| Supports | Does not support |
|---|---|
| kitchen/sensor/temperature | kitchen/sensor/humidity |
| bathroom/sensor/temperature | kitchen/coffeemaker |
| bedroom/sensor/temperature | kitchen/sensor/temperature/backup |
kitchen/#| Supports | Does not support |
|---|---|
| kitchen/sensor/temperature | bathroom/sensor/humidity |
| kitchen/sensor/humidity | bedroom/sensor/temperature |
| kitchen/coffeemaker |
You can only use MQTT Wildcards for topic filters; hence, they are meant for subscribing to topics, not publishing messages.
MQTT subscribe - successful or not?
Since the MQTT broker is the first recipient of the published message, it acknowledges the SUBSCRIBE packets by responding with a SUBACK packet to the subscriber. The SUBACK packet contains the packetId and return codes:
- 0 - Success-Maximum for QoS 0
- 1 - Success-Maximum for QoS 1
- 2 - Success-Maximum for QoS 2
- 128 - Failure
MQTT SUBACK packet example
| Field | Value |
|---|---|
| packetID | 0014 |
| returnCode1 | 128 |
| returnCode2 | 2 |
| returnCode3 | 3 |
If the subscription is successful, the MQTT broker will forward the published messages to the clients subscribed to the topic.
MQTT unsubscribe from a topic
To unsubscribe from one or multiple topics, a client sends the UNSUBSCRIBE packet that contains a packetId and a list of topics.
MQTT unsubscribe example
| Field | Value |
|---|---|
| packetID | 0014 |
| topic 4 | kitchen/sensor/temperature |
| topic 4 | kitchen/sensor/humidity |
| topic 2 | kitchen/coffeemaker |
Now that the clients are subscribing to the desired topics, you’ll be able to publish messages to the MQTT broker.
MQTT publish a message
Before proceeding, it’s important to recognize the flexibility of bidirectional publishing, where publishers can also act as subscribers, and vice versa. This means a subscriber can also be a publisher for another topic. In the coffeemaker example, your mobile app acts as a publishing client that sends a message to the coffeemaker. The coffeemaker, in turn, becomes a publisher when it sends a message to notify that your coffee is ready. This flexibility empowers developers to design dynamic communication setups.
Again, the information exchange between a publishing client and the MQTT broker starts with the connection. Once it’s successful, the publisher can send messages to the broker, which forwards messages to the clients subscribed to the message topic. For this, the client sends an MQTT PUBLISH packet with the following values:
packetId- Unique packet identifier that is set by the client library and the MQTT broker.topicName- the topic string.qos- the quality of service level for message delivery.retainFlag- if true, then the message will be retained. This makes sense when a subscribed device, for example, a car door sensor, cannot wait until the next message is published. To learn more about these messages, check out the MQTT retained messages guide.payload- encryption of application-specific data on the application level (a message).dupFlag- if true, then the message duplicate is resent.
MQTT publish example
Here is what the MQTT PUBLISH example packet looks like in real life.
| Field | Value |
|---|---|
| packetID | 0014 |
| topicName | kitchen/coffeemaker |
| qos | 2 |
| retainFlag | false |
| Payload | Hello, this is a message. |
| dupFlag | false |
MQTT publish acknowledgement
Different QoS levels have different acknowledgement mechanisms. For QoS 0, the MQTT broker forwards the published message to the subscribers without receiving any acknowledgement from them. This is why QoS 0 is often called ‘fire and forget.’
QoS 1 publish acknowledgement
For messages with QoS 1, subscribers send a publish acknowledge packet (PUBACK). If they do not send the acknowledgement, the MQTT broker continues to send MQTT PUBLISH packets with the dupFlag parameter set to TRUE.
QoS 2 publish acknowledgement
For the highest level of MQTT QoS, the publish acknowledgment is slightly trickier. Once the subscriber receives the published message, it replies with a PUBREC packet. Until the MQTT broker receives the PUBREC, it keeps sending PUBLISH packets with the dupFlag parameter set to TRUE.
Simultaneously, once the broker receives the PUBREC and forwards it to the publisher, the latter responds with a PUBREL packet. Again, the broker receives the PUBREL and forwards it to the subscriber, which replies with another packet - PUBCOMP. With the receipt of the PUBCOMP packet by the publisher, the packet ID becomes available for reuse.
Can the MQTT publisher know whether the published topic has subscribers?
In older versions of the MQTT messaging protocol (up to MQTT v5), the client was never aware of the subscribers to the published messages. However, MQTT v5 enables this for QoS levels 1 and 2. The MQTT broker sends a PUBACK or PUBREC packet indicating no subscribers.
Exploring Mosquitto sub and pub client capabilities
Now, let’s explore the options you can use with the simple client utilities that you get within the Mosquito package:
mosquitto_pub- to publish a single message on a topic.mosquitto_sub- to subscribe to topics.
These tools are straightforward to use and are particularly useful for testing clients’ publishing and subscribing functionalities. The following sections delve into the details and provide practical examples of how they function.
Connection and authentication
The following options applies to both clients:
-h/--host: Specifies the broker hostname (e.g.,-hlocalhost).-p: Specifies the port number to use for the connection. The default port is1883for unencrypted connections and8883for encrypted connections. Additionally, Pro Mosquitto uses8090for unencrypted WebSocket connections.-u/-P: Provides username/password for authentication.-i: Assigns a client ID for session management.-L: Specifies a complete MQTT broker URL in a single argument, instead of separately providing host, port, and protocol options. This makes it easier to connect to brokers using different protocols (such as mqtt, mqtts, ws, or wss) and simplifies the command syntax. The URL format is as follows:mqtt(s)://[username@]host/topic. For example:mqtt://myclient:secretpassword@localhost:1883/my_topic.-c: Disables the clean session flag, allowing for persistent sessions. The broker will store subscriptions and messages for the client even when it disconnects.-A: Binds the outgoing connection to a specific local IP address or hostname. When the client connects to an MQTT broker, it uses the specified IP address or hostname as the connection source.-x: Sets the session expiry interval (ranges from 0-4294967294 seconds) for MQTT v5 clients.
Message Handling
Publishing (mosquitto_pub)
-t: Specifies the topic for publishing (e.g., -t “sensors/temp”).-m: Publishes a single message (e.g., -m “22.5”).-f: Allows you to publish the contents of a file as your message payload. Instead of typing the message inline, just point to a file:-f filename.txt. This is especially useful when you want to send large payloads, JSON configs, or binary data—as there’s no need to paste it into the terminal.-r: Sets the retain flag for the message. When set, the broker stores the message and sends it to new subscribers when they connect.-n: Sends a null message, which is useful for clearing a retained message on a topic.--repeat: Repeats publication N times (e.g., —repeat 5).
Subscribing (mosquitto_sub)
-t: Subscribes to topics, supporting wildcards (e.g., -t “building/#”).-C: Exits after receiving N messages.-N: Hides message payloads (prints topics only).-R: Displays only retained messages.-v: Prints topics before messages.
Advanced features
The following applies to both mosquitto_pub and mosquitto_sub clients:
-q: Sets the QoS level (0, 1, or 2) for message delivery guarantees.-d: Enables debug mode, which outputs detailed debug information to the terminal while running the command. It helps you troubleshoot and diagnose issues by showing additional logs about the MQTT connection and message publishing process.-V: Specifies the MQTT protocol version to use (e.g., mqttv5, mqttv311, or mqttv31). Defaults to mqttv311.--will-*: Configures Last Will messages for unexpected disconnects.-D: MQTT version 5 introduces this option, letting you add extra information—called “properties”—to your MQTT messages. Allows you to attach metadata to your messages for more advanced communication.--will-topic: Specifies the topic on which to send a Last Will and Testament (LWT) message if the client disconnects unexpectedly.--will-qos: Sets the Quality of Service (QoS) level for the “Last Will and Testament” message.--will-payload: Specifies the message content (payload) that the broker stores and sends out if the client disconnects unexpectedly.--will-retain: Setting this option will treat the “Last Will and Testament” message as a retained message.
Security
Both mosquitto_pub and mosquitto_sub clients use the following security options:
--cafile/--cert/--key: Configures TLS/SSL certificates for encryption.--insecure: Disables certificate validation.--proxy: Routes traffic via SOCKS5 proxy.--cafile <file>: Specifies a PEM-encoded CA certificate file to trust for broker certificate validation.--capath <directory>: Defines a directory containing PEM-encoded CA certificates for broker validation.--cert <file>: Path to the client’s PEM-encoded certificate file.--key <file>: Path to the client’s private key file.--tls-version <version>: Sets the minimum TLS protocol version (tlsv1.3, tlsv1.2, or tlsv1.1). Default: tlsv1.2.--ciphers <cipher-list>: Configures the allowed cipher suites for encrypted connections using TLS v1.2 and earlier.
Tool-specific features
You can establish an encrypted connection using the client options described earlier. However, the following are exclusive features for each client.
mosquitto_pub exclusives:
-l: Reads messages from stdin line-by-line.-s: Reads stdin as a single message.
mosquitto_sub exclusives:
-T: Filters out specified topics.--pretty: Formats output for readability.
Besides the specific settings for TLS (certificates and keys) you have to consider the TCP port used. By default, MQTT uses port 8883 for secure TCP connections. It is not necessary to specify the port number when usingTLS options with the Mosquitto clients.
If you provide TLS-related options like, --cafile or --capath, and omit the -p option, mosquitto_pub or mosquitto_sub assumes you want to connect securely and automatically default to port 8883.
The following example shows how to publish a value using an Authority Certificate, a Client Certificate, and a Private Key in a TLS connection. In this case, there is no need to use a username and password since the client certificate (CN field of the certificate) serves as the username for authentication.
mosquitto_pub -t "home/temperature" -m "22.5" \
  --cafile /path/to/ca.crt \
  --cert /path/to/client.crt \
  --key /path/to/client.key
This type of communication provides a high level of security and is recommended for production environments. Remember to create different keys and certificates for each device that connects to the broker.
mosquitto_pub and mosquitto_sub use cases
Let’s examine a second (more common) use case using a home automation system. More specifically, by publishing and subscribing to data using the mosquitto_pub and mosquitto_sub tools.
Retained Flag (-r)
Scenario: Automating a smart thermostat with temperature readings.
Use Case: Publish temperature readings from a sensor to the topic home/temperature with the retain flag enabled. This ensures that new subscribers (e.g., Home Assistant or other devices) always receive the latest temperature reading upon connection:
mosquitto_pub -h broker_address -t home/temperature -m "22" -rExplanation: The retain flag stores the message on the broker, so any new device subscribing to home/temperature will immediately receive the last retained value.
Null Message (-n)
Scenario: Clearing retained messages for a smart thermostat.
Use Case: If you no longer need a retained message on home/temperature, send a null message to clear it:
mosquitto_pub -h broker_address -t home/lights/temperature -nExplanation: This removes the retained message, preventing the broker from sending outdated states to new subscribers.
Persistent Sessions (-c)
Scenario: Maintaining session state for sending notifications in a security system.
Use Case: Disable clean session so that subscriptions and messages persist even if the client disconnects temporarily. Imagine a front door camera that detects human activity and sends notifications. You want to receive those notifications on a remote device, like an alarm panel or a cell phone. If the remote device loses connection, you’ll get the last messages immediately as it reconnects:
mosquitto_sub -h broker_address -t home/door/humandetection -cExplanation: This ensures that missed messages during disconnection are delivered once the client reconnects. This option is ideal for unreliable networks.
Last Will and Testament (—will-topic, —will-qos, —will-retain)
Scenario: Handling unexpected disconnections for critical devices (e.g., security cameras).
Use Case: Set up an LWT message to notify when a camera unexpectedly goes offline:
mosquitto_pub --will-topic home/security/camera/status --will-qos 1 --will-retain \

-h broker_address -t home/security/camera/status --wil-payload "OFFLINE"Explanation: If the client disconnects unexpectedly, the broker publishes the LWT message (e.g., "OFFLINE") to alert subscribers. LWT is an important feature for many scenarios.
For example, a camera loses connection during a transmission due to a power failure or even vandalism. The subscribers of the security system will receive this notification to take action or verify the incident. This particular case utilizes all available testament and last will options. Let’s analyze each of them:
--will-topic home/security/camera/status: Specifies the topic where the broker will publish the LWT message if the client disconnects unexpectedly. In this case, the topic ishome/security/camera/status.--will-qos 1: Sets the QoS level for the LWT message. QoS 1 ensures that message delivery at least once, providing a balance between reliability and performance.--will-retain: Indicates the LWT message should be retained on the broker. This ensures that any new subscribers to the topic will immediately receive the retained LWT message (e.g.,"OFFLINE"if the client disconnects).—-will-payload: The payload that subscribers receive if the camera disconnects abruptly.--will-payload: The payload that subscribers receive if the camera disconnects abruptly.
Publishing and subscribing to the Pro Mosquitto broker
Now, let’s test these features using the Pro Mosquitto broker. Start by configuring a new client in the broker, and assign permissions with the following steps:
1. Access the Cedalo Platform, select the broker, and go to the client’s section (Figure 1).
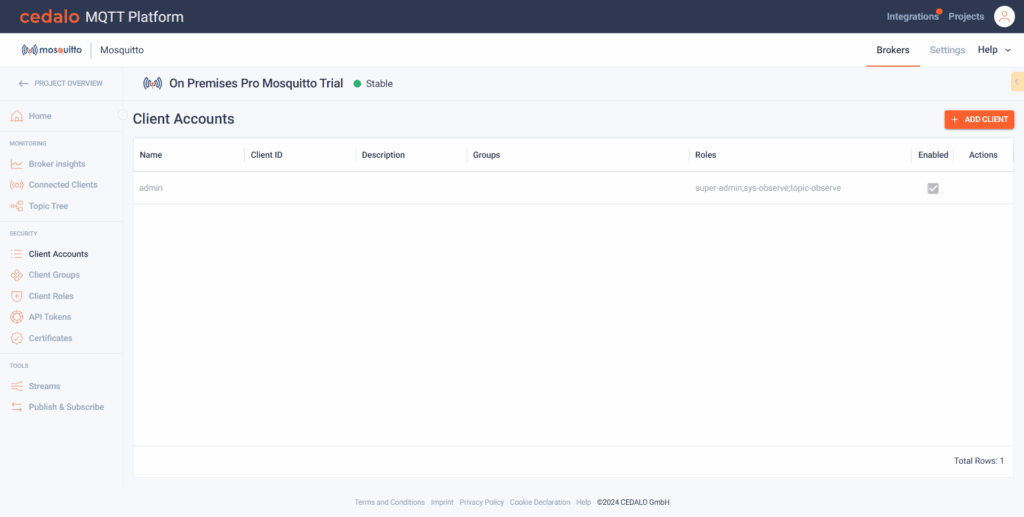
Figure 1 - “Client Accounts” section within the Cedalo MQTT Platform.
2. Click on + ADD CLIENT.
3. Give the new client a name and select “client” from the dropdown menu in the Roles column (Figure 2).
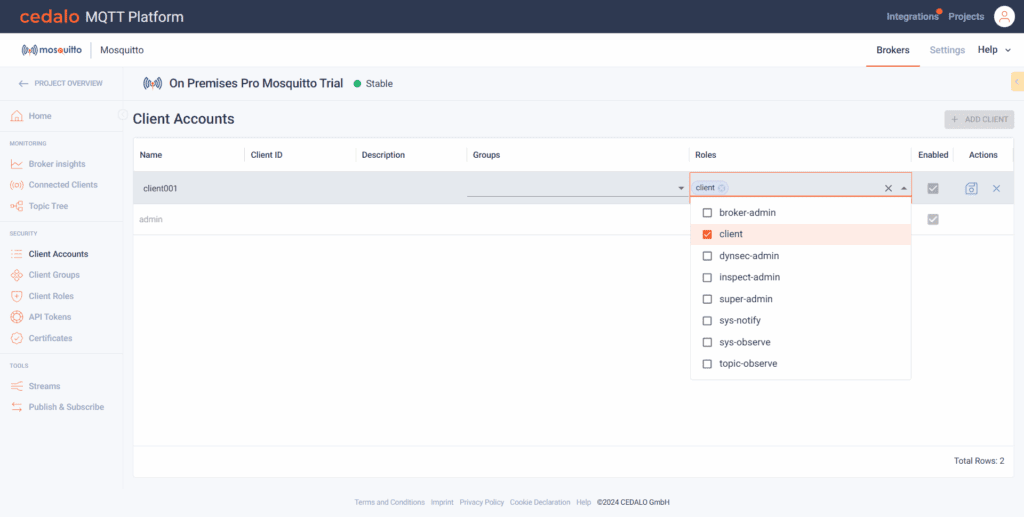
Figure 2 - Creating a new client.
4. In the pop-up, enter a password for the client (Figure 3).
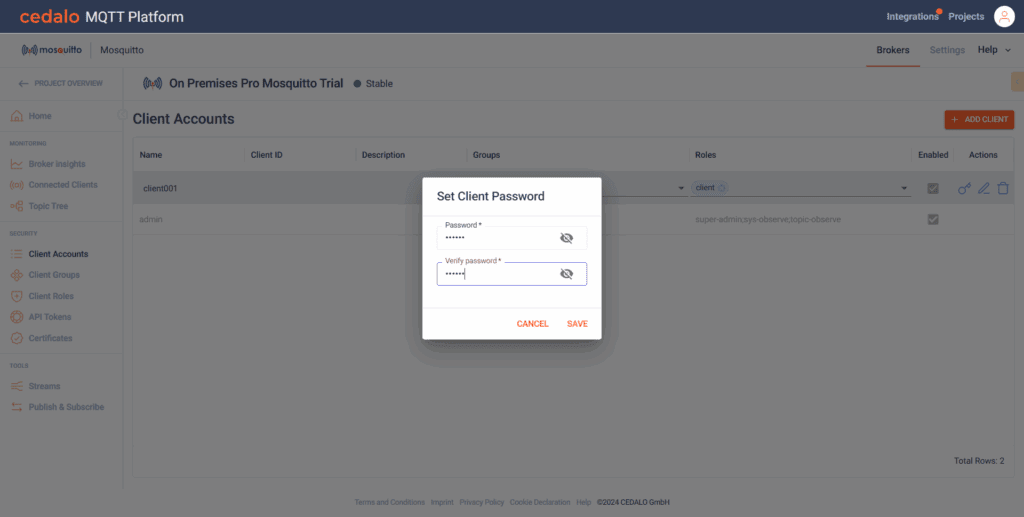
Figure 3 - Setting the “Client Password.”
With this last step, you’ve successfully created and configured a new MQTT client.
You can explore the available client roles by going to the “Client Roles” option in the left menu, which displays a list (see Figure 4).
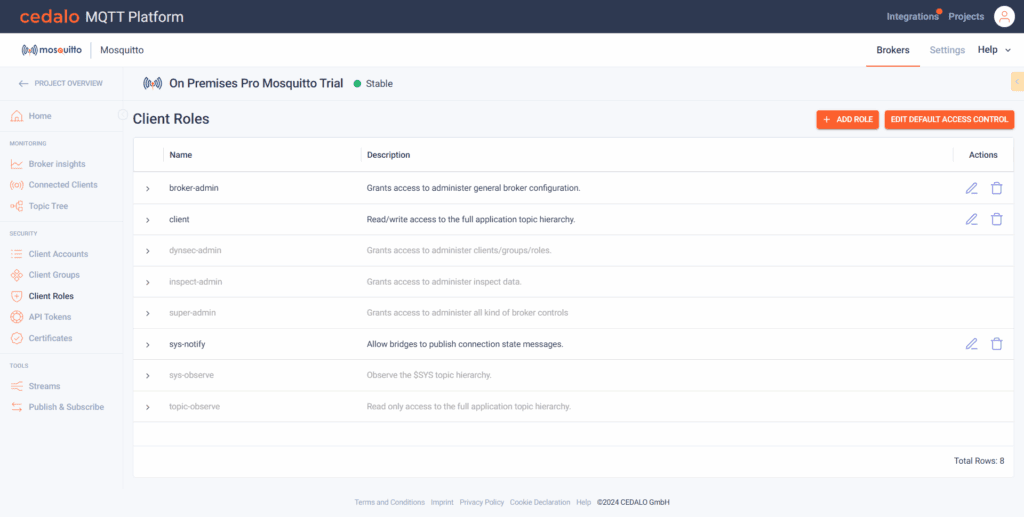
Figure 4 - “Client Roles” section to explore all client roles.
Note: you can create new roles and assign them special permissions. You can also see the permissions granted to the available client roles. Figure 5 shows the default permission for the “client” client role.
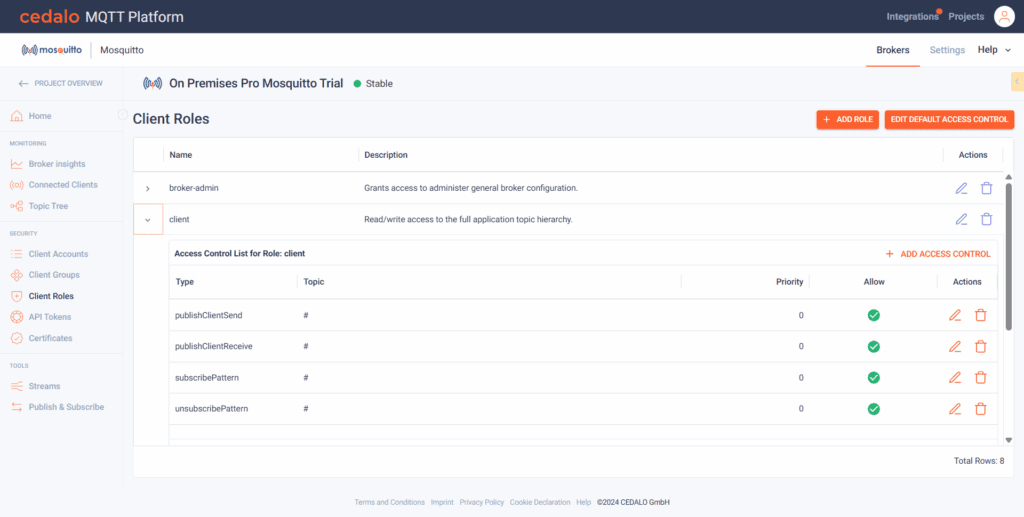
Figure 5 - Client role permissions for “client.”
The “client” role has permissions to publish and subscribe to any topic because it uses the # wildcard in the topic section. However, it’s recommended to apply more restrictive rules to prevent clients from gaining access to certain topics and actions.
Now that the new client is set, let’s experiment with the features described in the previous section.
Publishing and subscribing from the Cedalo MQTT Platform
The Cedalo MQTT Platform provides built-in tools to run MQTT clients, eliminating the need for external tools to test the broker.
To access them, go to the “Publish & Subscribe” section in the left menu, as shown in Figure 6.
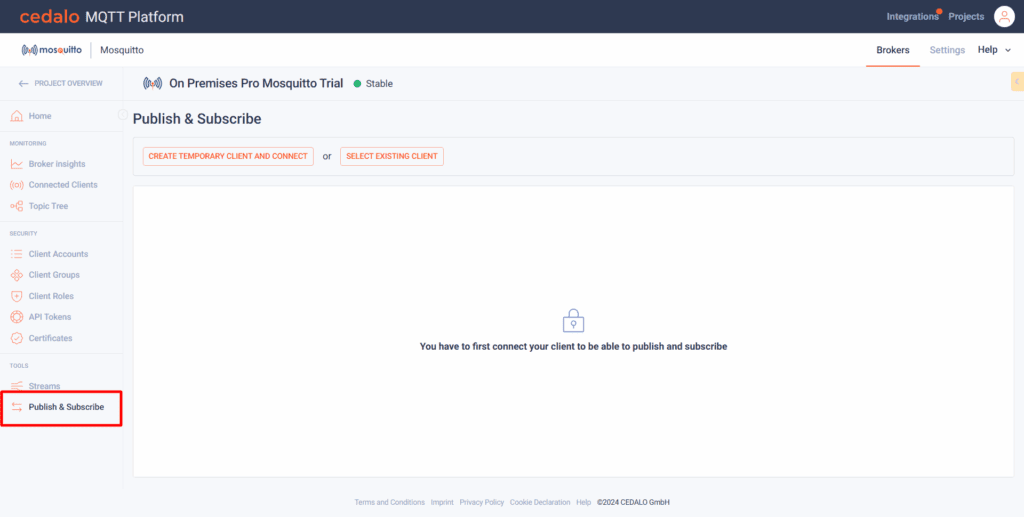
Figure 6 - “Publish & Subscribe” functionality within the Cedalo MQTT Platform.
Next, click on the “CREATE TEMPORARY CLIENT AND CONNECT” button. This will create a new MQTT client and automatically connect it to the MQTT broker, simplifying the testing process. After creating the client, a new user interface will appear, as shown in Figure 7.
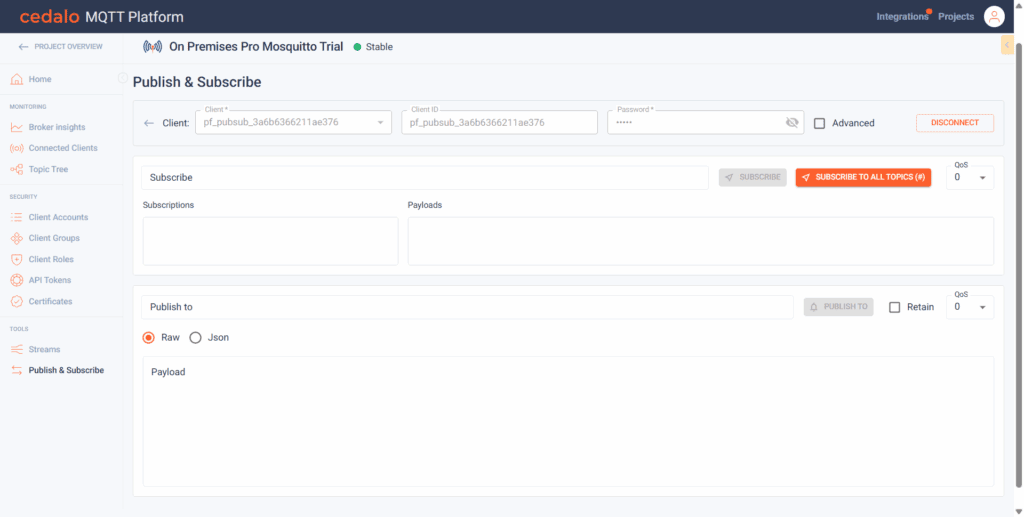
Figure 7 - New temporary client.
Clicking on the “Subscribe” section will display all the active topics available (see Figure 8).
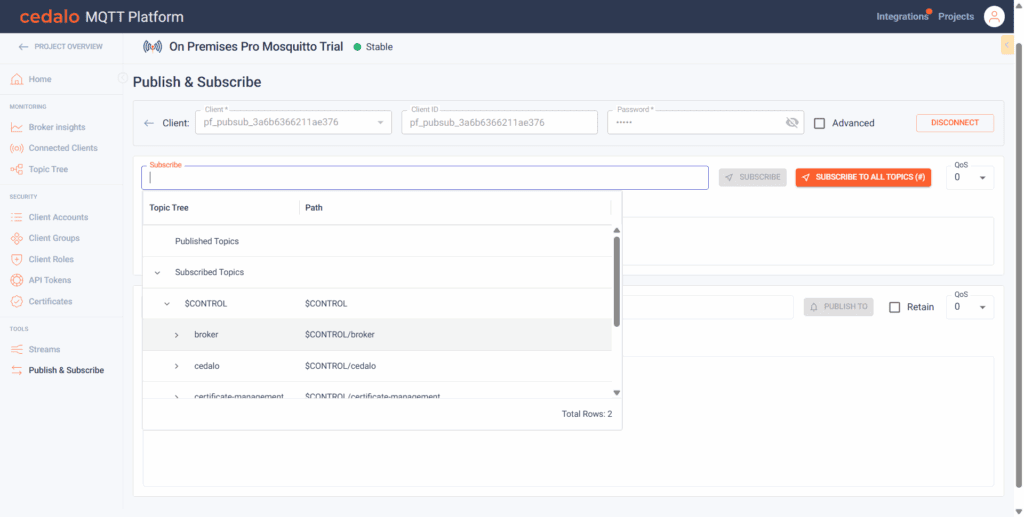
Figure 8 - Available “Subscribe” topics.
Now, you can use the user interface to publish to any topic (new or already available) and subscribe to receive messages, as shown in Figure 9. In this example, I am using the “testing” topic and publishing the message “this is a test.” You can also use JSON-structured data.
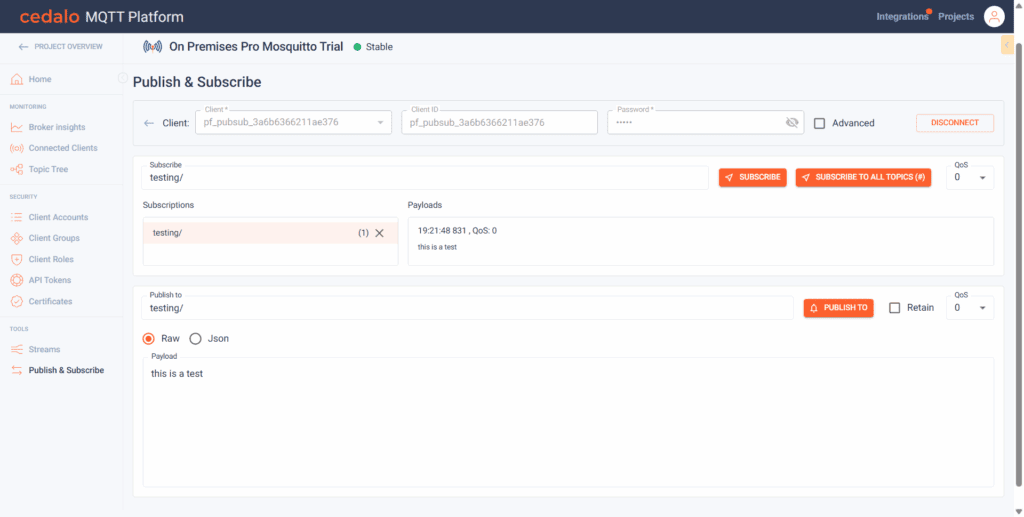
Figure 9 - Publishing and subscribing to a topic.
Now, let’s experiment with a more advanced example.
Example using Last Will and Testament (LWT) and Retained Messages
To test the LWT feature, you need to simulate an abrupt connection interruption, to trigger the last will topic. However, it’s not easy to achieve this using MQTT software clients. So, in this case, I’ll use a Python script that you can interrupt by pressing Ctrl+C, aborting the connection without closing it. This is the type of event the broker expects to change the value of the last will topics.
The following code requires you to change the broker address, port, username, and password to match your configuration.
Note: This example uses unencrypted messages. But it’s strongly recommended to use encryption in production environments, which you can enable using the client.tls_set() function from the paho library. Keep in mind that encrypted connections typically use port 8883, instead of 1883.
import paho.mqtt.client as mqtt
import random
import json
import time


def generate_sensor_data(sensor_id):
    return {
        'temperature': round(random.uniform(15.0, 30.0), 2),
        'humidity': round(random.uniform(30.0, 70.0), 2),
        'serial_number': f'SN{sensor_id}'
    }


def on_connect(client, userdata, flags, rc):
    print(f"Connected with result code {rc}")
    # Publish birth message when connected
    sensor_id = userdata
    birth_topic = f"sensor/status/{sensor_id}"
    birth_payload = json.dumps({
        "status": "online",
        "client_id": f"Client{sensor_id}",
        "timestamp": int(time.time())
    })
    client.publish(birth_topic, birth_payload, qos=1, retain=True)


def on_publish(client, userdata, mid):
    print(f"Message {mid} published.")


broker_address = "localhost"
username = "your-user"
password = "your-passs"
port = 1883
clients = []


for i in range(10):
    client = mqtt.Client(mqtt.CallbackAPIVersion.VERSION1, client_id=f"Client{i}")
    # note that for brokers with anonymous connections username and password must be left out
    client.username_pw_set(username, password)
    client.user_data_set({'sensor_id': i})  # Store sensor ID in userdata

    # Configure Last Will and Testament
    lwt_topic = f"sensor/status/{i}"
    lwt_payload = json.dumps({
        "status": "offline",
        "client_id": f"Client{i}",
        "timestamp": int(time.time())
    })
    client.will_set(lwt_topic, lwt_payload, qos=1, retain=True)

    client.on_connect = on_connect
    client.on_publish = on_publish
    client.connect(broker_address, port, 60)
    client.loop_start()
    clients.append((client, i))


try:
    while True:
        for client, sensor_id in clients:
            sensor_data = generate_sensor_data(sensor_id)
            payload = json.dumps(sensor_data)
            topic = f"sensor/data/{sensor_id}"
            client.publish(topic, payload)
        time.sleep(30)


except KeyboardInterrupt:
	print("Interrupted")
This script publishes MQTT messages using 10 different client instances.
The on_connect function is an MQTT client callback that executes when the client successfully connects to the broker. Here’s a breakdown of what each part does:
- Function Signature:
def on_connect(client, userdata, flags, rc)is the standard signature for the Paho MQTTon_connectcallback.client: The client instance that is connected.userdata: User-defined data passed during client setup (here, it contains the sensor ID).flags: Response flags the broker sends.rc: Result code of the connection attempt (0 means success).
- Extract Sensor ID:
sensor_id = userdataretrieves the sensor’s unique ID from the user data dictionary. This allows the function to personalize the topic for each client. - Define Birth Topic:
birth_topic = f"sensor/status/{sensor_id}"sets the topic where the client will publish its “birth” (online) message. Each sensor uses a unique topic (e.g.,sensor/status/10).
Create Birth Payload:
birth_payload = json.dumps({
    "status": "online",
    "client_id": f"Client{sensor_id}",
    "timestamp": int(time.time())
})- Constructs a JSON message indicating the client is online, including:
"status": "online": Shows the client is connected."client_id": f"Client{sensor_id}": Identifies the client."timestamp": int(time.time()): Records the exact time of connection.
Publish the birth message to the broker:
client.publish(birth_topic, birth_payload, qos=1, retain=True)-
qos=1: Ensuring message delivery at least once. -
retain=True: The broker stores this message as the last known status for the topic, so new subscribers immediately see the client’s online status. -
Last Will and Testament (LWT):
- If the client disconnects unexpectedly (without sending a proper disconnect message), the broker will automatically publish the message “offline” to the same topic (
sensor/status/clientid) on behalf of the client. - The LWT message is sent with QoS 1 (at least once delivery) and is retained, meaning the broker will store this “offline” message as the last known state for new subscribers to that topic.
- If the client disconnects unexpectedly (without sending a proper disconnect message), the broker will automatically publish the message “offline” to the same topic (
In conclusion, this callback notifies the system (via a retained MQTT message) whenever a client comes online, providing real-time and historical visibility into client status. This complements the LWT feature, which signals when a client unexpectedly goes offline.
To test this setup:
1. Run the Python script and let it execute indefinitely.
2. Open another console window and run a mosquitto client as shown in the following command:
mosquitto_sub -h localhost -p 8883 -t "sensor/status/#" -u your-client-user -P your-client-passReplace the username and password accordingly. You can also use the client in the MQTT platform, as shown in the previous section. After connecting, you will receive the online status of the sensors.
3. To abruptly interrupt the MQTT client connections, return to the console where the Python script is running and stop it by pressing Ctrl+C. You will see the state change in the console screen where the mosquitto client is running (Figure 6).
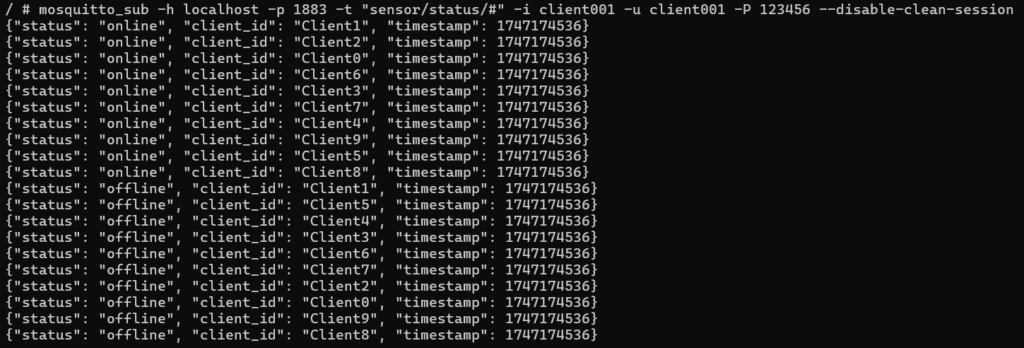
Figure 6 - State change because of LWT.
MQTT publish and subscribe key takeaways
Consequently, the MQTT publish/subscribe model may remind you of the traditional client-server communication pattern, where clients exchange information directly with the server.
In MQTT, all devices are clients, and they talk to each other via the MQTT broker. So, this is the central element that the entire IoT system rests on. MQTT brokers filter the clients’ published messages by topics and distribute them to the clients that are subscribed to the respective topics.
Eventually, the proper choice of the MQTT broker will let you optimize the communication of all devices in your system. So, choose wisely :)


