
In the era of information, databases play a central role in storing and managing vast amounts of data. From web applications to the ever-expanding Internet of Things (IoT), the need for efficient data handling has never been more critical.
With IoT, we know that MQTT is a widely adopted lightweight messaging protocol that can facilitate data exchange between IoT devices. However, the question arises: how can we efficiently harness this protocol and store the data effortlessly for future analysis? Here is where the MongoDB Bridge plugin steps in. In this article, I will demonstrate the intersection of databases and MQTT using the Mosquitto broker and the well-known database management system MongoDB.
Why use MongoDB?
Selecting the appropriate database for storing MQTT data is essential, but it can be challenging to determine which database system to use due to the many options available. MongoDB, on the other hand, stands out as one of the best solutions, offering key advantages that address the unique challenges of MQTT environments. For example:
- MongoDB’s schema flexibility is crucial for adapting to the ever-changing structures of MQTT payloads. Unlike traditional databases, MongoDB accommodates shifts in data format seamlessly, eliminating the constraints of rigid schema requirements.
- Scalability plays a key role as MQTT data volumes soar with the rise of IoT. MongoDB’s robust support for horizontal scaling ensures the system can handle increasing data influx without compromising performance.
- Beyond storage, MongoDB’s rich set of advanced query capabilities empowers users to extract meaningful insights from MQTT data.
The subsequent sections will delve deeper into these advantages, showing why MongoDB is the go-to database for seamlessly integrating with MQTT data streams.
A real-world Mosquitto use case
To illustrate the advantages of integrating Pro Mosquitto and MongoDB, consider the following scenario.
Managing and controlling a photovoltaic plant involves monitoring crucial data, such as power production and potential plant issues. A photovoltaic plant inverter system typically gathers and measures this information. The inverter, or an eventually connected data logger, will offer internet connection capability, enabling the transmission of this information to a remote access point for monitoring purposes. In the demonstrated case, the inverter will generate MQTT messages toward a remote central broker.
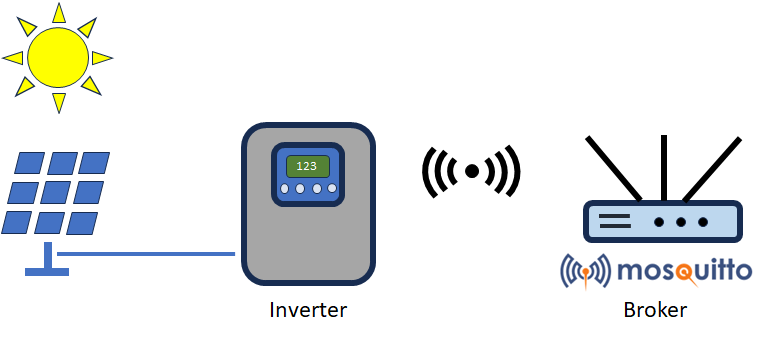
Figure 1 - The inverter logs the photovoltaic plant’s produced power and plant status, transmitting the data to a remote MQTT broker.
The data related to power production and plant status is transmitted via distinct MQTT topics. The challenge now lies in transferring this data from the broker to a specific database. Traditionally, this process would entail developing custom software, consuming valuable hours of development and testing. Fortunately, the Mosquitto MQTT MongoDB bridge makes this laborious task less time-consuming.
Pushing MQTT: The MongoDB bridge
Integrating MQTT with a database is undeniably a brilliant concept, but traditional MQTT brokers do not provide this capability. However, the Pro version of the open-source Mosquitto MQTT broker offers additional functionalities, like the MongoDB bridge (Figure 2).
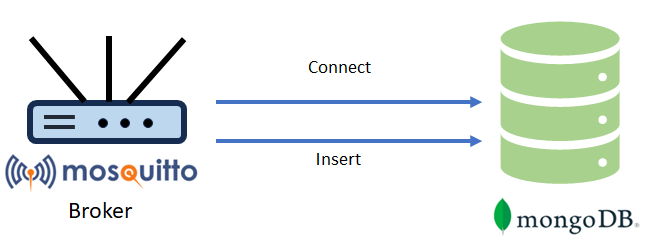
Figure 2 - Pro Mosquitto broker can efficiently store MQTT data in a MongoDB database through the MongoDB bridge.
This plugin is only available in the Pro version, which allows the Mosquitto broker to connect seamlessly and insert data into a MongoDB database. The plugin can handle multiple MongoDB client connections, each directed to a specific database. More details about the plugin will be given later in this article.
Therefore, I will be using Pro Mosquitto in my demonstration. Please refer to this comparison to know the relevant differences between the Pro Mosquitto and the open-source versions.
The MongoDB bridge project setup
I will use the elements presented in Figure 3 to describe the project setup.
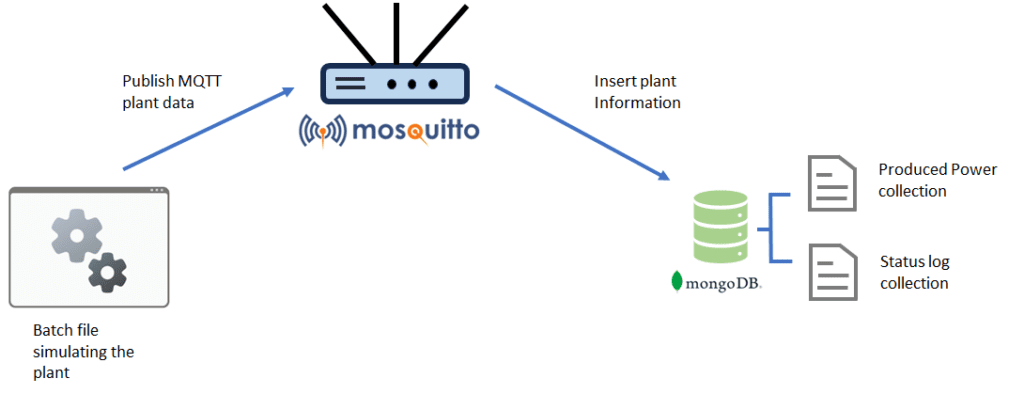
Figure 3 - The main elements involved in the project.
The project consists of three elements:
- A batch file that simulates the operations of a photovoltaic plant inverter and sends the relevant messages over MQTT.
- The Mosquitto broker, which is configured with the MongoDB Bridge plugin.
- The MongoDB database.
The next section will provide a detailed description of the configuration of each of these components.
Plant simulator MQTT configuration
It is easy to achieve the simulation of the photovoltaic plant with a Windows batch file. The batch file contains some predefined messages that will be sent over MQTT, interleaved by some delays.
The messages use two distinct topics: Plant1\ProducedPower for transmitting information about the produced power of the plant and Plant1\StatusLog for sending some logs about the plant status.
The client used to publish MQTT messages is based on the MQTT.js library (requiring Node.js). The batch file’s content is as follows:
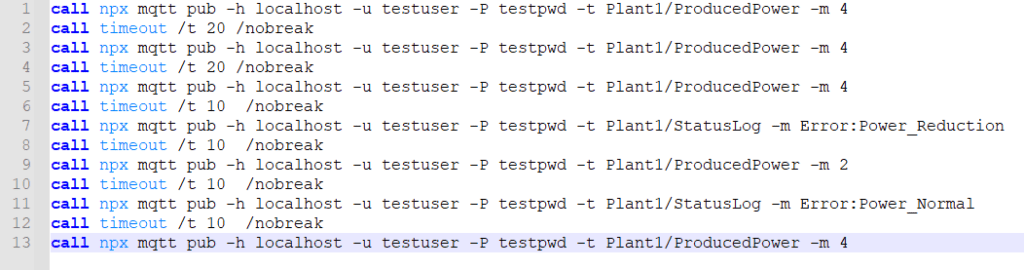
Figure 4 - Contents of the plant simulator batch file.
The batch file will simulate a plant producing a constant 4 kW power for a specific time until it detects a production error, reducing the plant power to 2 kW. After some time, the issue gets resolved, and the power production returns to 4 kW.
Specific delays are introduced between the MQTT messages to make the simulation more realistic.
MongoDB configuration
This project uses the MongoDB database system in its docker container version. This guide assumes you have already installed the docker system and extensions like Docker Compose.
In a Windows command shell, type the following command:
docker pull mongo:latestThis command will get the latest MongoDB docker version from the original repository. Once the pull operation is complete, you can start MongoDB with the following command:
docker run -d -p 27017:27017 --name=MongoPlant mongo:latestThe command will run a MongoDB docker instance, naming it “MongoPlant.” The connection port will be “27017,” both from the docker container and the hosting machine.
Once the MongoDB docker instance is running, I can access the MongoDB shell to verify the adequate functioning status of the database.
Let’s type the following command:
docker exec -it MongoPlant mongoshThe following shell will appear:
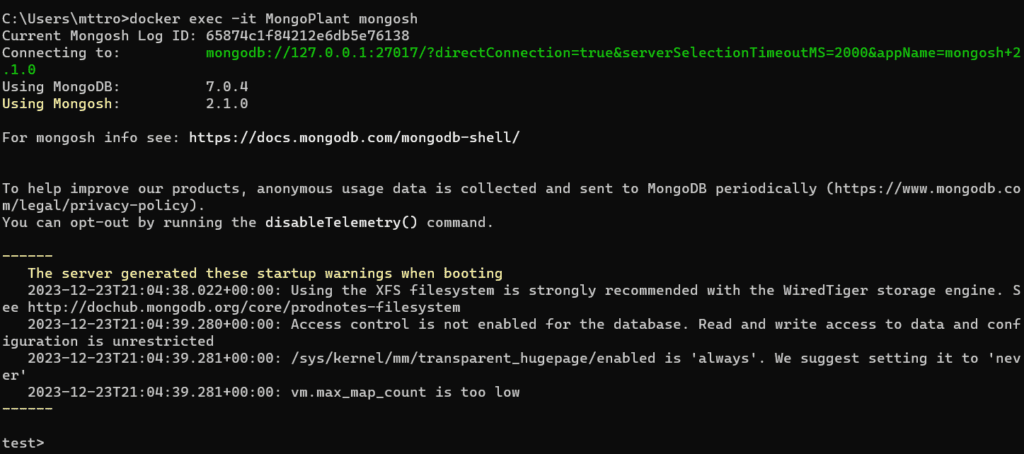
Figure 5 - Command shell of MongoDB.
MongoDB is now running and ready to accept commands. I can then create an internal docker network and connect the MongoDB docker to it.
Docker networks are internal networks that allow the creation of a communication channel between different dockers. In this case, a docker network enables communication between MongoDB and the Mosquitto broker, which also runs on a docker.
In the same Windows command shell, type the following command:
docker network create plantnetThis command will create an internal docker network named “plantnet.”
Using the following command, I can instruct the MongoDB docker to connect to this network:
docker network connect plantnet MongoPlantWhen starting the MongoDB docker instance, it is also possible to connect it to the plantnet network using the command below:
docker run -d -p 27017:27017 --name=MongoPlant –network plantnet mongo:latestThe MongoDB configuration is now complete!
In this project, I will not configure any user in the MongoDB database, allowing full access without authentication.
Let’s move to the next chapter, which describes the Pro Mosquitto configuration.
Pro Mosquitto configuration
For this project, I will be using the on-premises trial license for the latest Pro Edition of Eclipse Mosquito. You can request a free trial here, which includes basic MQTT HA configuration and access to advanced features like MongoDB bridge.
The Pro Mosquitto broker will run in a docker container - a detailed installation guide can be found here.
After installing Pro Mosquitto, I can proceed with the configuration in the following steps:
- Enabling and configuring the MongoDB bridge plugin.
- Activate full logs.
- Configuring the internal docker network.
- Check docker logs.
- Creating a Mosquitto client for authentication.
Refer to this documentation to enable and configure the MongoDB bridge plugin. The documentation gives a complete overview of the plugin’s functionality.
The plugin requires a configuration file named “mongodb-bridge.json,” for which you can copy and paste the content from here:
[
	{
    	"name": "connection-to-plantdb",
    	"mongodb": {
        	"hostname": "MongoPlant",
        	"port": 27017,
        	"database": "plantdb",
        	"queueSize": 100000,
        	"reconnectMinDelay": 5,
        	"reconnectMaxDelay": 25000
    	},
    	"schemaMappings": ,
    	"topicMappings": [
        	{
            	"name": "topic-mapping-producedpower",
            	"collection": "ProducedPower",
            	"schema": "reduced-mapping",
            	"topics":
        	},
        	{
            	"name": "topic-mapping-statuslog",
            	"collection": "StatusLog",
            	"schema": "reduced-mapping",
            	"topics":
        	}
    	]
	}
]
Relevant parts of the configuration are the database information, the schema mappings, and the topic mappings.
Topic mappings serve the role of defining the correlation between MQTT topics and their corresponding MongoDB collections. Every database insertion operation includes attributes such as payload, topic, qos, client_id, hostname, retain, and the timestamp derived from the received MQTT message. The default configuration includes all these attributes in the database insert command. However, you can use Schema mappings when the necessity arises to either filter or rename these attributes.
The topic mapping here is configured to support the two previously mentioned data collections on the two specific MQTT topics.
On the other hand, schema mapping is configured to insert the broker node’s hostname, the message’s payload, and the timestamp at which the broker received the message into the database.
Next, I can proceed with activating all possible docker logs through the “mosquitto.conf” file by adding the following command:
log_type allNow, let’s proceed with the docker network configuration, and connect the Mosquitto docker to the previously created network called “plantnet.”
To tell the Mosquitto docker to connect to this network, adapt the docker-compose.yml file by adding this new network to the “services” (Figure 6) and in the “networks” sections (Figure 7):
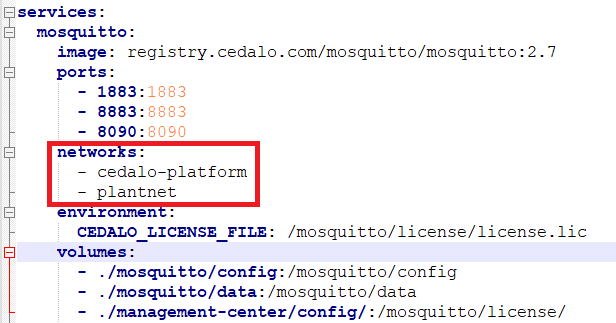
Figure 6 - Add plantnet network to the “services” section.
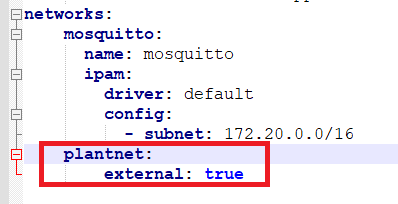
Figure 7 - Add plantnet network to the “networks” section.
I can now restart Pro Mosquitto to apply the changes. After restarting, I can check the produced logs to verify if the connection between Pro Mosquitto and MongoDB was successful.
Type the following command into the command shell:
docker logs mosquitto-27-mmc-27-mosquitto-1 2> outlog.txtThis command will print the complete docker log into a file named outlog.txt.
To verify if the database connection was successful, open the file and look for the log entries of MongoDB. You should see something similar to Figure 8:
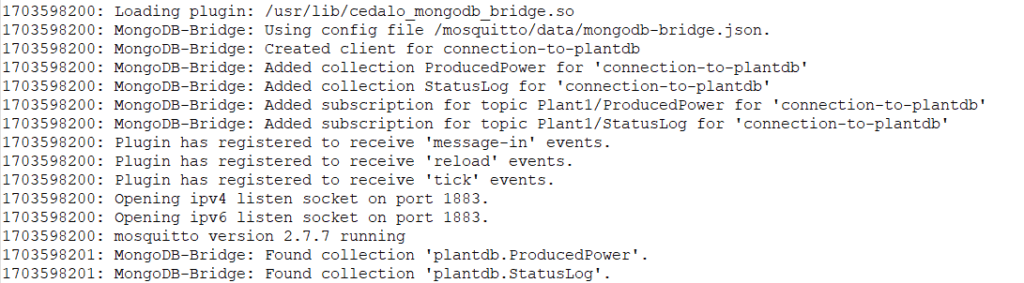
Figure 8 - Pro Mosquitto docker logs.
Lastly, I can create a client into the Mosquitto MMC to allow data publishing from the plant simulator. The user name must be set to “testuser” while the password to “testpwd,” according to the batch file command content (Figure 4).
Testing the MongoDB Bridge
Now, let’s test the complete setup by launching the plant.bat file created earlier.
Once the execution is complete, use the following commands to open the MongoDB shell to check the content of the database collections:
plantdb.ProducedPower.find()and
plantdb.StatusLog.find()The following content will be shown:
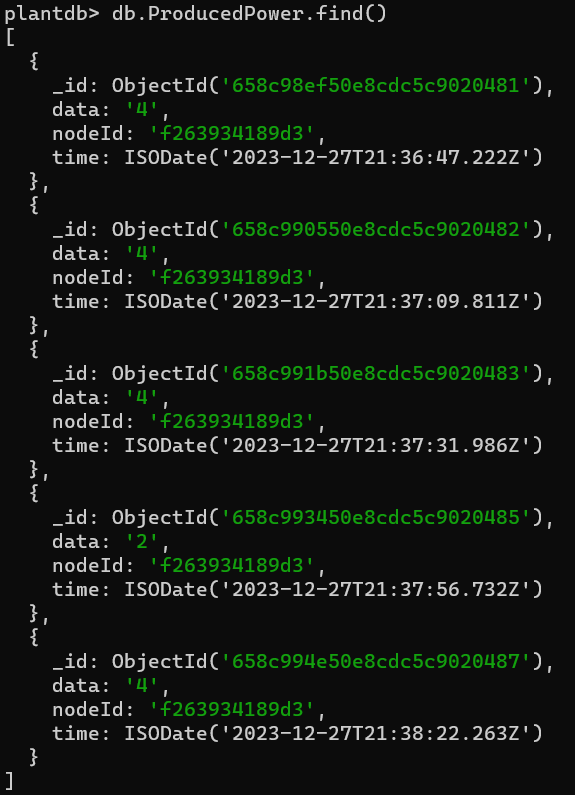
Figure 9 - Contents of the ProducedPower collection.
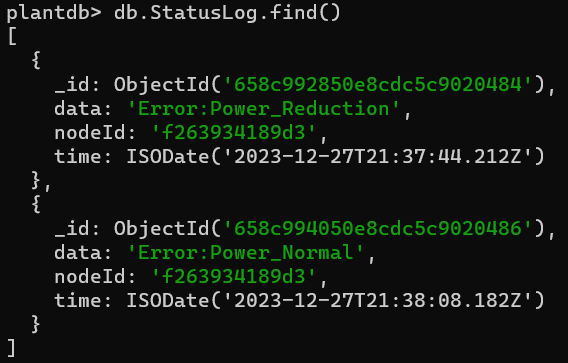
Figure 10 - Contents of the StatusLog collection.
Figures 9 and 10 show that the MongoDB bridge plugin correctly imported the MQTT messages into the MongoDB database.
Using the MongoDB collected data
Thus far, the project shows how it is possible to collect data from MQTT messages into a MongoDB database. However, it is important to understand how to utilize this data effectively.
One way is to extract the data using MongoDB queries based on specific criteria and plot them over some graphs using external tools. This could already give an idea about plant production over time. By analyzing the data on the graph, it is possible to analyze eventual trends and evaluate plant performance.
Moreover, using a dynamic graph that gets periodically updated would make it possible to implement a real-time monitoring mechanism. By integrating these practices, raw data transforms into actionable insights, enabling informed decisions and efficient photovoltaic plant management.
Conclusions
In summary, integrating Mosquitto with MongoDB through the MongoDB Bridge plugin presents a robust solution for efficient data logging and management. This seamless connection enables the extraction and visualization of diverse data types, allowing a broad range of applications beyond the photovoltaic plant example. This integration empowers users to analyze trends, implement real-time monitoring, and make informed decisions by streamlining the flow of MQTT data into MongoDB.


