
Processing real-time data streams at scale can be challenging, but there are powerful tools available to make it easier. One such tool is Apache Kafka. It is an open-source, distributed event streaming platform thousands of companies use for high-performance data pipelines, streaming analytics, data integration, and mission-critical applications.
When used in conjunction with a high-performance MQTT Broker, such as the Pro Edition of Eclipse Mosquitto, it is possible to create data-driven, value-adding pipelines on a large scale. For example, consider a real-world scenario where thousands of assets connected via LoRaWAN must monitor their battery values and radio signal strength. Stream processing is essential for extracting value from event data with high rates of events per second, such as thousands of IoT devices sending events (see Figure 2).
Cedalo’s Pro Mosquitto MQTT broker offers a Kafka Bridge plugin that connects the two platforms to build stream processing pipelines (see Figure 1). This article focuses on configuring and establishing this connection, as shown by a real use case.
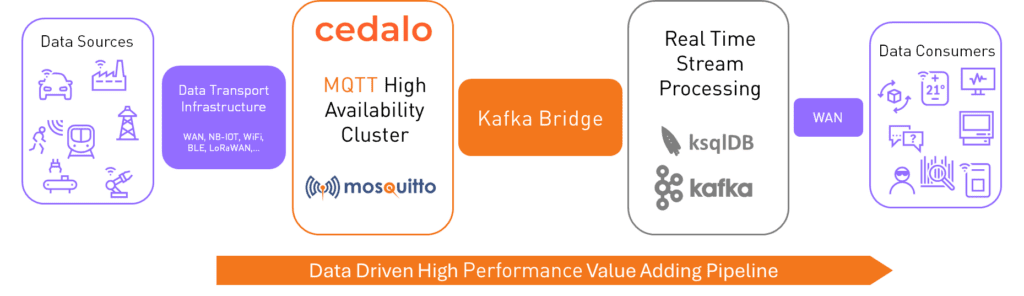
Figure 1 - Overview of data-driven value-adding pipeline, including the bridging of MQTT to Kafka brokers.

Figure 2 - Screenshot of Grafana heat map for visualizing LoRa packages received at a LoRa network server (LNS) and forwarded to a Mosquitto MQTT broker over time (as an example of MQTT messages on high rates).
The event streaming platform Apache Kafka®
In 2011, LinkedIn originally developed Apache Kafka as an open-source platform to handle real-time data feeds. Later, it was donated to the Apache Software Foundation. Many companies use Kafka for stream processing, data integration, and event-driven applications. To learn more about the fundamentals of Apache Kafka, refer to this comprehensive article.
At a high level, Apache Kafka is a message broker that organizes messages by topics – like MQTT brokers. But here is where the similarities end. Kafka handles message data and is synchronized among multiple brokers differently to ensure maximum performance. Additionally, message persistence is configurable for a period of time, allowing consumers to replay data or recover from failures. For a detailed comparison between MQTT and Kafka, check out this article on MQTT vs. Kafka.
In the context of real-time data stream processing, various components run alongside Kafka brokers in clusters. A typical small cluster deployment (3 nodes, Kubernetes) utilizes the helm charts from Confluent. The following components in the table are essential for a minimal setup.
Instance Name (typically)
Role / Function
Kafka broker
Message storage, distribution, data ingest endpoint (the Mosquitto MQTT bridge connects at the default port: 9092).
Kafka zookeeper
Maintains the cluster’s metadata and manages leader elections.
To use the Mosquitto Kafka bridge plugin, a minimal setup can also consist of a single node running just one instance of a Kafka broker. To deploy that, the docker environment and this docker-compose file are sufficient.
To follow this article, you do not need additional details for the Kafka setup – especially on the configuration and usage of the Kafka bridge. Refer to the official Kafka documentation for more information on concepts, terms and functionalities. Check the notes from Confluent for the different installation options.
Example use case
Imagine maintaining and monitoring many smart connected assets (IoT devices) that are mobile or distributed in a wide area with limited grid power supply and wifi access options. Some examples could be waste bins in big cities or opencast mining equipment like trucks or devices that need regular lubrication for operation. One concrete need is to plan maintenance routes efficiently to emptying the waste bins, replace batteries, or refill lubrication.
The challenge is to derive valuable information out of thousands of real-time events and identify which assets require attention. Moreover, this is not a static “filter” on all the information because the information and the events are dynamic and time-dependent. So this is where the functionality of stream processing comes into play. One possible solution on a high level is to bridge the two worlds: IoT, driven by MQTT protocol and stream processing, driven by Apache Kafka.
Use case architecture
To realize the use case, the architecture requires the data pipeline, as shown in Figure 3. In this specific case, the starting point is the data sources, concentrated in a so-called LoRaWAN Network Server (LNS). If you’re using a self-hosted or cloud-hosted LNS from “The Things Industries,” you can refer to their documentation for more details on how to set up the MQTT client.
Finally any LNS can act as a MQTT client, publishing messages on the Mosquitto MQTT broker. The LoRaWAN protocol ensures the payload is standardized regardless of the type of LoRa device from which the data is received, and formats it as a JSON string.
The connection between the LNS and the Mosquitto MQTT broker is established with enabled TLS encryption and username/password-based authentication/authorization. Whenever the LNS receives new data or an event from the devices, it publishes a message on a configurable topic.
To forward the payloads for real-time stream processing, the Pro Edition of Eclipse Mosquitto broker can connect as a data source to the Kafka broker endpoint. This connection is the Kafka Bridge plugin and is only available in the Pro version. Refer to this comparison table to understand the differences in features between the Pro and open-source versions of Mosquitto. Beside the credentials and authentication parameters the topic mapping is configured which will be described in detail in the next sections.

Figure 3 - High-level architecture use case to process real-time data streams from LoRa devices (nodes) in Apache Kafka using the Mosquitto MQTT Kafka Bridge.
How to set up the MQTT Kafka Bridge
To set up the use case with the MQTT Kafka bridge, we will utilize the Pro Mosquitto on-premises trial license by requesting a free Cedalo MQTT Platform trial.
Let’s assume that the following points are already prepared and available:
- At least one Mosquitto broker in the pro edition is up and running in a docker environment. Refer to this detailed installation guide on how to set up the Mosquitto broker.
- Administrative access to the configuration of the MQTT broker or MQTT HA cluster.
- One or more MQTT clients publishing messages on different topics on the MQTT broker.
- An Apache Kafka broker that is accessible from the MQTT broker over ethernet/TCP. Let’s assume the MQTT broker instance can access the Apache Kafka service using the URI tcp://mykafka.kafka.svc:9092 (e.g., within a Kubernetes cluster). If you want to know more about configuring the Mosquitto MQTT broker in Kubernetes, read this tutorial.
- Known Credentials (e.g., username, password) on the Kafka site authorize publishing on a given Kafka topic named “uplinks.”
Start the Mosquitto MQTT Kafka Bridge plugin
To enable the Kafka Bridge plugin in the Mosquitto broker, add the following lines to the mosquitto.conf file:
plugin /usr/lib/cedalo_kafka_bridge.so
persistence_location /mosquitto/config
In most cases, the option persistence_location is already set in the configuration file and is used as the path where the Kafka bridge plugin config file is located. Name the configuration file for the plugin as kafka-bridge.json.
Finally, a typical configuration file for the Mosquitto broker with enabled Kafka bridge plugin has the following content:
allow_anonymous false
plugin /usr/lib/mosquitto_dynamic_security.so
plugin_opt_config_file /mosquitto/config/dynamic-security.json

plugin /usr/lib/cedalo_kafka_bridge.so
persistence_location /mosquitto/config
Regardless of the Kafka bridge plugin configuration details, the log output of the broker can look as shown in Figure 4. It shows that the plugin has been loaded.
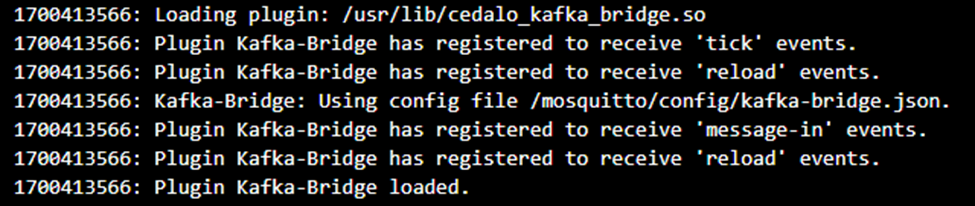
Figure 4 - Screenshot of the log output from a Pro Mosquitto broker instance when loading the Kafka bridge plugin (Pro Mosquitto version 2.7.2).
If the log output resembles Figure 4, the plugin has loaded successfully. You can now focus on the configuration (kafka-bridge.json) in the next section.
Configuring the Kafka Bridge plugin
The plugin configuration file requires configuration for three main parts:
- Kafka connection endpoint and authentication
- Topics mapping from MQTT to Kafka
- Message queue options like size and delay times
The following example is based on the use case given above. For all details and options, refer to the documentation here.
For the use case above, the following JSON-formatted content defines the configuration file /mosquitto/config/kafka-bridge.json:
[
   {
       "name": "LoRaNodes",
       "connection": {
"clientId": "mosquitto-broker",
           "brokers": ,
           "sasl": {
               "mechanism": "plain",
               "username": "user",
               "password": "secret_password"
           },
           "queueSize": 10,
           "retryPublishMinDelay": 250,
           "retryPublishMaxDelay": 2500,
           "allowAutoTopicCreation": true
       },
       "topicMappings": [
           {
               "name": "AllUplinks",
               "kafkaTopic": "uplinks",
               "mqttTopics":
           }
       ]
   }
]
The three main parts in the shown JSON define the authentication and the endpoint to use under connection.sasl and connection.brokers. The implemented Kafka client in the plugin allows basic authentication with username and password. The Kafka bridge plugin currently supports the following SASL mechanisms: plain, scram-sha-256 or scram-sha-512. These settings in the plugin must match the settings on the Kafka broker. Follow these instructions on setting up the PLAIN mechanism, and here for SCRAM, which is advisable in production use cases to prevent storing passwords in plaintext.
The Kafka bridge plugin can also persist messages and handle connection interruptions. The following settings can configure this behavior:
queueSize: The size of the MQTT broker internal queue that is valid for each Kafka topic. The queue stores messages in case the plugin cannot establish a connection to the Kafka broker. If thequeueSizeis reached, incoming messages will be dropped.- If the Kafka bridge plugin fails to publish a message on the Kafka broker, the plugin will wait at least the amount of milliseconds defined in
retryPublishMinDelay. And will wait at most the number of milliseconds defined inretryPublishMaxDelay. - If
allowAutoTopicCreationis set to true, topics will automatically be created in the Kafka broker with a retention period of 7 days (default period defined by Kafka broker settings) in case the topic does not exist.
The values in the example configuration above are suitable for a default setup.
The last part in the configuration file is the pivotal component to realizing the topic mapping from MQTT to Kafka topics. Here, the intended overarching benefit will drive the setup. The correctness of the mapping is crucial for subsequent processing on topics, as described in the next section.
In this use case, there are multiple MQTT clients publishing messages on different topics but with a standardized payload formatted in JSON, including a unique sensor node ID, among others. The benefit is monitoring battery level and radio signal strength off all sensor nodes. So, concentrating on only one topic and processing this single topic is advantageous.
Therefore, you can configure the Kafka bridge plugin to map multiple MQTT topics to one Kafka topic. Moreover, use the well-known ‘#’ wildcard for topic names like the following:
       "topicMappings": [
           {
               "name": "SampleMultiple",
               "kafkaTopic": "mqtt_collecting_topic",
               "mqttTopics":
           }
       ]
This mapping is possible for one or more Kafka topics. To do this, repeat the mapping settings in the JSON array topicMappings as necessary:
"topicMappings": [
      {"name": "ex1","kafkaTopic": "topic1","mqttTopics": },
      {"name": "ex2","kafkaTopic": "topic2","mqttTopics": },
      ...
      ]
Applying changes to the configuration requires restarting the MQTT broker instance(s) to update the settings. If the Kafka plugin is configured correctly, it compares if the topic where new messages arrive on the MQTT broker matches the mapping definitions and forwards the message if a match is found.
What can you do with the data in Kafka?
To summarize, a Pro Mosquitto broker with a configured Kafka bridge plugin is running, and a Kafka broker is running within the Kafka cluster (refer to Figure 1).
Some MQTT clients publish messages on the MQTT broker, for example, events from LoRa devices.
You can then apply powerful processing options using the ksqlDB, the database built purposely for stream processing applications using Kafka brokers. Or, Node-RED is a good choice for simple debugging and visualization. For more information, check out this guide on integrating Node-RED with the Mosquitto MQTT broker. You must install the palette nodes from the node-red-kafka-client and apply at least the corresponding setting:
- Host: IP address or name and port
- Topic: The topic which is bridge from the MQTT broker
See an example dialog in Figure 5.
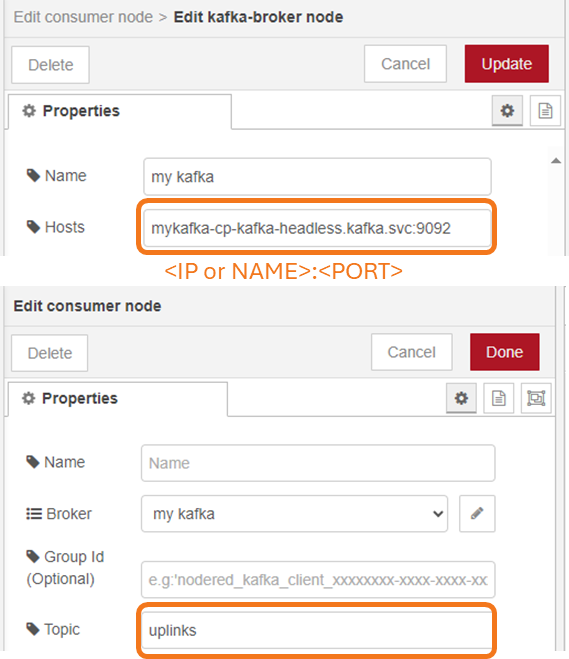
Figure 5 - Screenshot of the Kafka Consumer Node settings. Only two fields are required in a minimal case (Host and Topic).
The nodes in the Node-RED graphical editor show some indication of the consumer state. If new messages arrive on the topic, the state changes from ‘Idle’ to ‘Reading’. The subsequent flow/nodes populate the read data in the usual Node-RED message object.
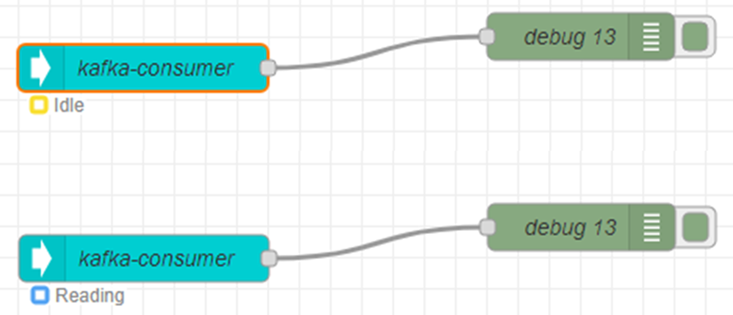
Figure 6 - Screenshot of a Node-RED editor showing a Kafka consumer node. The subscript ‘Idle’ and ‘Reading’ indicate the consumer states.
You can use the web-based dashboard of Node-RED to visualize the output of the Kafka consumer node easily.
Wrap-up
The Kafka bridge plugin in the pro edition of Mosquitto connects the IoT and stream processing world. Using bridged information from MQTT topics to Kafka topics makes high-performance data pipelines possible at a large scale. Consumer applications like dashboard and databases can be addressed using the manifold provided by Kafka sinks.
A given schema can configure the bridge plugin in a single configuration file. To test the functionality, you can sign up for a free Cedalo MQTT Platform trial and obtain a Pro Mosquitto on-premises license with basic MQTT HA configuration. The article provides a use case example with prepared ksql queries that you can easily customize to meet your specific requirements.


