
To operate digital IoT services using the Mosquitto™ MQTT broker at a large scale and reliably, you will need software platform tools that provide automatic security, scaling, and high availability with minimal user effort. A perfect match to realize this is to use Kubernetes to operate the Mosquitto with High Availability (HA) MQTT broker.
Kubernetes efficiently harnesses Mosquitto MQTT broker in a containerized environment, facilitating secure and scalable MQTT messaging for your applications and services.
With Kubernetes, you can deploy your applications on any cloud infrastructure or your hosts without worrying about the underlying technical details. Cedalo offers the option to run an on-premises Mosquitto HA Cluster on a Kubernetes platform for professional use. This article will focus on setting up and maintaining the cluster on virtual or bare metal machines using self-managed Kubernetes.
Prerequisites for a Pro Mosquitto MQTT broker Kubernetes setup
Ensure the following prerequisites are ready before setting up the Pro Edition for Mosquitto HA broker:
- Administrative access to a Kubernetes Cluster (v1.23 or higher) with one control panel host and at least three worker nodes.
- Enable the kernel module NFS-server on the host managing the Kubernetes control panel.
- The hosts managing the worker nodes have the option to mount NFS shares (apt install nfs-utils).
- Sign up for the 30-day free Pro Mosquitto HA broker trial license.
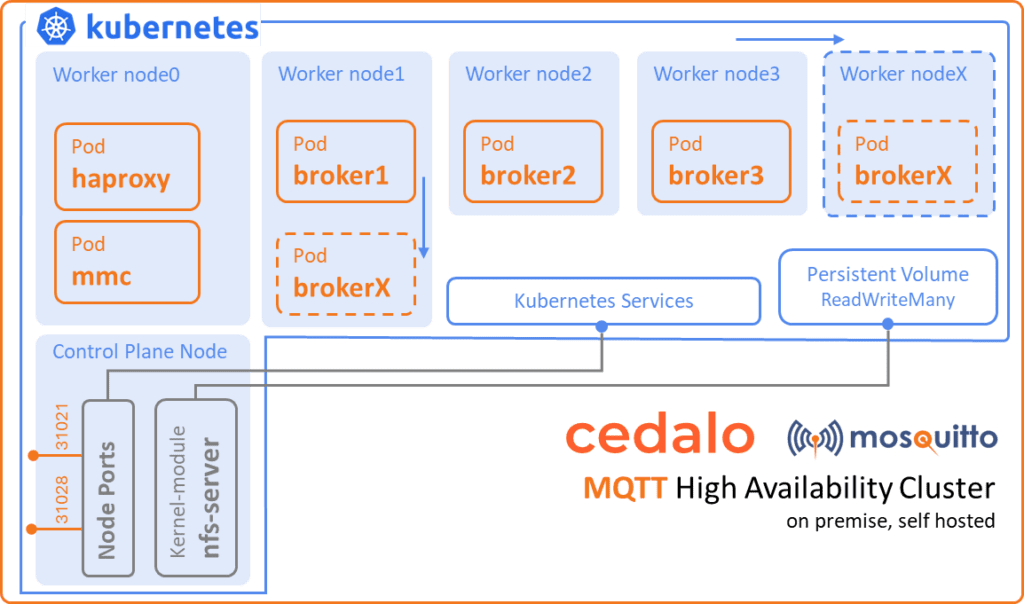
Figure 1 – Architecture of Mosquitto High Availability Cluster setup using Kubernetes.
In this project, a host refers to a physical or virtual machine capable of hosting a node. A node is an environment within the Kubernetes cluster that can perform various tasks. Typically, it uses the host’s container runtime to operate pods and is referred to as a worker node. The most common host operating systems are Ubuntu server LTS systems, typically launched using cloud-init scripts or customized images.
Create the on-premises self-managed Kubernetes cluster for MQTT broker setup
To begin with, there multiple options to set up your own on-premises Kubernetes cluster. Ensuring the highest availability will require different physical machines (bare metal). But you can also use Hypervisor systems from Microsoft together with the software multipass or vSphere from VMWare to start virtual hosts on your hardware.
To match the architecture above, start-up four hosts with Ubuntu (22.04 LTS) or Debian (11) operating system and ensure that:
- The hosts are all on the same (virtual) network, e.g., 192.168.1.0/16
- You have administrative console access via SSH protocol to all hosts
- The hostnames are control-plane, node0, node1, node2, and node3
Now, install the Kubernetes platform using these installation scripts. This procedure installs the dependencies and uses kubeadm to initialize the Kubernetes cluster, join worker nodes, set up network services, and enable required features.
Alternatively, choose the ubuntu server as an operating system for the hosts and install microk8s on every host:
sudo snap install microk8s --classicOnce complete, add the other nodes to the cluster by running the following on the control-plane host:
sudo microk8s add-nodeAs a result, this will print the information necessary to run on every other host (node0, node1,node2, node3):
sudo microk8s join <control-plane-ip>:25000/<token>Then, use the specific IP address and the token printout from the add-node command.
Finally, enable the features needed for the cluster on the control-plane host:
sudo microk8s enable ha-cluster dns storageMonitor, control, and administer the MQTT Kubernetes Cluster
Controlling and monitoring the Kubernetes cluster will require tools like the command line application kubectl. However, if you are working with microk8s snap for Ubuntu, the installation is already complete. Otherwise, follow these installation instructions.
Run the following command to display the state of the nodes in the cluster:
kubectl get nodesFor example, these are the possible results:
NAME	STATUS 	       ROLES		AGE   VERSION
Node0	Ready    	worker		28d   v1.25.16
Node1	Ready    	worker		28d   v1.25.16
Node2	Ready    	worker		28d   v1.25.16
Node3	Ready    	worker		28d   v1.25.16
Meanwhile, use the helm tool to deploy Pro Edition for Eclipse Mosquitto MQTT resources later on. It is specialized for Kubernetes deployments, known as helm charts, and is comparable to other package management tools like apt, brew, and yum. Installing helm is straightforward using these instructions, or it will already be in place if you set up the cluster with the snap microk8s (run: sudo microk8s helm).
Another optional but helpful tool is the Kubernetes dashboard. It allows you to apply changes, view logs, and view the state of the resources in the cluster. The dashboard itself runs as an additional service and container in the cluster and is accessible through a web browser. Follow these steps to install and run the Kubernetes dashboard.
To enable the dashboard using microk8s, execute the command:
sudo microk8s enable dashboardAs a non-gui alternative for the dashboard, use the command line tool K9S to achieve the same functionality on your console.
At this point, the self-managed Kubernetes cluster is in place with tools to monitor (dashboard or K9S), control (kubectl and K9S), and manage deployments (helm) via command line or web browser.
If you haven’t signed up for a free Cedalo MQTT Platform trial to test Pro Mosquitto MQTT Broker that supports MQTT High Availability and Kubernetes deployment, you can do it here!
Deploy the Pro Edition for Eclipse Mosquitto MQTT HA Cluster on Kubernetes
You can see the core variant of deployment below:
- Multi-node on-premises (own infrastructure, one availability zone = all host at same place)
- Self managed Kubernetes
- High availability cluster mode with scaling option (1 Management Center, 1 NFS server, on-demand Pro Edition for Eclipse Mosquitto brokers)
The deployment has the following steps:
- Create and define the NFS export on the control-panel host.
- Create a Kubernetes namespace, create the secret for the container registry, and create config maps for the license and the Pro Edition for Eclipse Mosquitto broker configuration.
- Create the load balancer configuration (HA proxy).
- Deploy the resources via helm chart.
After signing up for the Pro Mosquitto broker trial (select “yes” for the Kubernetes setup), you will receive an email from Cedalo containing all the necessary information and files:
- Your personal Cedalo registry credentials (username/password)
- (Trial) License as a text file
- Helm chart as a compressed archive
NFS Server
Install the NFS server on the control-panel host to provide file storage locations for the broker instances on the worker nodes. Configuration is done in the /etc/exports file, with export paths matching those defined for the persistent volumes in the helm chart. Refer to the documentation for details on the /etc/exports file.
Namespace, secret, and config maps
Now, to prepare the Kubernetes cluster, create a namespace with a name of your choice (for this project, let’s use cedalo):
kubectl create namespace cedaloThen, create a secret named mosquitto-pro-secret for Kubernetes to pull docker images from the Cedalo registry. You can set the secret using the command:
kubectl create secret docker-registry  mosquitto-pro-secret --docker-server=registry.cedalo.com
--docker-username=<username>
--docker-password=<password>
--docker-email=<your-email-from-registration>
--namespace cedalo
Place the license in a config map named mosquitto-license so that the instances of MMC and Pro Mosquitto MQTT broker can mount the license in the container. Create the config map using the license file from the sign-up email:
kubectl create configmap mosquitto-license --from-file=<path-to-your-license-file>Furthermore, this final step will create a config map named mosquitto-config1 for all Pro Mosquitto MQTT broker instances in the cluster:
kubectl apply -f - <<EOF
apiVersion: v1
kind: ConfigMap
metadata:
  name: mosquitto-config1
data:
  mosquitto.conf: |
      global_plugin /usr/lib/cedalo_mosquitto_ha.so
      allow_anonymous false
      listener 1883
      listener 1885
      admin_listener true
      set_tcp_nodelay true
      persistence_location /mosquitto/data
      plugin /usr/lib/cedalo_inspect.so
      plugin /usr/lib/cedalo_client_control.so
      plugin /usr/lib/cedalo_certificate_management.so
      enable_control_api true
EOF
Load balancer configuration (HA proxy)
Understanding how load balancing works is crucial for achieving high availability in a cluster. A load balancer routes client service traffic to redundant pods (replicas) capable of handling the load. As we can see, the configuration in Figure 1 shows three worker nodes running, with one broker instance (pod) on each of them. The load balancer has different methods for choosing which broker to address, with the most common and default method being named round-robin.
The load balancer routes new connections to each service sequentially, starting from one and moving to the last available service for a pod replica. This ensures that the load stays in balance across all available replicas. In the context of the Pro Edition for Mosquitto MQTT broker, this is the HA - Dynamic-Security Sync (active-active) configuration, as all replicas of the broker are active and capable of handling loads. For HA-Full Sync (active-passive), only one broker is active and accepts connections on the defined port, typically 1883. Although there is no load balancing, the load balancer can still handle this by recognizing the availability of the replicas and automatically routing traffic to the active leader. The leader is elected using the Raft consensus algorithm.
Load balancers can live inside the cluster and run as a pod, or outside the cluster as a host service. While popular cloud infrastructure providers offer these services as inherent functionality, I would recommend installing them separately on-premises, as is the case here. HAproxy is an open-source implementation that can run inside the cluster and function as a reverse proxy, TLS termination endpoint and load balancer. HAproxy can be installed using Cedalo’s steering diagram by creating the haconfig config map from the configuration file.
Create the config map for the HAproxy pod with:
kubectl create configmap haconfig -n <namespace> --from-file=<path-to-haproxy.cfg>and place the following content in a file named haproxy.cfg before executing.
global
    daemon
    maxconn 4096


frontend mqtt_frontend
    bind *:1883
    mode tcp
    default_backend mqtt_backend
    timeout client 10m


backend mqtt_backend
    timeout connect 5000
    timeout server 10m
    mode tcp
    option redispatch
    server m1 mosquitto-0.mosquitto.cedalo.svc.cluster.local:1883 check on-marked-down shutdown-sessions
    server m2 mosquitto-1.mosquitto.cedalo.svc.cluster.local:1883 check on-marked-down shutdown-sessions
    server m3 mosquitto-2.mosquitto.cedalo.svc.cluster.local:1883 check on-marked-down shutdown-sessions
The helm chart will deploy one instance of the Pro Mosquitto MQTT broker on every worker node (node1, node2, node3) and create a headless service for each broker instance. You can address these services within the cluster by the name (DNS):
mosquitto-X.mosquitto.cedalo.svc.cluster.localwhere X stands for the replica number, which in this case is 0,1, or 2. The DNS service names represent the defined backend servers in the configuration file for the HAproxy.
Deploying resources via helm chart
At this point, the following exists:
- An NFS server with a known IP address and defined exports is accessible by all nodes
- A Kubernetes cluster with four worker nodes and one control-plane node
- A “cedalo” (or any other chosen name) namespace
- A “mosquitto-pro-secret” secret for accessing the cedalo registry
- A “mosquitto-license” config map with your license
- A “mosquitto-config1” config map with the broker configuration
- A “haconfig” config map for the load balancer (HAproxy)
To deploy Pro Mosquitto MQTT broker, run the helm command with the following parameters:
helm upgrade --install mosquitto_ha mosquitto-multi-node-multi-host-0.1.0.tgz
--namespace cedalo
--set namespace=cedalo
--set nfs=<IP-ADRESS-NFS-SERVER>
Cedalo will provide a folder containing the entire setup, including helm charts (i.e., mosquitto-multi-node-multi-host-0.1.0.tgz) and other configs.
After a while, you can observe the pods on the different nodes. For example, executing:
kubectl get pods -n cedaloshould display information similar to Figure 2. You can also use tools like K9S or the Kubernetes dashboard to monitor the deployment process. Depending on your internet connection’s bandwidth, the docker images may take a few minutes to download and start.

Figure 2 – A view of the running pods for the Pro Mosquitto broker, three broker replicas and one Management Center.
The MMC pod is accessible at this stage without TLS encryption by using a web browser with the following URL (user: cedalo, password: mmcisawesome):
http://<IP-CONTROL-PLANE-HOST>:31021The connection is established via the “mmc” service which is configured as a node port. To ensure that the MMC service is running on the correct port run:
kubectl describe service mmc -n cedaloand observe the number shown after “nodePort” in the command output.
Configure Pro Mosquitto in Kubernetes and Test
The Pro Mosquitto MQTT broker replicas and the MMC are now running in the Kubernetes cluster. However, you must configure the type of cluster synchronization, the HA broker itself, and the access in the MMC. To do so:
- Create the broker connections
- Create the cluster
- Create client credentials, roles and ACL
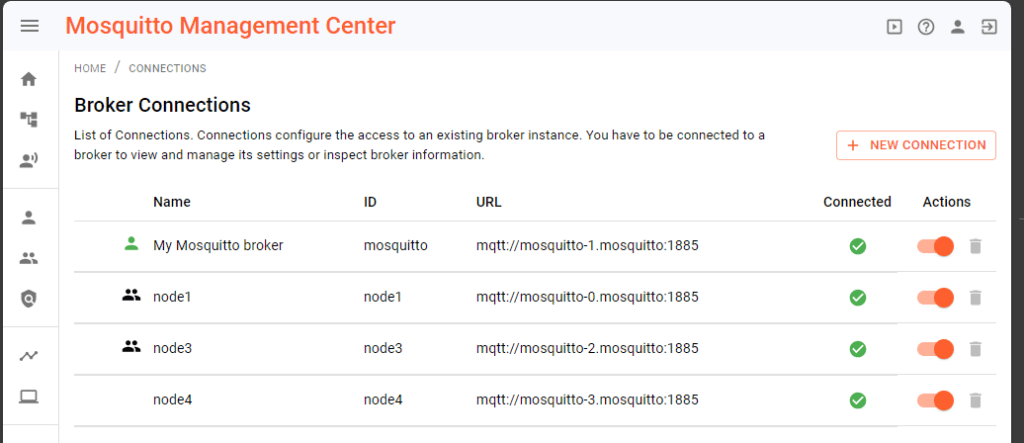
Figure 3 – Screenshot showing an example overview of broker connections with the leader and follower nodes.
Broker connections
A prerequisite for the broker connections is the dynamic-security admin password, which you can obtain from the environment variable MOSQUITTO_DYNSEC_PASSWORD configured for the broker instances.
To display this variable, one option is to execute:
kubectl describe statefulset mosquitto -n cedaloand observe the “Environment” section in the output. After copying the password, the broker can create connections by following this documentation.
Afterwards, in the URL field, enter “mqtt://mosquitto-X.mosquitto:1885” (X ranges from 0 to 2), username with “admin” and password with the value from the environment variable MOSQUITTO_DYNSEC_PASSWORD. Name the broker connections “nodeY” where Y ranges from 1 to 3.
Configure the HA cluster
Firstly, create the cluster configuration in the MMC. Secondly, choose the three configured “nodeY” broker connections and set the address to “mosquitto-X.mosquitto,” where X ranges from 0 to 2 and Y from 1 to 3. Choose Full sync mode and click save.
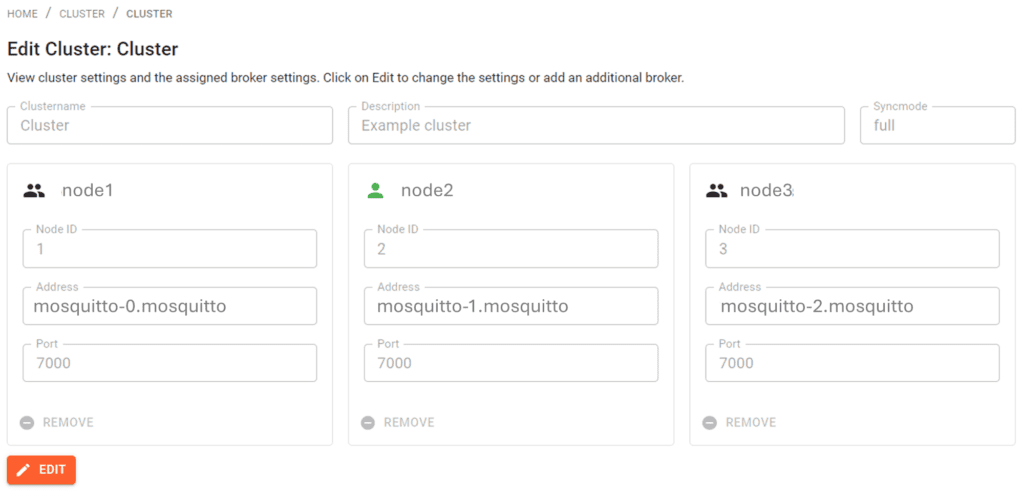
Figure 4 – A screenshot of an example cluster configuration with three nodes.
Create client credentials, roles and ACL
Now, the cluster is defined and configured. You may use the Kubernetes monitoring tools – Dashboard, kubectl, or K9S to observe the logs from the Kubernetes pods.
For example:
kubectl logs statefulsets/mosquitto -n cedalowill print the logs of all the running broker instances.
To create a first client, choose the broker connection in MMC marked as the leader – see the green icon in the top right of Figure 5. Then, create client credentials as usual and assign roles and groups. Figure 5 shows a screenshot where the “user” client is created and assigned the “client” role, granting permission to publish and subscribe to all topics.
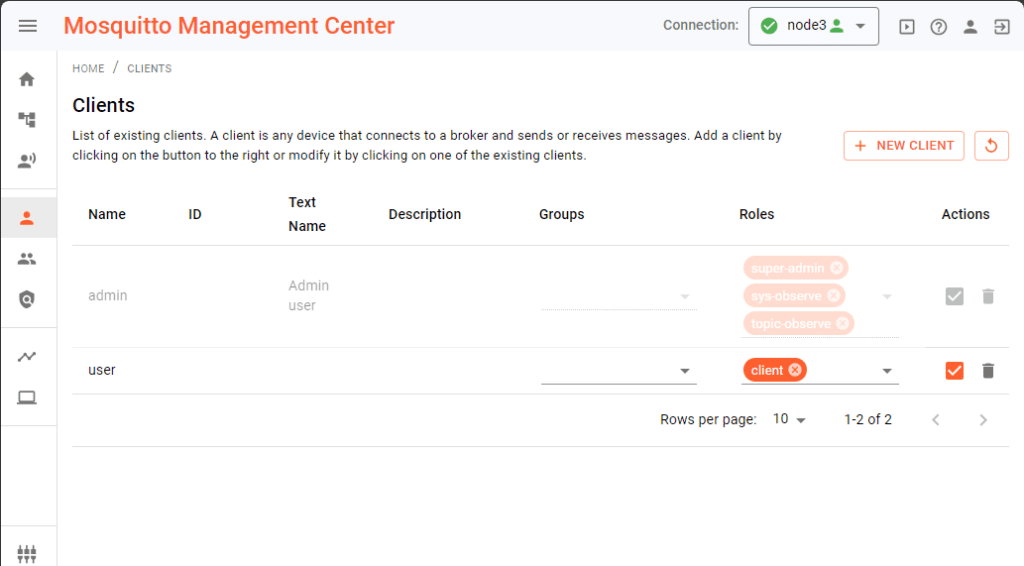
Figure 5 – Screenshot of the client list in MMC for the cluster; showing that the broker connection “node3” is the cluster leader (top-right).
Overall, you can perform functional tests with these client credentials and the assigned role.
Test Pro Mosquitto MQTT broker on Kubernetes and simulate a node failure
To test the high availability mechanism in full sync mode, connect two clients to the cluster. One client subscribes to a test topic and the other publishes messages periodically on the test topic. The publishing client sends a number as a message payload every 100ms. Each time a message is goes out, the number increases by one. Use the MMC to identify the leader broker (full sync mode). To simulate a failure, delete this leader broker (pod) in the Kubernetes cluster. When this happens, one of the two passive brokers will automatically become active and take over the connection. The point marked in Figure 6 indicates a single lost message, but the operation is fully functional again within 200 ms.
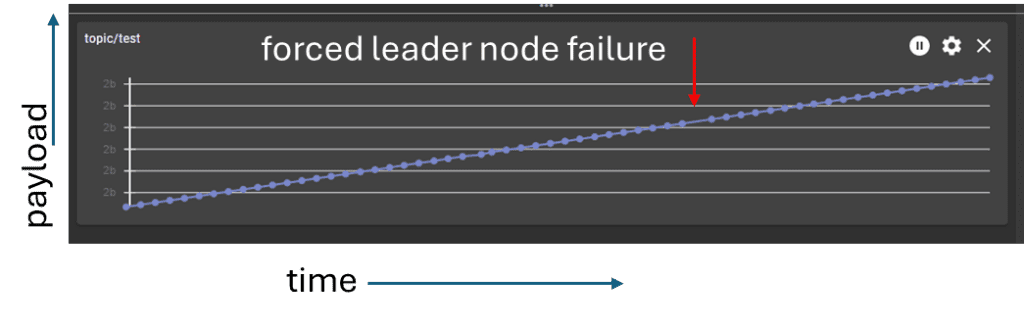
Figure 6 – Graph of the test client payload over time. Every 100ms, the client sends an integer number increase by one. One message is missed due to forced leader node failure in full sync mode.
Add a node and scale the MQTT cluster
To increase load capacity, scale up the cluster by adding more broker instances. This is only useful for Dynamic-Security Sync, where every broker instance is active and takes loads:
- Add another node to the cluster
- Update the load balancer configuration (HA proxy)
- Increase the replicas for the Kubernetes statefulset
- Reconfigure the cluster
The procedure for adding another worker node to the self-managed Kubernetes cluster depends on the cluster configurations. If you are using microk8s, execute on the control panel node:
sudo microk8s add nodeCopy the output token, control-plane IP address, and execute on the new worker node:
sudo microk8s join <control-plane-ip>:25000/<token>Check the state of the new node by:
kubectl get nodesThen edit the HAproxy config. Add a new line for the new node (see config file above), and restart the HAproxy deployment with the command:
kubectl rollout restart deploy ha -n cedaloThe next step is to increase the number of replicas for the Pro Mosquitto MQTT broker statefulset:
kubectl scale statefulsets mosquitto -n cedalo --replicas=4Assuming you already have three replicas, the Kubernetes functionality will recognize the new worker node and schedule the additional replica to run on it.
Finally, add the new resources to the Pro Edition for Eclipse Mosquitto HA cluster using the MMC. Set up the connection to the new broker instance (mosquitto-3.mosquitto:1885), choose cluster management, edit the existing cluster, and add the new connection to the cluster.
Use the following command to restart all broker instances and apply the new cluster configuration:
kubectl rollout restart statefulset mosquitto -n cedaloAs you can see, Figure 7 shows a possible log output of one broker, where the configuration specifies four brokers. Ultimately, this specific broker is not elected as a leader, switches to a follower, and does not take connection requests.
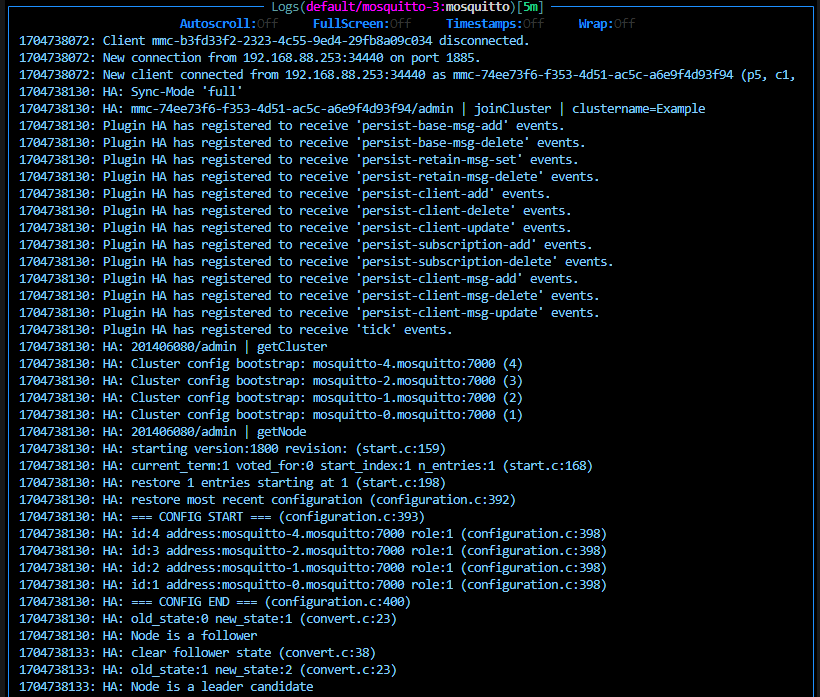
Figure 7 – Screenshot of the log output of one broker after editing and extending the cluster configuration by one additional broker.
TLS termination
While this article does not discuss TLS encryption setup, it’s worth noting that it is crucial to secure all production loads or data. TLS encryption is mandatory for a production-ready Pro Mosquitto HA cluster on Kubernetes. As a matter of fact, there are several options for achieving this, depending on factors such as the availability of valid certificates and automatic renewal within or outside the Kubernetes cluster. In the local self-managed setup, TLS termination can happen in the following way:
- The pod (i.e., Pro Mosquitto MQTT broker) itself, as client session data is synchronized across broker instances.
- The load balancer pods (i.e., HA proxy) that include TLS termination for MMC
- Outside the cluster with additional applications/services
In fact, a common approach is to use the Kubernetes cert-manager. As a result, this application automatically provides valid certificates based on a configured certificate authority as secrets, which can then be consumed and used by every pod within the cluster.
Conclusion
To sum up, the Pro Edition for Eclipse Mosquitto on Kubernetes is a perfect match for operating digital IoT services. It ensures the seamless management of security, scaling, and high availability with minimal user effort.
Thus, two parts can be seen when setting up the Pro Edition for Eclipse Mosquitto MQTT broker HA cluster on a self-managed Kubernetes platform:
- Establishing the Kubernetes cluster with shared storage, load balancing, secrets, and config maps.
- Monitoring the MQTT HA cluster using the Management Center (MMC) for an intuitive GUI-based approach.
Therefore, to test the functionality on your infrastructure, sign up for a free 30-day on-premises trial with basic MQTT HA configuration and Kubernetes deployment support.


