
Using small and IoT devices is common nowadays. Technologies such as Bluetooth Low Energy (BLE) and Long-Range radio technology (LoRa, LoRaWAN) combined with internet access enable applications like parking slot monitoring, indoor navigation, etc. Such applications commonly use highly integrated energy-efficient microcontrollers (µC) or systems on a chip (SoC).
Therefore, the ESP32 series microcontrollers with integrated Wi-Fi/Bluetooth modules on the chip are the ideal candidates for such tasks.

In addition to using ESP32 µCs as hardware, another common approach is to use the Pro Edition for Eclipse Mosquitto™ MQTT broker with High Availability for communication and information exchange.
Therefore, this article describes establishing a reliable and secure MQTT communication between an ESP32 module (ESP32 IoT board with ethernet) and the MQTT server.
It addresses:
- MQTT protocol v5.0
- TLS encryption
- WebSocket transport
- Auto reconnect functionality
Quickstart using MQTT on ESP32 with WebSocket and SSL/TLS
- Head to https://aschiffler.github.io/esp32-mqtt-node/
- Connect your ESP32 module via a USB cable to the PC where a page from step 1 is open in a web browser.
- Click the “flash the firmware to your device” button.
- Choose the correct serial port (mostly showing text like: “USB to UART bridge”) and click “connect”.
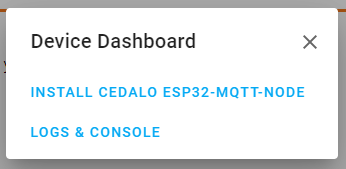
- Click “INSTALL…” and confirm the installation.
- After installation, click “Next” and then (same dialog as above) click “LOGS & CONSOLE.”
To illustrate, now you see the application running and waiting for your input.
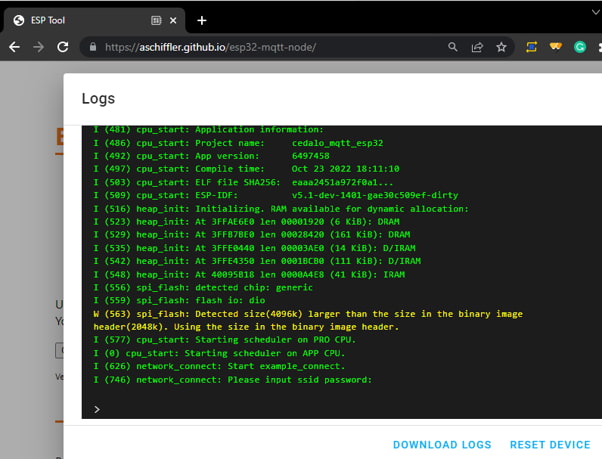
At this stage, you need to input the following information:
- Wi-Fi connection: Enter the Wi-Fi SSID and password in one line, like “mywifi mypass” (the pre-built firmware supports only WPA2 PSK).
- After enabling the connection to Wi-Fi/internet, the application tries to contact an NTP time server to get a synchronized date/time.
- MQTT Broker connection string: Enter the MQTT broker in one of the options, as you can find in the table below.
- MQTT protocol version: Type ‘y’ to use protocol version v5.0.
- Client/User credentials: Enter username and password (This client shall be able to publish messages and subscribe to the MQTT broker topics: “topic/qos1” and “topic/qos0”).
Possible MQTT server connection strings
| Connection string | Description |
|---|---|
mqtt://your-broker.cedalo.cloud | No TLS, default port 1883 |
mqtts://your-broker.cedalo.cloud | TLS and certificate verification enabled, default port 8883 |
ws://your-broker.cedalo.cloud | Transport over WebSocket, default port 80 |
wss://your-broker.cedalo.cloud | TLS and certificate verification enabled, Transport over WebSocket, default port 8883 |
<wss,ws,mqtt,mqtts>://<IP or DNS>:<PORT>/<basepath may be needed for WebSocket> | General scheme |
As a result, the output looks like the image below. If all goes right, the ESP32 module will publish the “Cedalo is awesome” message on the “topic/qos0” topic.
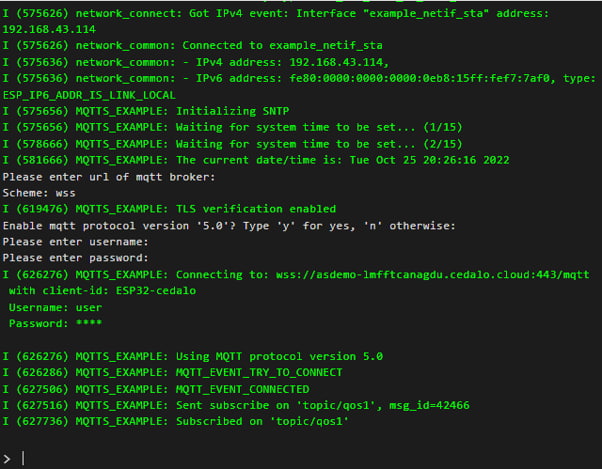
Now, you’re in control. Use any other MQTT client to publish the MQTT message “time” on “topic/qos1.” This will prompt a response from your ESP32 module on the MQTT topic “topic/qos0” and the console log. You’ll see the actual date and time from the ESP32, all at your command.

In the picture above, you can also see that the MQTT client automatically tries to reconnect after a connection loss. Disabling the Wi-Fi connection on the access point provoked this.
If this quick start fails, navigate to the Possible Issues section. Alternatively, read the following section for details about the firmware and the MQTT client on ESP32.
Software needed to use MQTT on ESP32
The nature of microcontrollers is that you need firmware that can flash on the device and, therefore, run the application itself. In most cases, the ESP32 modules you can find online have already installed bootloader firmware. The bootloader lets the user flash the custom firmware in the memory over a USB connection with a PC.
As you can see in the table below, several options exist for building the application firmware for ESP32.
| Name | SDK / Libraries | Development Environment (IDE) |
|---|---|---|
| ESP-IDF | Espressif Systems | Eclipse, VSCode, Common CMake IDEs |
| Arduino | Arduino | Arduino 2.0 (main file extension *.ino) |
| PlatformIO | Same as for Arduino | VSCode + PlatformIO Extension |
Because this article focuses on MQTT, we need to look more closely at the existing MQTT libraries or options that we could use together with ESP32 µCs.
| Name / Link | TLS | WebSocket | MQTT v5.0 | Documentation / Usage for ESP32 | Note |
|---|---|---|---|---|---|
| Paho embedded C | Yes | No | Dev branch, no release | Unsure | Last commits on github 2018 |
| espMqttClient | Yes, via add. Libraries | No | No | Good | TLS only for Wi-Fi |
| Arduino Client for MQTT | Yes, via add. Libraries | No | No | Very Good | TLS only for Wi-Fi |
| micro Python + umqtt.simple | No | No | No | Very Good | ESP32 acts as a python runtime via terminal |
| ESP-IDF | Yes, via Add. Libraries (mbedTLS) | Yes | Yes | Good | Maintained by Espressif, manufacturer of ESP32 |
Using micro Python on ESP32 is becoming increasingly popular, but the well-known PAHO MQTT client can’t run on embedded micro Python.
As I mentioned in the introduction, ESP32 µCs are often used in mobile applications. Since network connectivity is challenging, one should consider unknown network routes and firewall rules when implementing this project. Therefore, the preferred approach is choosing a “bidirectional HTTP protocol” called WebSocket. Due to its robustness, this protocol is often the best choice for transmitting MQTT payloads over HTTP/WebSocket, especially on unknown routes. Check out this blog post to learn more about enabling WebSockets for Mosquitto.
Reading the above information and facing the requirements also clarifies that we have to choose the Espressif IoT Development Framework (ESP-IDF) for the development. In short, the ESP-IDF is comprehensive, covers all technological topics, and uses C/C++, which makes the development more challenging from the initial point of view. However, do not worry, as there are many examples in the public repository that will provide you with the support you need.
In short, this article explains how to use the prepared source code and pre-built firmware to create a demonstrative MQTT application. Therefore, you can follow this link (you will need a GitHub account) and start a ready-to-use development environment in your internet browser.
MQTT ESP32 example application
The following sections explain building a basic program that enables the ESP32 to connect securely to the Mosquitto MQTT server to publish messages and subscribe to MQTT topics.
The sample application has a simple functionality. Every time an MQTT message is published to a specific topic, the ESP32 will publish the current time, which is synchronized via NTP, to another topic.
If you’re interested in learning more about the possibilities of using the ESP32 board in MQTT projects, read our Home Assistant Mosquitto tutorial.
Requirements for the MQTT Broker to work with ESP32
As a result, to make use of this functionality, you will require the following:
- Firstly, a running MQTT broker and the address (ipv4 or DNS name).
- Secondly, the credentials (username/password) to publish messages and subscribe to topics.
- Lastly, you’ll need the broker’s X509 certificate (only if the issuer CA is other than the well-known R3’s “Let’s encrypt”).
Rest assured, all the above requirements can be easily met with Pro Mosquitto, included in the Cedalo MQTT Platform trial. Try it for free—in the cloud or on-premises—and explore advanced functionality, including Persistent Queueing, Audit Trails, MQTT High Availability, and more.
The source code for ESP32 MQTT client
The source code for the sample application I described in this article is here. Also, it uses the ESP-IDF SDK to build the firmware.
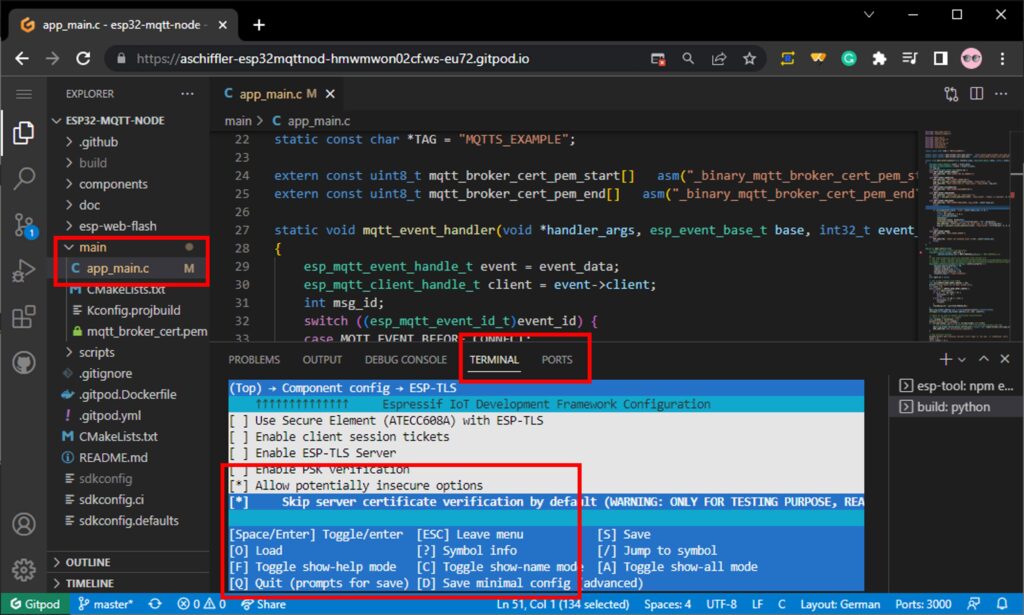
In brief, editing and adjusting the code will start mostly in the file main/app_main.c
The relevant structure of app_main.c is as follows. The code is presented as a simplified excerpt, showing the most critical MQTT-related parts.
Includes (excerpt, MQTT, TLS, NTP)
#include "mqtt_client.h"
#include "esp_tls.h"
#include "esp_sntp.h"
The function app_main starts the network connection, NTP synchronization, and, finally, the MQTT client in line 4.
1 | void app_main(void){
..
2 |     ESP_ERROR_CHECK(network_connect());
3 |     ESP_ERROR_CHECK(sntp());
4 |     ESP_ERROR_CHECK(mqtt_start());
...
5 | }
After that, the function sntp sets the time servers and starts the synchronization task.
6 | esp_err_t sntp(void){
...
7 |  sntp_setservername(0, "0.de.pool.ntp.org");
8 |  sntp_setservername(1, "1.de.pool.ntp.org");
9 |  sntp_setservername(2, "2.de.pool.ntp.org");
10|  sntp_init();
...
11| }
As a matter of fact, this function – mqtt_start – is one core component in this sample application. The struct in lines 13-17 defines the mandatory client settings (see here for reference).
Furthermore, in lines 18-23, some of the MQTT v5.0-specific values are set. These settings only apply if the value is set to MQTT_PROTOCOL_V_5 in line 14. Moreover, you can read the article here for more information on using protocol v5.0.
Later, in line 25, the client instance handle is created, and the settings are applied. The function call registers the callback function in line 30, and finally, the MQTT loop task is started in line 31.
12| esp_err_t mqtt_start(void){
...
13|   esp_mqtt_client_config_t mqtt_cfg = {
14|    .session.protocol_ver = MQTT_PROTOCOL_V_3_1_1
15|    .broker.address.uri = “mqtts://your-borker.cedalo.cloud”
16|    .credentials.username = “user”
16|    .credentials.authentication.password = “password”
17|   };
18|   esp_mqtt5_connection_property_config_t connect_property = {
19|    .session_expiry_interval = 10,
20|    .request_resp_info = true,
21|    .request_problem_info = true,
22|    .message_expiry_interval = 10,
23|    .response_topic = "topic/response",
24|   };
...
25|   esp_mqtt_client_handle_t client = esp_mqtt_client_init(&mqtt_cfg);
26|    if (mqtt_v5){
27|     esp_mqtt5_client_set_connect_property(client, &connect_property);
28|     ESP_LOGI(TAG,"Using MQTT protocol version 5.0");
29|   }
30|   esp_mqtt_client_register_event(client, ESP_EVENT_ANY_ID,...);
31|   esp_mqtt_client_start(client);
...
32| }
The mqtt_event_handler function implements the main functionality of the sample application. First, it handles different events by looking at the event ID (line 37).
Therefore, there are two events in the code excerpt. After the client has established a connection to the broker, the client subscribes to the topic “topic/qos1” with the Quality of Service level 1 (line 40). This article provides further insights into MQTT QoS levels.
If the broker successfully registers the subscription and reports to the client, the event in line 42 will be handled. In the sample application, this event triggers the client to publish an MQTT message to the topic “topic/qos0” with Quality of Service level 0, lines 43 and 44 (see this reference about the function call parameters).
Finally, every time a message is received on one of the subscribed topics – wildcards like “topic/#” are possible – in lines 46 and 47, the message (= event->data) is printed on the console.
33| static void mqtt_event_handler(...){
...
34|  esp_mqtt_event_handle_t event = event_data;
35|  esp_mqtt_client_handle_t client = event->client;
36|  int msg_id;
37|  switch ((esp_mqtt_event_id_t)event_id) {
38|   case MQTT_EVENT_CONNECTED:
39|     ESP_LOGI(TAG, "MQTT_EVENT_CONNECTED");
40|     msg_id = esp_mqtt_client_subscribe(client, "topic/qos1", 1);
41|     break;
42|   case MQTT_EVENT_SUBSCRIBED:
43|     msg_id = esp_mqtt_client_publish(
44|          client, "topic/qos0", "Cedalo is awesome", 0, 0, 0);
45|     break;
46|   case MQTT_EVENT_DATA:
47|     ESP_LOGI(TAG,"Received message: %s",event->data);
48|     break;
49|  }
...
50| }
Build your own ESP32 MQTT application
The easiest way to customize or create your application is to use the ready-to-code environment provided here. Also, this will start a gitpod instance (GitHub account needed) with all the tools and libraries already set up.
By executing the command idf.py menuconfig in the terminal, a menu configuration dialog opens, and you can set various options for the application or the components. For example, you can disable the certificate verification by default for testing purposes. Therefore, navigate the menu to Component Config > ESP-TLS > Allow insecure options > Skip verification and enable this option. Then hit “Q” and “Y” to exit and save.
To compile the code and build the application (firmware), type idf.py build in the terminal and wait until finished.
Finally, you can now flash the built firmware by opening the web flash tool. To do so, click the “Ports” tab (see image below) and click the URL on the page.
Additionally, you can find the procedure with the modified firmware in the Quickstart section.
However, if you prefer not to code in the browser and want to use a local IDE setup, check out the repository’s docker file. It has a complete list of the mandatory packages. Alternatively, you can always refer to the official documentation for ESP-IDF.
How do I troubleshoot the MQTT ESP32 connection issues?
Quick-Start, using the MQTT application on ESP32 issues
Issue No. 1: The console shows a critical connection timeout for Wi-Fi or MQTT broker, a problem that needs immediate attention.
Reason:
- The ESP32 module can not access the broker via Wi-Fi, or the Wi-Fi router does not assign an IP address via DHCP; the Wi-Fi router has no route to the broker (no internet connection).
Solutions:
- You can restart the ESP32 by clicking restart in the console or by making a power cycle by unplugging and plugging in the USB cable.
- Type in the correct credentials for Wi-Fi and MQTT broker.
- Establish a network route to the MQTT broker.
Issue No. 2: The console shows esp-tls-errors.
Reasons:
- The certificate provided by the MQTT broker is not valid.
- The certificate provided by the MQTT broker can not be verified.
Solutions:
- Check with other tools if the certificate is valid (self-signed certificates are always invalid). If not, disable verification (see section before).
- Check the certificate in the main/mqtt_broker_cert.pem file to see if it matches your MQTT broker’s issuer CA (default R3’s “Let’s encrypt”). If it does not match, replace the mqtt_broker_cert.pem with the correct one.
- Restart the ESP32 module by power cycle.
Issue No. 3: MQTT connection errors/timeout.
Reasons:
- Wrong user credentials.
- Protocol Version not supported.
- Port (e.g., 8883, 1883) can not be reached by the ESP32 client.
Solutions:
- Check/adjust credentials.
- Test connection to specific ports with other wifi clients in the same network.
- Use Protocol version 3.1.1.
- Restart the ESP32 module by power cycle.
Build the application/firmware issues
Issue No. 1: Compilation fails.
Reason:
- Syntax errors, file not found, type cast.
Solutions:
- Investigate on given lines.
- Search the internet for similar problems.
Issue No. 2: Command idf.py was not found.
Reason:
- Rate limits and idle throttling of gitpod instance.
Solution:
- Restart the gitpod instance (Code changes will be preserved).
Issue No.3: Web Flash Tool is not available; shows “manifest not found.”
Reasons:
- The binary files (firmware) are not available.
- The web flash tool is not served.
Solutions:
- Build the firmware with the command idf.py build.
- Download the firmware from the build folder and use another flash tool.


