
MQTT ranks among the most used and powerful standardized protocols in the Internet of Things. Its success is attributable to customizable topic names and encoding payload data. However, for industrial applications such as IIoT/SCADA Systems, it can be beneficial to align with cross vendor specifications, like those from fieldbus protocols or other non-real-time protocols. To achieve this aim, Sparkplug B comes as a specification based on MQTT. It defines:
- Consistent Topic Namespace
- Payload Format Definition
- State Management
In this article, you will find details of the specification and a Python tutorial on how to build a simple Sparkplug-enabled architecture (Figure 1).
Note: This article refers specifically to Sparkplug B, as it is currently in practical use.
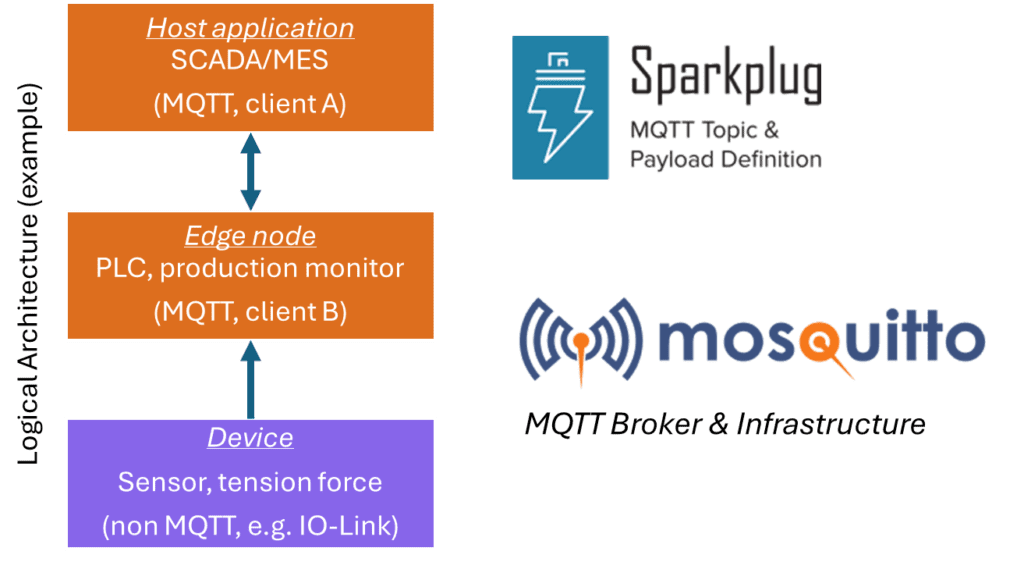
Figure 1 - An example architecture to demonstrate a Sparkplug specification on MQTT use case.
Sparkplug B specification: Key points and usage
Cirrus Link initiated the Sparkplug Specification in 2016 and released the most recent updates at the end of 2022. Sparkplug is not a transport protocol; it defines rules and methods on top of the MQTT transport protocol. On a higher abstract level, you can compare it to the fact that MQTT defines a transport container, and Sparkplug defines the inner design of the container. In other words, it is an extension of MQTT to realize the Industrial Internet of Things (IIoT) with namespace, payload, and state definitions across device vendors. The next section names and explains its key features in detail.
Explore the power of MQTT and Sparkplug by requesting a free Cedalo MQTT Platform trial. Use the trial to set up a Sparkplug-enabled architecture using our Pro Edition for Eclipse Mosquitto™ broker, and unlock advanced features like MQTT High Availability configuration and more.
Consistent topic definition
Sparkplug introduces a consistent topic namespace that allows different devices and applications to communicate effectively. This ensures that devices can discover and interact with each other seamlessly. The MQTT topic namespace is defined as:
spBv1.0/<group_id>/<topic_verb>/<node_id>/The group_id, node_id, and the optional device_id components are user-defined strings. The topic_verb component is one of the following types defined in the specification:
- NBIRTH, NDEATH, DBIRTH, DDEATH for node/device state management
- STATE for host application state management
- NCMD, DCMD for messages received by the node/device
- NDATA, DDATA for messages published by the node/device
Using this topic definition is mandatory for all clients in a Sparkplug-enabled namespace. The string for group_id helps structure information exchange, for example, at the machine or factory level in an industrial production environment.
Payload encoding
Besides topics, Sparkplug defines a consistent payload format by a fixed scheme in JSON syntax. This defines how data is encoded and shared between devices and applications. By adhering to this format, Sparkplug ensures interoperability across the IIoT ecosystem. The payload is encoded using binary protocol buffers (aka “protobuf”). This approach ensures cross language compatibility and maximum performance due to its compact size and fast parsing possibilities. However, payloads encoded as binary protocol buffers are not human-readable like common MQTT message payloads.
Node/device state management
One of the most significant features of the Sparkplug specification is state management, which is enabled with a compatible MQTT broker like Pro Edition for Eclipse Mosquitto™ from Cedalo. This feature allows for the comprehensive and reliable monitoring of the online state of nodes, devices, and host applications.
Sparkplug introduces the topic verbs NBIRTH and DBIRTH for creating and joining nodes/devices to the MQTT broker. The content of the birth message payloads includes information about later published data, such as measurement metrics and data types. Nodes/devices disconnecting from the MQTT broker use the topic verbs NDEATH and DDEATH. The corresponding payloads for the device state messages are called certificates and include, at least, sequence numbers that enable the relation of “DBIRTH” to “DDEATH” messages. The corresponding node publishes these messages.
In an industrial use case, the “node” can be a PLC with at least one sensor (the device in the context of Sparkplug) connection (see Figure 1). If the sensor is in operation and works as expected, the PLC (node) publishes the DBirth message on the behalf of the sensor. If the sensor fails or is not operational, the PLC publishes the DDeath message.
NBirth and NDeath messages define the state of the PLC (node). Unlike the device state messages, the “NDeath” messages utilize the (last) will message function of the MQTT protocol. This message must contain a sequence number so that the “Birth” and “Death” can relate correctly.
The client does not set the birth/death messages as retained. The Sparkplug Aware MQTT broker automatically sets the Sparkplug system topics ($sparkplug/#), which represent the persistent state of all Sparkplug clients. For more information about the basic functionalities of the Mosquitto MQTT broker regarding Will Message, retain messages or quality of service levels, refer to the article.
Host application state management
Unlike the node and device states, the state message for a host application resides on a different topic tree:
spBv1.0/STATE/<host_application_id>The user-defined string host_application_id must be unique across the Sparkplug namespace on the MQTT broker. In the sense of MQTT, the host application is also a client. During initialization, this client publishes a will message with a JSON payload: {‘online’:false, ‘timestamp’: <time_0 unix ms>}, retain set to true on the topic given above.
If the host application is operational, it publishes the payload {‘online’:true, ‘timestamp’: <time_0 unix ms>}. Note that the timestamp should match the one in the will message. If the host application disconnects intentionally or by failure, the MQTT broker will publish the will message with the key online set to false. It does this to ensure consistent state information about the host application, which is especially important if another MQTT client later connects to distribute information about the host application’s online state. Additional monitoring is possible and further increases the robustness of the information system.
Sparkplug Awareness of Pro Mosquitto MQTT broker
A Sparkplug Aware MQTT server extends the state management approach of Sparkplug by automatically storing the birth and death certificates as retained messages in the Sparkplug system topics $sparkplug/certificates/#.
$sparkplug/certificates/namespace/group_id/<topic_verb>/edge_node_id/device_idThe topic_verb can be NBIRTH, NDEATH, DBIRTH or DDEATH. Host applications or any other MQTT client that newly connects to the MQTT broker and subscribes to the Sparkplug system topics will immediately receive the complete state of all nodes/devices.
To enable the Sparkplug awareness in the Pro Mosquitto MQTT broker, set the following option in the configuration file:
global_plugin /usr/lib/mosquitto_sparkplug_aware.soAdditionally, you can deploy Pro Mosquitto in a high availability cluster setup. This is a powerful and reliable building block to realize any industrial use case with the Sparkplug extension.
Example of running a Sparkplug Aware Pro Mosquitto MQTT broker in Python
To familiarize yourself with the Sparkplug extension of the MQTT protocol, I will describe a straightforward use case constructed and realized using Python scripts.
The use case consists of four components, as shown in Figure 1:
- Pro Mosquitto MQTT broker, and optionally, the Management Center for Mosquitto™ web UI. Sign up for a free Cedalo MQTT Platform trial to experience their full capabilities and explore supported protocols like Sparkplug, WebSockets over TLS, and more.
- SCADA/MES represents an MQTT client to serve as a host application according to the Sparkplug specification.
- Sensor connected to the PLC measuring a mechanical value (Sparkplug device).
- PLC represents an MQTT client, which serves as a node according to the Sparkplug specification. It periodically publishes the measured value on the sensor’s behalf using the
DDATAtopic_verb.
The use case aims to realize the on-demand remote monitoring of a process, such as when issues arise in production. The SCADA/MES sends a command to the PLC to “switch on detailed monitoring.” The PLC then publishes sensor measurements to the specific device topic. For a deeper understanding of SCADA and its role in modern IoT systems, check out this article to see how it fits into the Sparkplug-enabled architecture.
This repository contains two Jupyter notebooks: sparkplug_demo-host and sparkplug_demo-node, which contain the code and descriptions. You can start working directly in the browser by following the link: Start Sparkplug Python Demo on Binder-Hub.
The following sections highlight key code lines, but you can find the complete code here. It also assumes that you have a Sparkplug Aware Pro Mosquitto MQTT broker with a known address, credentials, and the necessary permissions to publish/subscribe to Sparkplug topics.
Python use case demo – Host application
In this use case, the host and node use the OSS libraries paho (version 1.6.1) and pysparkplug (0.3.2). The host application configures and connects to the MQTT broker using the Paho client in Python, which offers various options such as websocket/tcp transport, v3/v5, and tls.
During the initialization of the connection, you should set the Will message with QoS=1 and retain=True, according to the Sparkplug specification. This example will name the SCADA system “mySCADA.” Additionally, subscribe to the Will topic:
import paho.mqtt.client as paho_mqtt
import pysparkplug as psp
#... others lines


# Register a WILL message see Spec: 12.63. STATE
paho_client.will_set(
    "spBv1.0/STATE/"+sparkplug_host_id,
    json.dumps({
        'online':False,
        'timestamp':host_birth_ts}
    ),
    1, True
)
# … other lines
paho_client.subscribe("spBv1.0/STATE/mySCADA",1)
Hand over the established MQTT connection to the Sparkplug host application object (pysparkplug). Then, publish the state message with the same timestamp host_birth_ts as the Will message.
mes_client = psp.Client()
# Hand over connection object
mes_client._client = paho_client


mes_cmd_topic = psp.Topic(
message_type=psp.MessageType.STATE,
group_id="production_line_PSM",
sparkplug_host_id=”mySCADA”
)


mes_cmd_payload = psp.State(timestamp=host_birth_ts, online=True)


mes_cmds = psp.Message(
topic=mes_cmd_topic,
payload=mes_cmd_payload,
qos=psp.QoS.AT_MOST_ONCE,
retain=True
)


mes_client.publish(mes_cmds, include_dtypes=True)
The host application is now ready for operation. In case of failure or disconnection from the MQTT broker, the Will message is sent out to other clients, informing them that the host application is online=False.
The complete example code linked above provides debugging options that print out messages from the node/device. Alternatively, you can easily use the MMC to watch topics and messages (Figure 2).
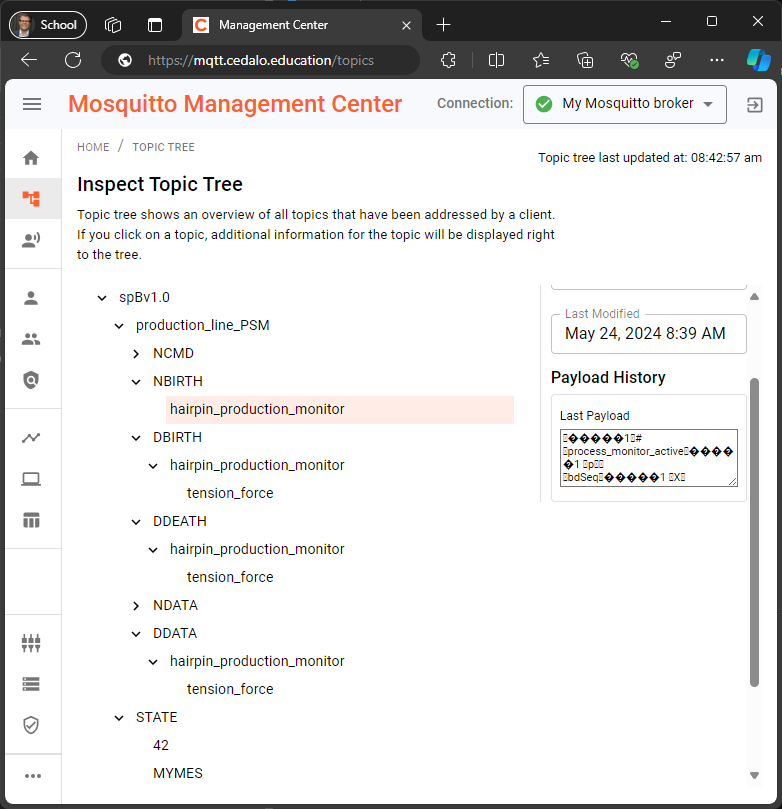
Figure 2 - Screenshot of the MMC to monitor online Sparkplug topics and payloads.
The final step in the example host application involves sending a command to the node to set process_monitor_active as true or false. The following code sequence shows five commands to achieve this.
mes_cmd_metric = (
    psp.Metric(
        timestamp=psp.get_current_timestamp(),
        name="process_monitor_active",
        # The following line needs to be changed True/False to control the node
        datatype=psp.DataType.BOOLEAN, value=True
    )
)


Mes_cmd_topic = psp.Topic(
    message_type=psp.MessageType.NCMD,
    group_id="production_line_PSM",
    edge_node_id="hairpin_production_plc"
)


mes_cmd_payload = psp.NCmd(
    timestamp=psp.get_current_timestamp(),
    metrics=mes_cmd_metric
)


mes_cmds = psp.Message(
    topic=mes_cmd_topic,
    payload=mes_cmd_payload,
    qos=psp.QoS.AT_MOST_ONCE,
    retain=False
)


mes_client.publish(mes_cmds,include_dtypes=True)
The commands are:
- Create the metric
psp.Metric()where the main confirmation is set - Set the right topic and message type to
NCMD - Construct a node command payload with
psp.NCmd() - Construct a Sparkplug message with
psp.Message() - Finally, publish the message object with
<client>.publish()
Python use case demo – Node
This section shows how the edge node (the PLC) and the device (the sensor) are set up and how the PLC consumes messages and publishes the sensor measurements. The following code snippet is an excerpt from the “sparkplug_demo-node” code in the provided repository.
import paho.mqtt.client as paho_mqtt
import pysparkplug as psp
#... others lines


edge_metrics = psp.Metric(
    timestamp=psp.get_current_timestamp(),
    name="process_monitor_active",
    datatype=psp.DataType.BOOLEAN,
    #... initially set to False
    value=False
)


device_metrics = (
    psp.Metric(
        timestamp=psp.get_current_timestamp(),
        name="batch_id",
        datatype=psp.DataType.STRING,
        value="coil_4711"
    ),
    psp.Metric(
        timestamp=psp.get_current_timestamp(),
        name="max_tension",
        datatype=psp.DataType.FLOAT,
       value=0.0
    )
)


edge_node = psp.EdgeNode(
    "production_line_PSM",
    "hairpin_production_plc",
    Edge_metrics
)


edge_node._client._client = paho_client


device = psp.Device("tension_force", device_metrics)


edge_node.connect(broker)


edge_node.register(device)
In the beginning, the edge node will publish metrics with the variables edge_metrics and device_metrics. After that, calling psp.EdgeNode() creates an instance of a node object with defined metrics name “hairpin_production_plc” and the group_id “production_line_PSM”.
Then, adapt the edge_node instance with the line edge_node._client._client = paho_client to connect the node object to the MQTT broker using the Paho client.
The code lines edge_node.connect(broker) and edge_node.register(device) will publish the Birth messages per the Sparkplug specification.
In order to receive and process commands from a host application, the node must subscribe to the specific command topics. The active subscription calls a callback function that handles the command-to-action logic. The following code lines enable the node to set a variable named process_monitor_active to True or False using external NCMD topic_verbs.
def callback(client: psp.Client, message: psp.Message) -> None:
    global monitor_active # variable to control sensor
    for metric in message.payload.metrics:
        if metric.name == "process_monitor_active":
		# update the control variable for the sensor measurement
            monitor_active = metric.value
    return


edge_node.subscribe(
    psp.Topic(
        group_id="production_line_PSM",
        message_type=psp.MessageType.NCMD,
        edge_node_id="hairpin_production_plc"
    ),
    psp.QoS.AT_LEAST_ONCE, callback
)
The subscription should be QoS level 1, as per the Sparkplug specification.
Now, the edge node (PLC) is ready for operation.
A PLC typically follows a sequence of commands periodically, which this use case demonstrates using a loop. In each cycle, the “process_monitor_active” metric is updated (published on the MQTT broker) by calling edge_node.update() to report the state of the functionality.
If the internal variable monitor_active equals true, the PLC reads the external sensor value and updates the device tension_force by calling edge_node.update_device(). After that, the node will publish messages with topic_verb NDATA or DDATA on every call of the update functions.
Now, the node can check if the sensor is available or in operation. If not, the edge node calls the function edge_node.deregister(device_id) and publishes the DDEATH message for the corresponding device.
for i in range(999):
    time.sleep(2)
    edge_metrics = (
        psp.Metric(
            timestamp=psp.get_current_timestamp(),
            name="process_monitor_active",
            datatype=psp.DataType.BOOLEAN,
            value=monitor_active
        )
    )
    edge_node.update(edge_metrics)
    # only update the published sensor device values if active
    if monitor_active:
        # Get sensor values
        sensor_values = 47.11
        device_metrics = (
            psp.Metric(
                timestamp=psp.get_current_timestamp(),
                name="batch_id",
                datatype=psp.DataType.STRING,
                value="coil_4711"
            ),
            psp.Metric(
                timestamp=psp.get_current_timestamp(),
                name="max_tension",
                datatype=psp.DataType.FLOAT,
                value=sensor_values
            )
        )
        edge_node.update_device("tension_force", device_metrics)
edge_node.deregister("tension_force")
Troubleshooting MQTT-Sparkplug setup: Common issues and solutions
In the following section, I divide setup possible issues into two categories: MQTT or Sparkplug-specific challenges.
The most common MQTT issues stem from misconfiguring:
- Broker address (IP, FQDN) and port – Check if the client instance you want to use can access the broker via a network connection.
- Credentials and topic access – Check the credentials and the access to publish and subscribe to the needed topics in the Sparkplug namespace.
- The MQTT protocol version is not supported – Switch back to major version 4 in your MQTT client libraries.
If you use the Pro Mosquitto MQTT broker with the MMC, you can easily debug and resolve the issues using the client inspection plugin.
For Sparkplug-specific issues, the most probable challenges would revolve around state management:
- Retained Birth and Death messages are not published on the system namespace topics ($sparkplug/certificates/#). The broker is not Sparkplug Aware per the specification, so choose the Pro Mosquitto MQTT broker and enable the plugin as described.
- If no STATE, Birth, Death messages are published, check the compatibility of the used client libraries. Take a look at the Eclipse Tahu project for more information. The library used in the given Python example code “pysparkplug” is compatible.
Wrap-up
Finally, to run the example and see results, you need to start both the host “sparkplug_demo-host.ipynb” and the edge node “sparkplug_demo-node.ipynb” in parallel to simulate at least two clients/instances. In the host example, you can send the command to the specific node (PLC) to activate or deactivate the measurement from the connected sensor. Other clients or the host application can consume the published sensor data (DDATA) as needed.
The Sparkplug-compliant implementation of the host/node clients and the Sparkplug Aware Mosquitto MQTT broker enables comprehensive state management and monitoring of the clients and operations. Therefore, it utilizes the topic verbs BIRTH, DEATH and STATE.
By leveraging high-performance and high-available MQTT broker solutions, you can realize or expand production-scale industrial applications within the IIoT context. Request a free Cedalo MQTT Platform trial to test the Pro Mosquitto-Sparkplug example directly in your web browser and evaluate its functionalities.


