
In the rapidly changing Internet of Things (IoT) environment, bringing ideas to life requires innovation and technical know-how. This is where Node-RED comes in. It helps creators to bridge the gap between concept and execution regardless of their coding expertise.
In this article, I explore the world of Node-RED and how it simplifies the development of robust IoT projects. Moreover, I demonstrate how Node-RED combines with Mosquitto to enhance the efficiency and flexibility of your IoT solutions.
What is Node-RED?
Node-RED is a user-friendly open-source tool designed for creating and managing applications primarily related to IoT and home automation. It offers a unique visual approach where you connect various “nodes” on a grid to build your application’s logic. These nodes represent tasks and functions like data processing, device communication, and web services. This visual approach makes it easy for technical and non-technical users to design complex data flows without extensive coding.
Moreover, Node-RED provides a wide array of built-in nodes that handle different tasks. It is particularly well-known for its support of IoT messaging protocols like MQTT and HTTP. Users can also develop custom nodes using JavaScript. Once you’ve crafted your application’s flow by connecting nodes, you can deploy it to different environments — a local machine, cloud server, or IoT device.
Reasons to combine Node-RED and MQTT
Node-RED and MQTT offer powerful solutions, especially for IoT, automation, and real-time data processing. The following are real-world examples where utilizing Node-RED with MQTT proves highly effective:
- Smart home setup: MQTT connects all smart devices, such as lights, thermostats, door sensors, and motion detectors, allowing Node-RED to manage and automate them based on the client’s preferences. If you’re interested in leveraging MQTT for home automation projects, refer to this tutorial.
- Factory and industrial automation: Node-RED and MQTT integrate industrial sensors, programmable logic controllers (PLCs), and machinery into the Industrial Internet of Things (IIoT). This setup enables process automation, real-time equipment status monitoring, data analysis, and remote operations control.
- Monitoring the environment: To ensure better living conditions, you need to analyze various metrics like temperature, humidity levels, and air quality. Sending this info via MQTT to Node-RED allows you to set up alerts, observe trends, and automatically adjust to the changes in the environment.
- Energy management: With Node-RED and an MQTT broker, you can monitor energy consumption, identify usage trends, and even optimize energy distribution to save energy by connecting to smart meters and sensors.
- Smart farming: Sensors connected to MQTT and Node-RED can improve irrigation schedules, automate greenhouse controls, and better manage crops using the data on soil moisture and temperature.
- Heighten security measures: You can send information from your security gadgets, like cameras and motion detectors, through the MQTT broker to Node-RED. The system can trigger alarms, create automated responses, and provide real-time video feeds.
- Logging data: You can also use Node-RED to gather data from different sources using MQTT and log that information into external databases or services. This solution enables users to analyze data, identify trends, and create reports. For more information on logging in the Mosquitto MQTT broker, please refer to our MQTT Logging tutorial.
Installing Node-RED for an IoT scenario
Now, I will demonstrate the installation of Node-RED by running it locally from a Windows PC. The following instructions will assume you are using a Windows operating system.
Node-RED is available for different platforms and operating systems. Here, you can find a comprehensive list of supported environments with setup instructions.
Additionally, Node-RED requires Node.js to function, which you can download here. If you’re unfamiliar with Node.js, explore the Node.js and MQTT guide for setup instructions and learn how they enable real-time data exchange.
Once the installation completes, it is possible to verify the procedure’s correctness by typing the following command into a Powershell console:
node --version; npm --versionAs a result, you can expect a similar output:

Figure 1 - Version of Node.js and npm proving the correctness of the installation.
The command in Figure 1 verifies the proper installation of Node.js and npm, which is the Node Packet Manager used for managing Node.js software packages.
After this step, proceed with installing Node-RED by typing the following command in the same Powershell console:
npm install -g --unsafe-perm node-redFinally, the Node-RED setup will start.
Starting the Node-RED environment
Once the installation is complete, run Node-RED by typing the command below in the same Powershell console:
node-redNode-RED starts showing the following output:
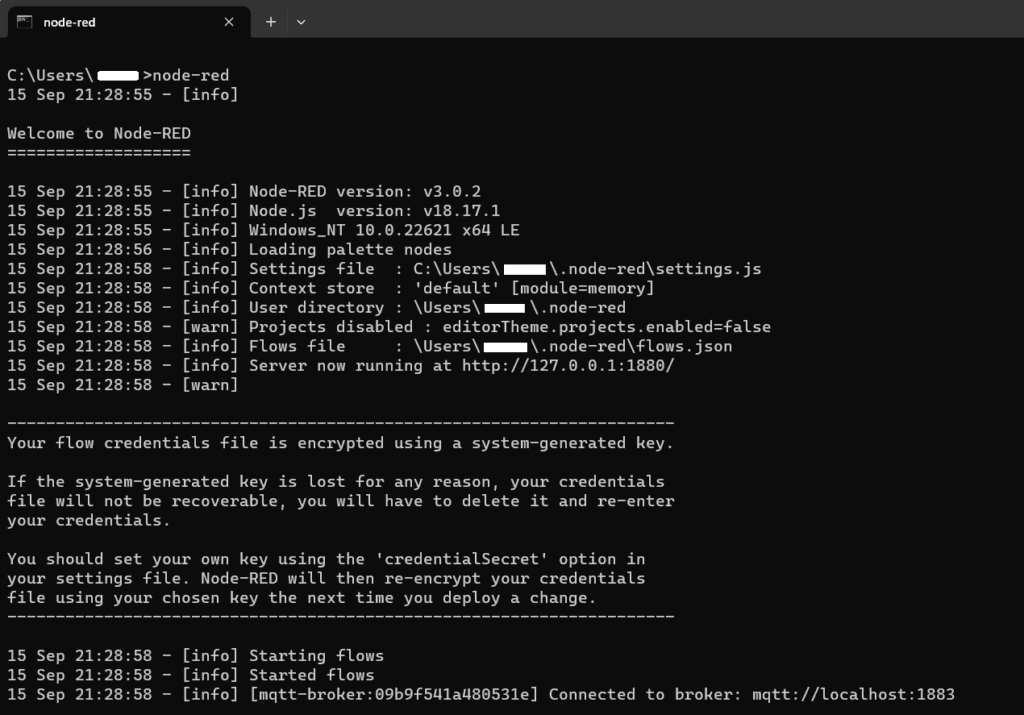
Figure 2 - Output log from Node-RED.
The console will stay open with Node-RED now running. If the console closes, this will also terminate the Node-RED process.
While this is the default “start-up” instruction provided in the official tutorial, running it at start-up or as a service is still possible using third-party tools.
To reach the configuration panel, follow this link: http://localhost:1880. Then, the Node-RED editor will load in your browser window and look like Figure 3.
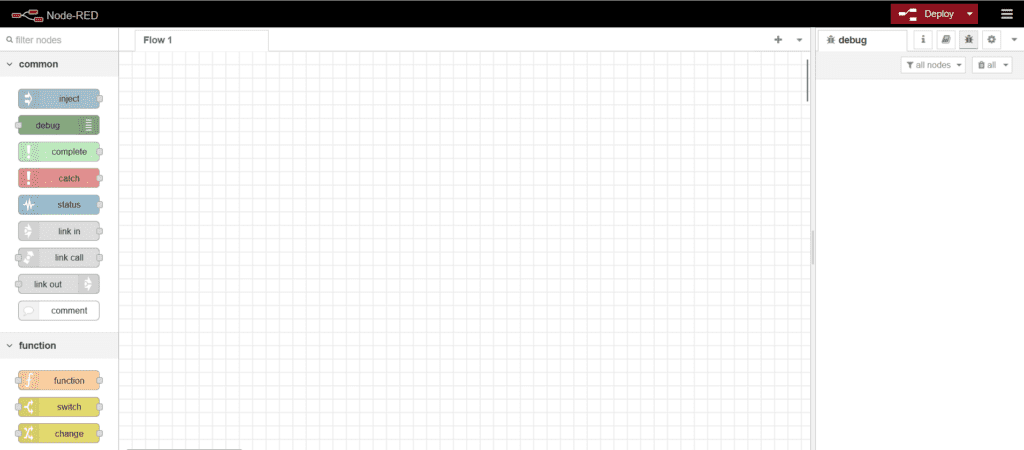
Figure 3 - Configuration panel of Node-RED.
The configuration panel consists of three parts:
- A grid in the middle where you can design my project.
- A menu panel on the left with a list of objects, called nodes, which you can drag and drop on the grid to design your configuration.
- And an information panel on the right, which holds the debug panel, among others.
Node-RED offers many kinds of nodes for implementing different functionalities or system resources.
Nodes exchange messages that include a topic and a payload, which carry the message information. Every node can use MQTT messages to get information, transform it, and finally send it as output for other nodes. However, it is possible to interconnect them graphically using a line (Figure 4).

Figure 4 - Simple design with an inject node and a debug node.
Preparing the MQTT broker infrastructure
After the first introduction to Node-RED, it’s time to proceed with configuring the MQTT infrastructure. In this tutorial, I’ll use the Cedalo MQTT Platform trial to deploy a cloud license for the Pro Edition for Eclipse Mosquitto™ broker. However, an on-premises version is also available. It grants access to advanced features such as basic MQTT HA, enhanced security and integrations, Persistent Queueing, and more.
How to set up a Pro Mosquitto cloud trial
The first step consists of signing up for a free Pro Mosquitto trial. Click here, then select “Cloud” on the menu tab (Figure 5).

Figure 5 - Signing up for a free Pro Mosquitto Cloud trial.
To set up a Pro Mosquitto broker, enter your email address and the server location where you will host the broker. There are several options to choose from.
Then, complete the form by clicking the “Submit” button and wait for a confirmation mail. The Pro Mosquitto setup procedure will begin upon confirming the mail address – requiring 10 to 15 minutes.
Shortly after, you will receive a second email once the configuration is complete (Figure 6). It will contain important information like the MQTT broker address or the credentials required to access the private configuration area of Mosquitto, called Mosquitto Management Center (MMC).

Figure 6 - Confirmation email with MMC credentials and broker endpoint URLs. The URLs are newly generated for every new user subscription.
How to set up clients in Mosquitto Management Center (MMC)
Once your Pro Mosquitto Cloud trial is active, you can open the MMC panel by typing the link in the email into a browser and successfully login (Figure 7).

Figure 7 - Pro Mosquitto Management Center (MMC).
This is the central control dashboard where you can monitor relevant information, like the number of connected clients, exchanged MQTT messages, and more. Another essential functionality accessible from this dashboard is “Clients creation,” which I will use in my example.
To demonstrate the Node-RED and MQTT broker integration, you need to create two clients: one for Node-RED__, named “nodered,__” and one used locally from my PC, named “localpc” – where a publisher and a subscriber are located. The role of both clients will be set to “client”. You can see the design of my demonstration in Figure 8.
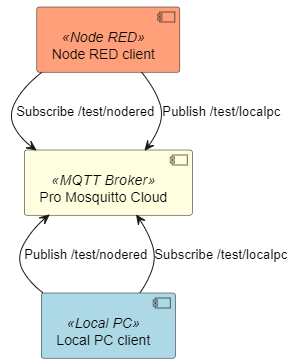
Figure 8 - Simple design demonstrating the interaction between Node-RED and Mosquitto.
For a detailed guide on creating MQTT clients, refer to Cedalo’s extended guides like this one.
Once created, the two clients are visible on the Clients page.

Figure 9 - Creation of Node-RED and Local PC clients.
Connecting the MQTT broker in Node-RED
With everything set up to connect with the MQTT broker, open the Node-RED dashboard as demonstrated in the chapter “Starting the Node-RED environment.” Drag an “MQTT in” node and a “Debug” node into the canvas, as shown below, and make sure to connect the two nodes.

Figure 10 - The first demonstration setup comprises only a MQTT-in and a Debug node.
The “MQTT in” node receives messages from a broker, much like a subscribing client. The “Debug” node enables printing all the received data from the “MQTT in” node in a debug window__, demonstrating correct data reception.
To open the configuration window, double-click on the “MQTT in” node in my design (Figure 11).

Figure 11 - Configuration window of the “MQTT in” node.
This window allows configuring the essential information regarding the broker and the topic to which Node-RED has to subscribe.
First, set up the broker configuration. Then, click on the pencil button near the “Server“ textbox to open the specific broker configuration window (Figure 12).

Figure 12 - Broker configuration window.
This window allows you to set up the mandatory parameters like the broker address__, the port, the MQTT protocol version, or the Keep Alive timer.
On the “Server“ textbox, you can place the address of the Pro Mosquitto MQTT broker, as received per email but also accessible from the MMC dashboard.
For a classical non-encrypted connection, you can keep the port default value to 1883 or switch it to 8883 for TLS-encrypted communication.
Now, switch to the “Security” tab on the same window to configure the Node-RED client credentials (Figure 13).

Figure 13 - Client configuration in Node-RED.
Once done, you can click on the “Save” button and go back to the window shown in Figure 11 for configuring the topic.
In my example, I will set the subscribing topic to /test/nodered and leave the field “Action” to its default value.
With the “MQTT-in” node configuration complete, you can proceed with configuring an “MQTT-out” node to finalize the Node-RED integration demonstration.
Drag and drop an “MQTT-out” node and an inject node _on the canvas, then connect the two nodes to obtain the design as shown in Figure 1_4.
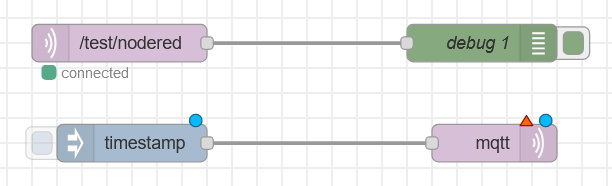
Figure 14- Complete design with an “MQTT-in” and an “MQTT-out” node.
The “MQTT-out” node publishes messages over a specific topic, while the “Inject” node creates and sends data to other nodes. In this case, the “Inject” node will cyclically send the current timestamp as an output every second. This output will then be published by the “MQTT-out” node, as shown in Figure 15.
It’s time to double-click on the “MQTT-out” node and perform the configuration, which is almost identical to the “MQTT-in” node configuration. (Omit the specific step-by-step description here). The only difference is the topic where the node will publish the message, which is set to /test/localpc in this case.

Figure 15 - Configuration of the timestamp inject node for MQTT publishing tests.
The configuration is now complete, and you can check the correctness of the MQTT configuration by looking at the broker connection status indicated near the “MQTT-in” and “MQTT-out” nodes, as shown in Figure 16.
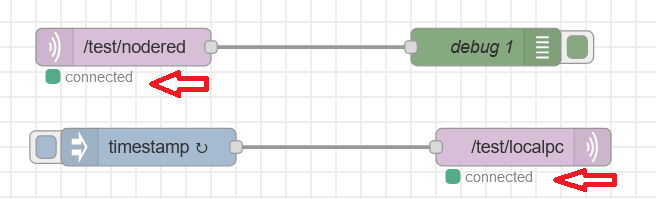
Figure 16 - Small green squares near “MQTT-in/out” nodes, indicating broker connection status.
Test the Node-RED configuration
Node-RED is now configured to act as a subscriber and publisher. However, this setup is still not running. You must click the “Deploy” button in the upper-right corner of the Node-RED console window to activate the design.
Once the Node-RED configuration runs, you can create a local publisher and subscriber hosted by your PC, which will interact with Node-RED.
Let’s test the configuration.
You can start by testing the “MQTT-in” node operation, which means you can try to publish a message from a local publisher client to the Node-RED client. Create a publisher client using the MQTT.js client library through the following command into a Powershell console:
npx mqtt pub -h hg13dtohpgob-tvqx2k3tdgzf.cedalo.dev -t /test/nodered -m "Message to Node-RED" -u localpc -P testpwdIf you don’t install the library on your machine beforehand, the packet manager will automatically prompt a request for installation. Another possibility would be to use the client utilities provided by the open-source version of Mosquitto, for which professional technical support is available.
This command will publish a message on the topic /test/nodered, logging as the localpc client. The message will reach the Node-RED “MQTT-in” node and display it on the debug console, courtesy of the debug node (Figure 17).
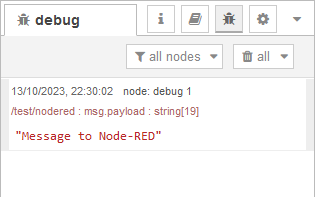
Figure 17 - Node-RED debug window.
Now, let’s test the second part of the configuration to verify the “MQTT-out” node effectively publishes the injected data.
Create a subscriber client on the PC using the MQTT.js client library with the following command:
npx mqtt sub -h hg13dtohpgob-tvqx2k3tdgzf.cedalo.dev -t /test/localpc -u localpc -P testpwdThe user will subscribe to the specified topic and receive the data published from Node-RED. Then, a list of published timestamps will be displayed (Figure 18).

Figure 18 - Timestamps value published by Node-RED and received by the subscriber client.
Conclusion
In summary, integrating the Pro Mosquitto MQTT broker with Node-RED offers a powerful combination for IoT and automation applications. The steps in this article demonstrate the seamless MQTT broker and Node-RED connection. The real-case test highlights the integration’s robustness and demonstrates the process of creating MQTT clients to enhance security.
This synergy provides a versatile platform for creating responsive IoT applications for home automation or industrial monitoring. To understand how the Pro Mosquitto broker’s reliability can provide a solid foundation for your projects, explore our comprehensive Home Assistant tutorial.


