
Running a professional and secure Pro Mosquitto™ installation is possible using cloud infrastructure such as Amazon Web services (AWS). The simplest and most efficient way is to set up an elastic compute instance (or EC2 instance). These instances ensure high-security standard_s, and provide _robust management features to ensure a Pro Mosquitto MQTT installation for your productive workloads and user management.
Configure and Start an EC2 instance on AWS
To begin, request a free Cedalo MQTT Platform trial for an on-premises deployment of the Pro Edition for Eclipse Mosquitto MQTT broker. This trial lets you test advanced features, such as integrations with Kafka, MongoDB, MySQL, PostgreSQL, and many more.
However, if you do not have an AWS account yet, use the free tier offer from AWS.
To prepare the setup, either use your existing account or sign up for a new one and log in to the management console: https://console.aws.amazon.com/console/home.
On the console home page (Figure 1):
- Choose and set the region where your instance will take place.
- Then, search for and select the service name “EC2.”
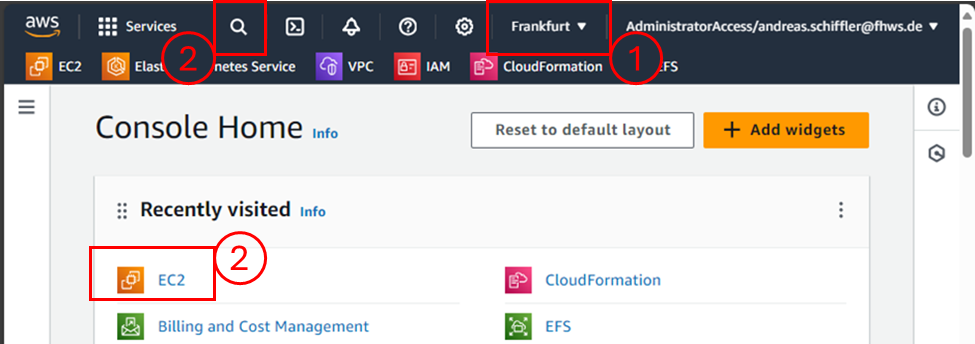
Figure 1 - Screenshot of the Console Home page on AWS.
The following EC2 dashboard (Figure 2) contains information irrelevant to the configuration, so simply click on the orange “Launch Instance” button. Doing so will open a new view where all the configurations will be set (see the following figures).
You will only need to adjust three sections:
- Name
- Key pair (Access)
- Network settings
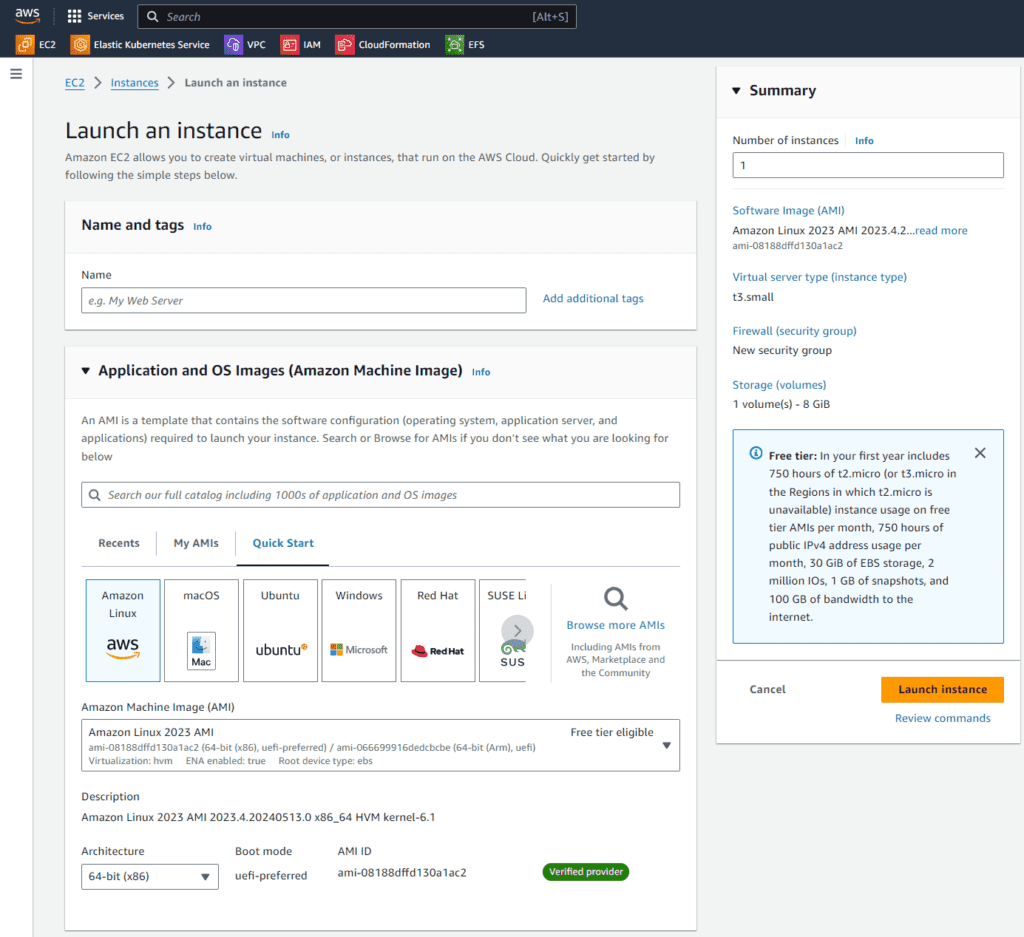
Figure 2 - Screenshot of the upper part of an EC2 instance configuration. Assign the instance a name and keep the default value for the Amazon Machine Image.
Optionally, change the instance type to one with more vCPU and RAM (refer to Figure 3). The free tier instance type with one vCPU and 1GB RAM named t2.micro will work. However, it may perform poorly due to insufficient RAM, particularly when using a docker runtime on the instance. As an alternative with more RAM choose the instance family t3a (see Figure 3), for example, t3a.small. But keep in mind that this instance size is not covered by the free tier account.
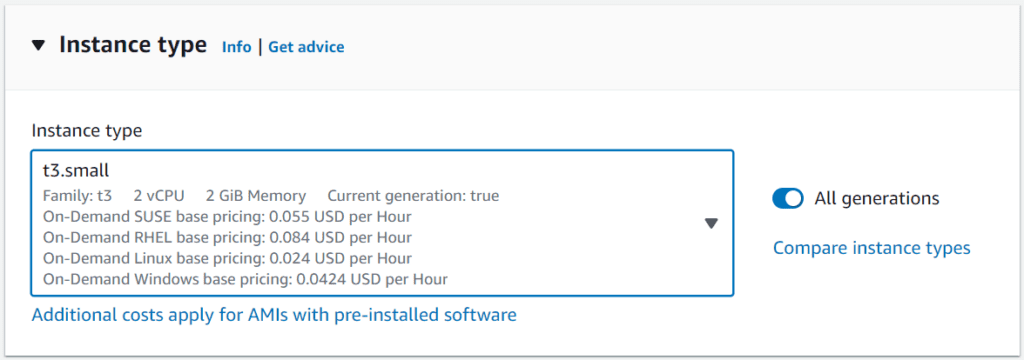
Figure 3 - Screenshot of the section to change the instance type during the EC2 launch setup.
To deploy the Pro Mosquitto installation, you will need to access the instance via a secure shell connection (ssh). This can be done via the AWS management console, however it is best practice to create a key pair for the access. Figure 4 shows an example setting after selecting “Generate new key pair” in the access section. Save the private key in a secure space on your local device and follow the instructions shown.
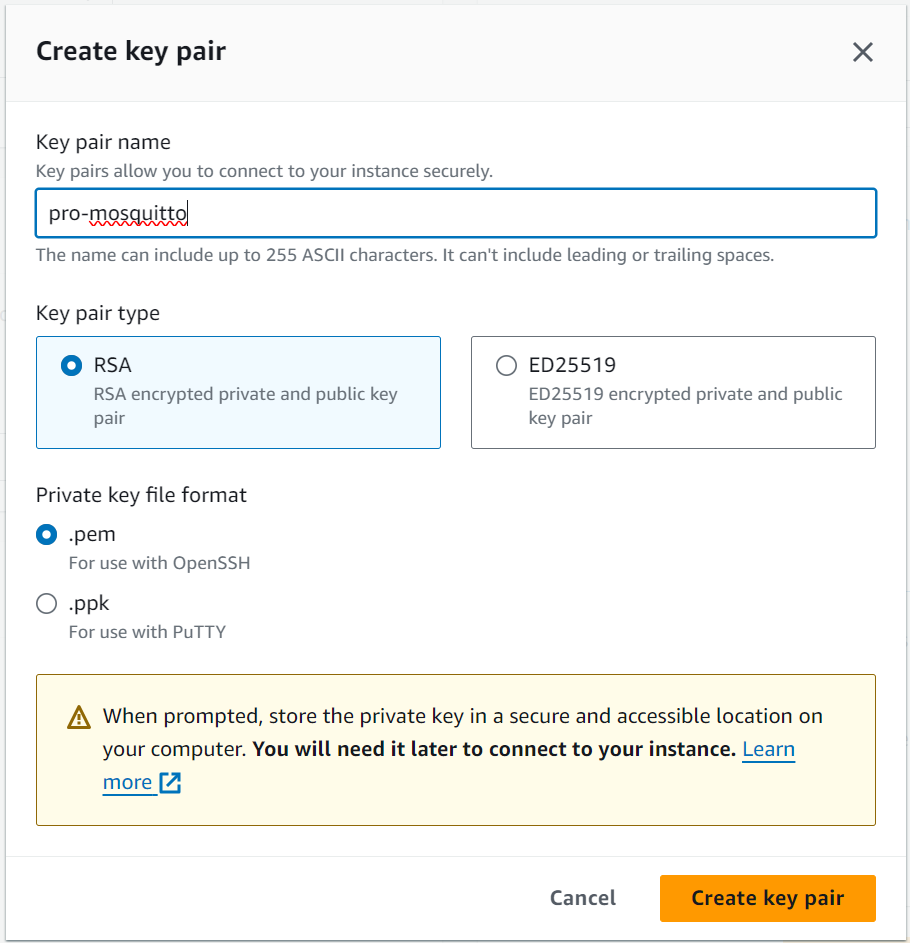
Figure 4 - Screenshot of the dialog for creating a new key pair to access the EC2 instance by editing the name only.
Finally, adjust the network settings in the bottom part of the instance setup by modifying two points:
- Enable auto-assign public IP
- Open ports 22, 80, 443 and 8883 in the security group rules (firewall)
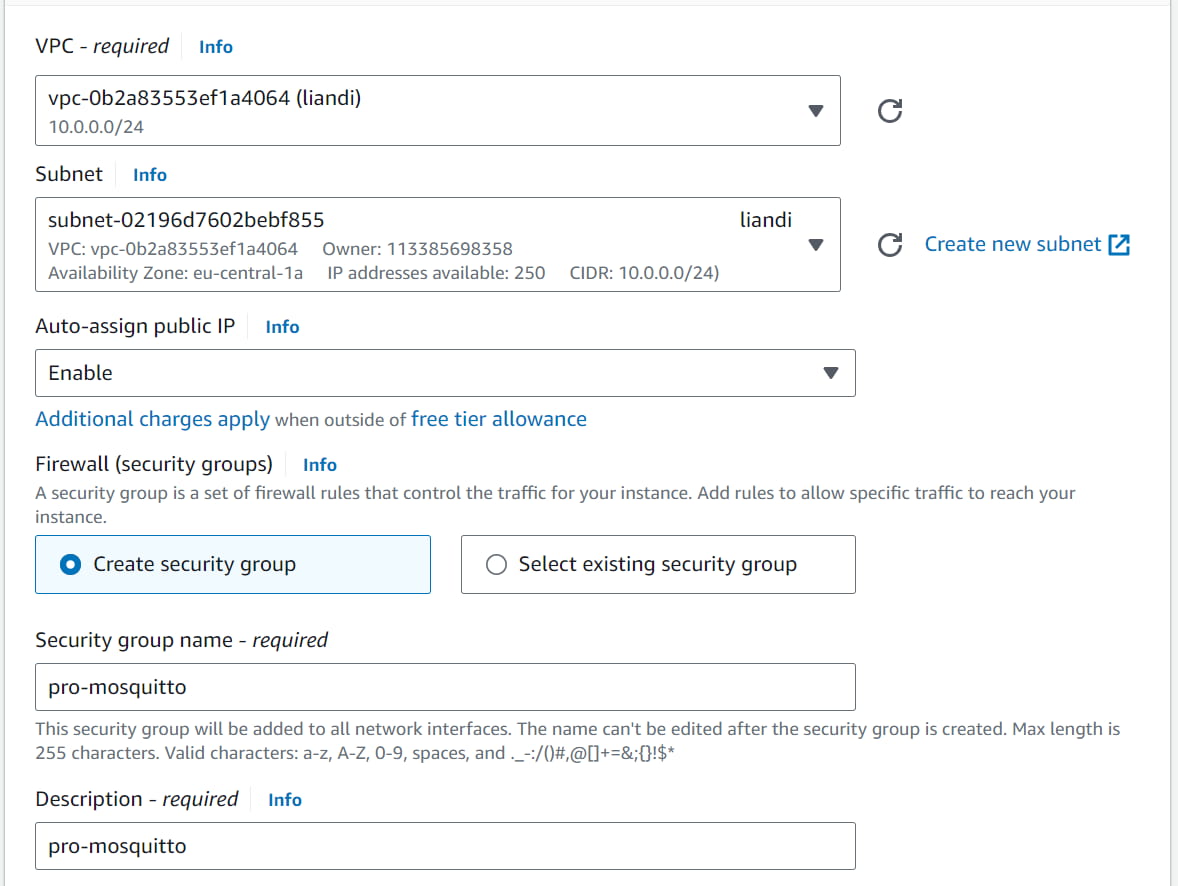
Figure 5 - Screenshot of the network settings to change the Auto-assign public IP to “enable.”
To edit the inbound security group rule, click “edit” on the top right section of the network settings. Then, add security group rules for the following port numbers: 22, 80, 443 and 8883 (MQTT), as shown in Figure 6.
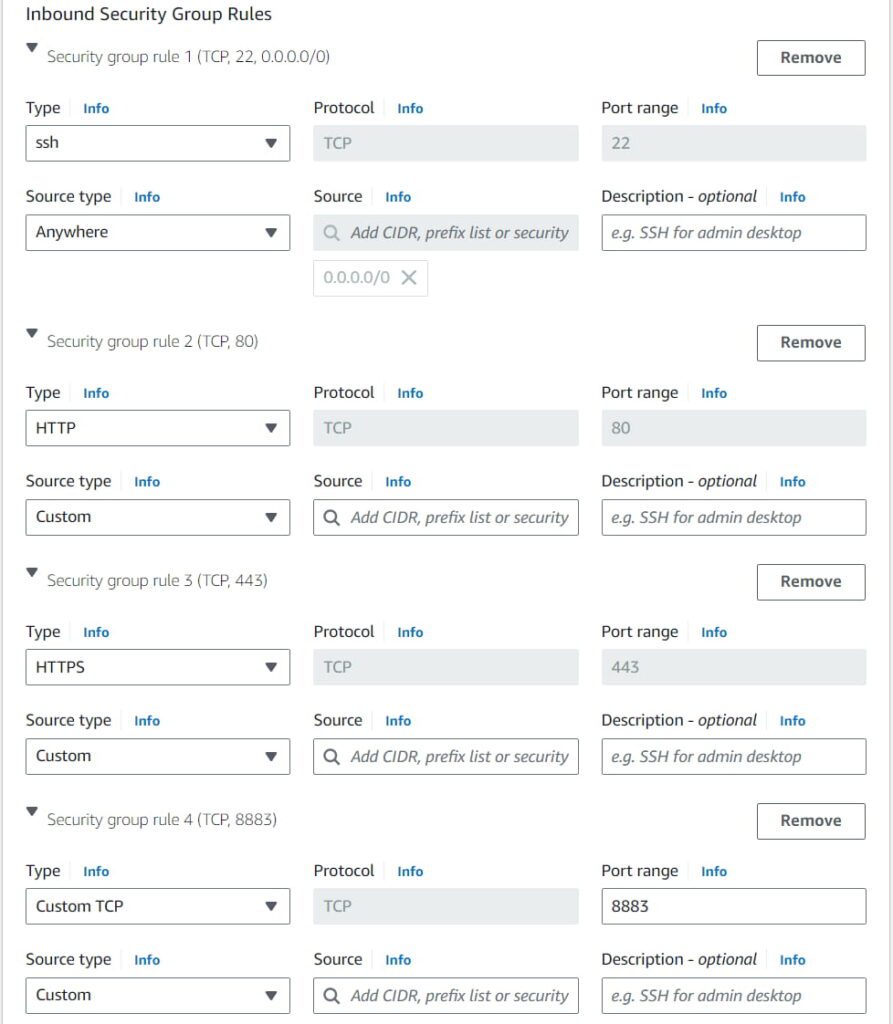
Figure 6 - Screenshot of the custom edits for the inbound security group rules to enable public access to the instance in ports 22, 80, 443, and 8883.
Check the settings again:
- Instance name, type
- Access via key pair (the private key accessible and saved)
- Network setting (open ports: 22, 80, 443, and 8883 with CIDR 0.0.0.0/0)
Finally, hit the “Launch Instance” button.
Access the EC2 AWS instance and install Mosquitto MQTT broker docker container environment
After launching the EC2 instance, you can observe the start-up in the EC2 Dashboard section, “Instances” (see Figure 7).

Figure 7 - Screenshot of the EC2 instance overview in the Dashboard with the selected option to connect to the marked instance.
Now connect to the instance after start-up by selecting the instance and clicking the “Connect” button as shown in the Figure 8 dialog. This will establish the console access to the instance right in the internet browser.
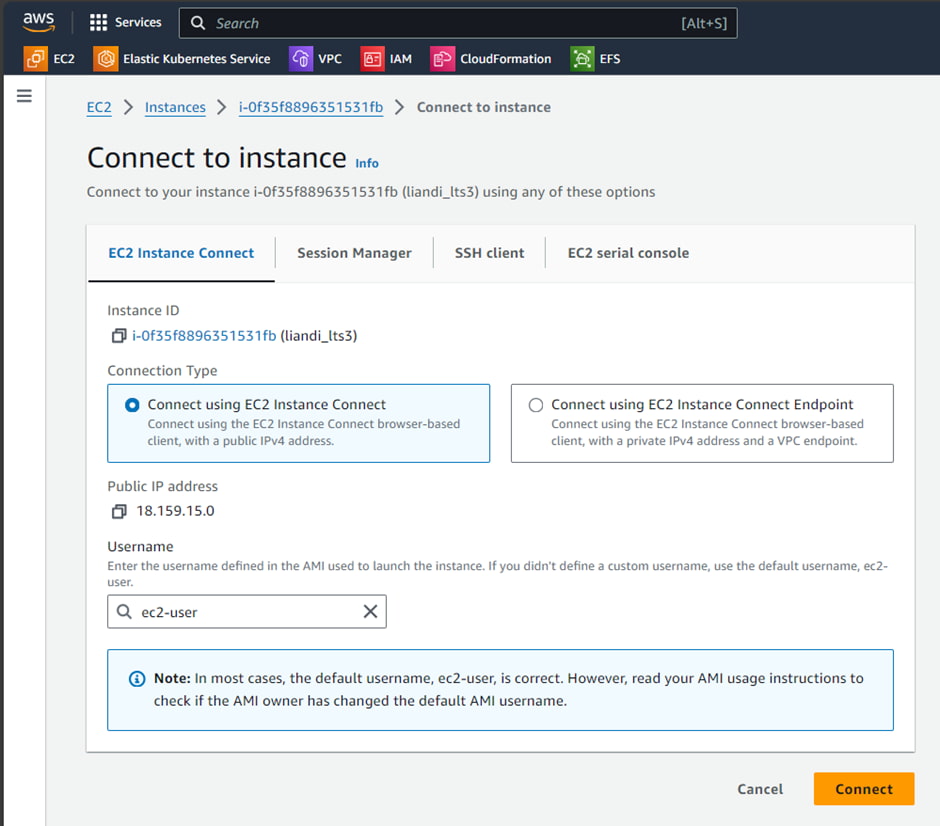
Figure 8 - Screenshot of the dialog to establish a connection to an EC2 instance. Choose the default setting to connect right away with the internet browser in use.
The established access and connection to the instance will look similar to the screenshot shown in Figure 9.
To install the docker environment, execute the following three command lines:
sudo yum install docker
sudo systemctl start docker
sudo usermod -a -G docker ec2-user
After completing the installation procedure, type exit, close the window, and reconnect to the instance as described before. This step is necessary to apply the changed group membership for the ec2-user.
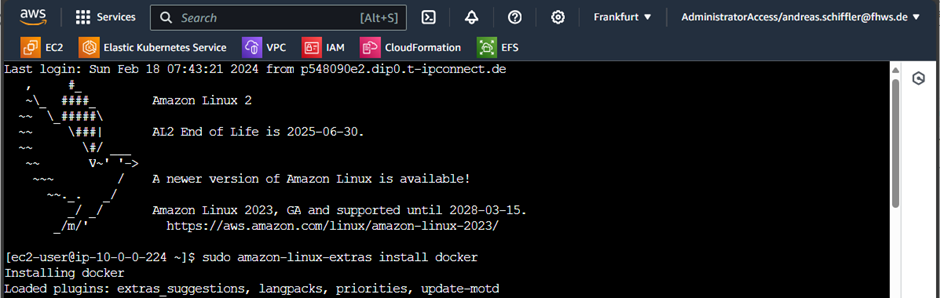
Figure 9 - Screenshot of the console access to the instance using the internet browser and the connect option provided in the AWS EC2 dashboard.
To deploy and run the Pro Mosquitto broker, including the Management Center for Mosquitto™ MQTT UI, you also need the docker-compose tool. Run the following two command lines in the instance console to install this tool:
sudo curl -L https://github.com/docker/compose/releases/latest/download/docker-compose-$(uname -s)-$(uname -m) -o /usr/local/bin/docker-compose
sudo chmod +x /usr/local/bin/docker-compose
Then, run the two command lines to test the docker installation:
docker info
docker-compose version
If the installation is correct, the output will show no errors and display information about the versions and installation. The EC2 instance is now ready for the Pro Mosquitto broker deployment, including the MMC. For more details, refer to this article on setting up a Mosquitto MQTT broker in Docker.
Rollout the Mosquitto MQTT broker and MMC on an EC2 AWS instance
Before proceeding, check the following prerequisites:
- Ensure that ports 443 and 8883 are open to public networks for the EC2 instance (refer to the EC2 instance setup).
- The docker environment including the docker-compose tool is available (see the previous section).
- A (trial) license for Pro Mosquitto is available with the file name license.lic.
- Credentials (username / password) to login in for the cedalo docker registry are in place.
The application for the Pro Mosquitto broker fulfills the prerequisites for the license and credentials easily. Just visit the Cedalo MQTT Platform trial here and fill out the requested information.
To proceed, execute the command line:
docker login registry.cedalo.comThen, enter your credentials to prepare the docker connection to the cedalo registry (see Figure 10).

Figure 10 - Screenshot of a successful login process for the Cedalo registry.
In the next steps, you need to create directories and files and start the docker deployment.
First, create the directories in your home location:
cd
mkdir cedalo
cd cedalo
mkdir certs license data config
Afterward, place or copy the license file with the name license.lic in the path ~/cedalo/license/license.lic. For example, execute:
cp /path/where-file-is-stored/license.lic ~/cedalo/license/license.licThen create a self-signed certificate for the TLS termination of the Mosquitto broker and the MMC.
cd ~/cedalo


sudo openssl req -x509 -newkey rsa:4096 -keyout certs/server.key -out certs/server.crt -days 365 -nodes
Enter the requested certificate information as it fits for your application (any input will work).
The last step is to create three files on the given paths with the shown content:
- Path: ~/cedalo/config/mosquitto.conf
plugin /usr/lib/mosquitto_dynamic_security.so
plugin_opt_config_file /mosquitto/config/dynamic-security.json
persistence_location /mosquitto/data
allow_anonymous false
listener 8883
certfile /mosquitto/certs/server.crt
keyfile /mosquitto/certs/server.key
listener 1885
admin_listener true
enable_control_api true- Path: ~/cedalo/config/config.json
{ "plugins":}- Path: ~/cedalo/docker-compose.yml
version: '3.7'
services:
    mosquitto:
        image: registry.cedalo.com/mosquitto/mosquitto:2.7
        ports:
            - 8883:8883
        volumes:
            - ./config:/mosquitto/config
            - ./data:/mosquitto/data
            - ./certs:/mosquitto/certs
            - ./license:/mosquitto/license:ro
        hostname: mosquitto
        environment:
            CEDALO_LICENSE_FILE: /mosquitto/license/license.lic
            MOSQUITTO_DYNSEC_PASSWORD: supersecretand12charlong
        restart: unless-stopped
    management-center:
        image: registry.cedalo.com/mosquitto/management-center:2.7
        environment:
            CEDALO_MC_USERNAME: admin
            CEDALO_MC_PASSWORD: admin
            CEDALO_MC_LICENSE_PATH: /management-center/license/license.lic
            CEDALO_MC_PLUGIN_HTTPS_KEY_PATH: /management-center/certs/server.key
            CEDALO_MC_PLUGIN_HTTPS_CERT_PATH: /management-center/certs/server.crt
        ports:
            - 443:8088
        volumes:
            - ./license:/management-center/license
            - ./certs:/management-center/certs
            - ./config:/management-center/config
        restart: unless-stopped
After creating the three files, the self-signed certificate, and the key, you can start the docker containers for the Mosquitto broker and the MMC.
Go to the path ~/cedalo where the file docker-compose.yml is located and execute the command:
docker-compose upA possible output without errors and issues is shown in Figure 11.
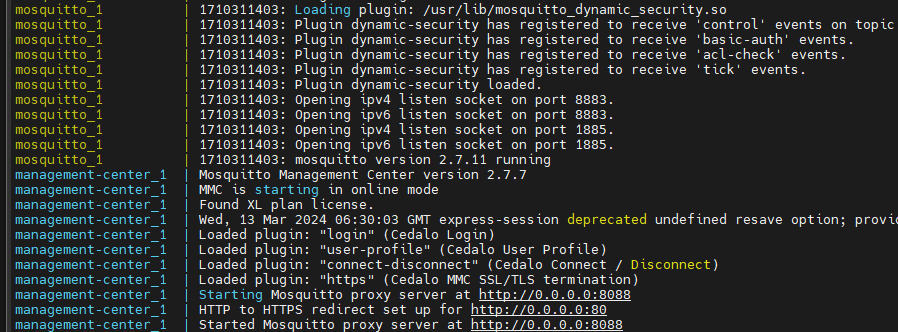
Figure 11 - Screenshot of the log output of the two docker containers after a successful start-up.
Finally, use the URL https://
After successfully logging into the MMC, create a new broker connection with the URL mqtt://mosquitto:1885. The credentials are set to admin for username and the password defined in the docker-compose.yml file at the line MOSQUITTO_DYNSEC_PASSWORD (in this example: supersecretand12charlong). Refer to the MMC documentation for details.
AWS MQTT: Possible issues and optimizations for the Mosquitto broker deployment
The setup and deployment shown have some points for tweaking to improve its effectiveness.
Transport encryption TLS
This setup exposes the broker and the MMC to the public internet, a self-signed certificate is created and used. This results in the internet browser warning to access the MMC (https://
There are two ways to resolve this issue: you can either skip certificate verification or install and utilize trusted and valid certificates. Solve the latter option by obtaining valid certificates from Let’s Encrypt, for example, and use tools like certbot for automatic installation.
It is crucial to note that you should never use connections without TLS encryption on public internet connections. For more information, check out this comprehensive guide on setting up MQTT TLS for the Mosquitto broker.
Information Security
It is also essential to change the passwords for MMC and the broker’s admin API. The corresponding settings are in the file docker-compose.yml from earlier.
Functionality
Depending on your specific use case and license options, it’s essential to adjust the broker and MMC configuration files. This may involve restarting the containers, especially to activate additional plug-ins for the broker or MMC. For optimal usage, execute the docker-compose with the flag -d to run in the background.
File not found issues
If you encounter a ‘file not found’ error in the log output, check that the following files exist and are in the correct location: server.crt, server.key, license.lic, config.json and mosquitto.conf. According to the shown setup, these files will be in the corresponding directories config, certs, and license.
Wrap-up
In conclusion, setting up a Pro Mosquitto installation on AWS using an EC2 instance is a reliable platform to manage your MQTT workloads. This guide outlines the steps to configure the environment and deploy the Mosquitto broker and MMC, ensuring high-security standards and robust user friendly management features.
While the initial setup provides a solid foundation, addressing potential issues is important to further maximize the performance and security of their Pro Mosquitto installation on AWS.
Request a free Cedalo MQTT Platform trial to obtain a Pro Edition for Eclipse Mosquitto on-premises license and set up your own EC2 instance. The trial includes basic MQTT HA configuration and access to numerous advanced features. To set up the environment and create a cluster, refer to this step-by-step tutorial.


