Simple Streamsheets Demo: Hello Shelly
To show a very basic demo of how Streamsheets works we use a Shelly 1 Wi-Fi Switch.
Shelly 1 is a Wi-Fi enabled home automation device that has a relay to control an electrical circuit and an input for detecting the status of a switch. Because Shelly 1 supports MQTT natively, you can monitor the status of the relay and the switch over MQTT. You can also set the on/off status of the relay via MQTT. In the following drawing you can see how things work together.
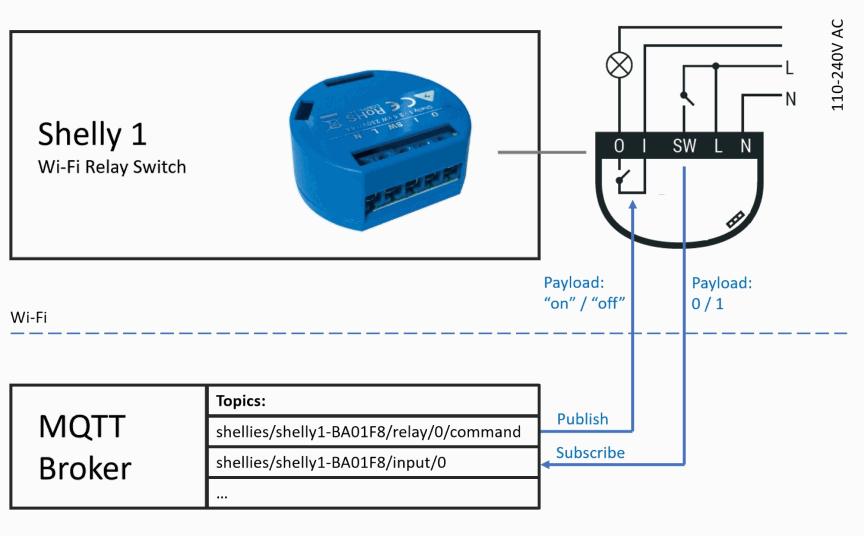
The MQTT topics in this demo are preset by the Shelly device. In the settings page of the Shelly device, we enable MQTT and supply the URL and port of the MQTT broker that we want to use. Since the Streamsheet server comes with its own installation of the Mosquitto MQTT Broker, I used this one in this demo (URL: 192.168.178.199:1883).
We want to build a Streamsheet that subscribes to the MQTT topic “shellies/shelly1-BA01F8/input/0” to get the status of the switch (which can bei 0 or 1). Depending on the status of the switch we want the Streamsheet to publish the value “on” or “off” to the topic “shellies/shelly1-BA01F8/relay/0/command”. Every time a value is published to this topic, the relay will then open or close the relay accordingly.
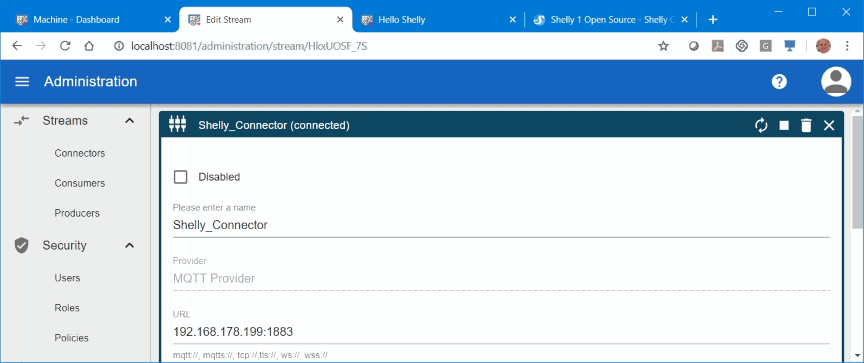
The first step is to open the Streamsheet admin console and create a connector to the MQTT broker. As in the Shelly device we will use the local IP Address of the broker (in my case it is 192.168.178.199) and port 1883 (which is standard port for MQTT).
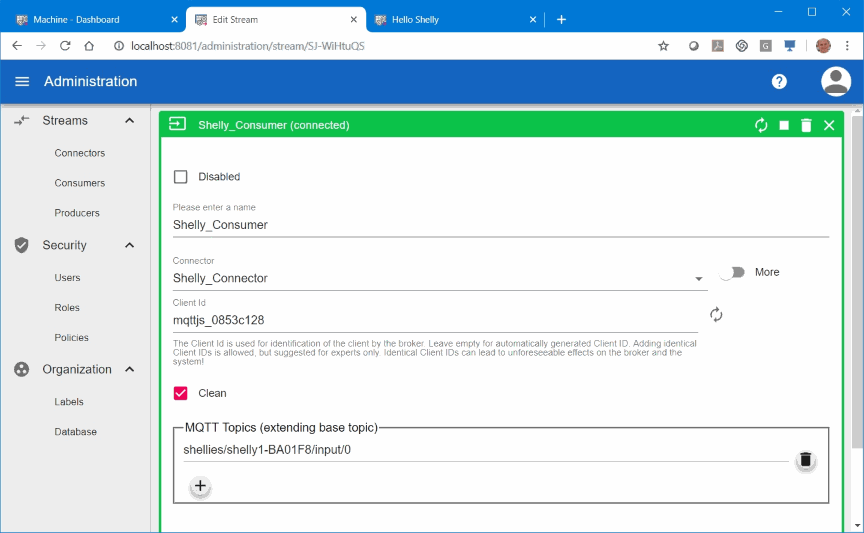
Once we have a MQTT connector, we can create a MQTT consumer. There we define the MQTT topics that we want to subscribe to on this broker. In our case this will be the topic “shellies/shelly1-BA01F8/input/0” which monitors the status of the switch input signal (SW). We name the consumer “Shelly_Consumer”.
Now we are ready to create the Streamsheet itself. In the Streamsheet dashboard we select “New…” from the Menu. In the following dialog I chose the name “Hello Shelly” as name for the new Streamsheet and then I selected the consumer “Shelly Consumer” as the input stream for the the new Streamsheets.

After hitting “ADD” in this dialog the server creates a new Streamsheet and connects the sheet to all incoming data from topic “shellies/shelly1-BA01F8/input/0”. To get the Streamsheet running and receiving data we press the play symbol on the right side of the blue menu bar. The second when the connected on/off switch is operated we get a MQTT message in the inbox on the left.
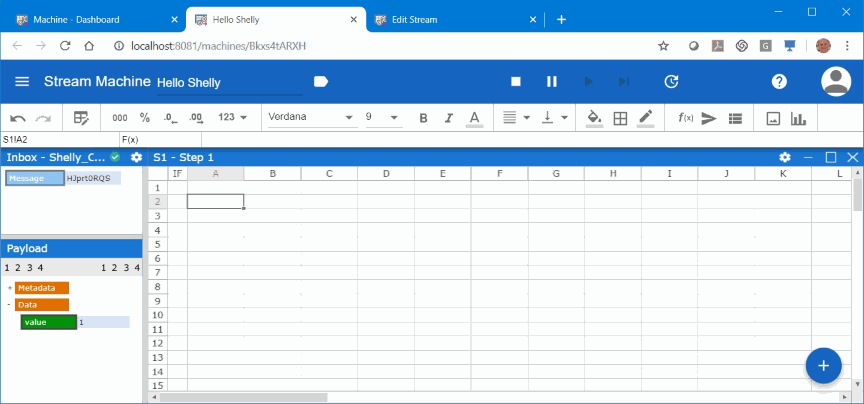
In the payload section on the left you see the data that comes with the MQTT message. In addition to the message metadata we only get one key/value pair. The value is 1 or 0, depending on the status of the switch.
To connect this key/value pair to the cells of the Streamsheet, we simply drag-and-drop the green value field from the payload section to a cell in the sheet. In this case I chose cell A5 as target cell. As a result, the key/value pair of the payload is now linked to cells A5 and B5 of the sheet. B5 holds the actual 0/1 value.
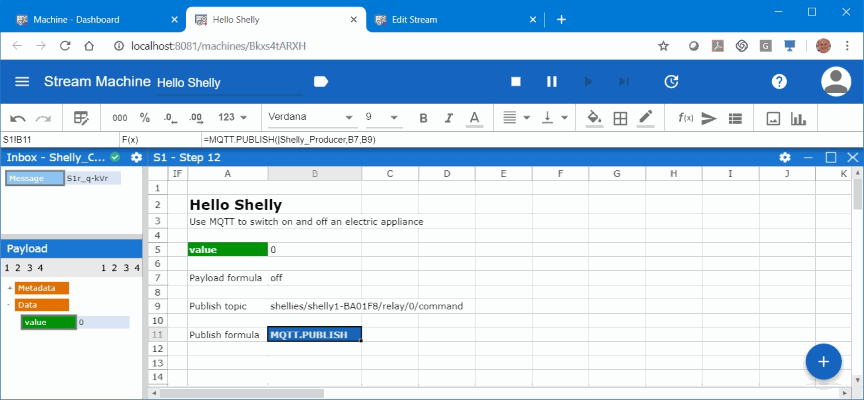
In the following screenshot you can see the result of the drag-and-drop operation. And you can see that I additionally enter the label “Payload formula” in cell A7 as well as the formula =IF(B5=1,”on”,”off”) in cell B7.
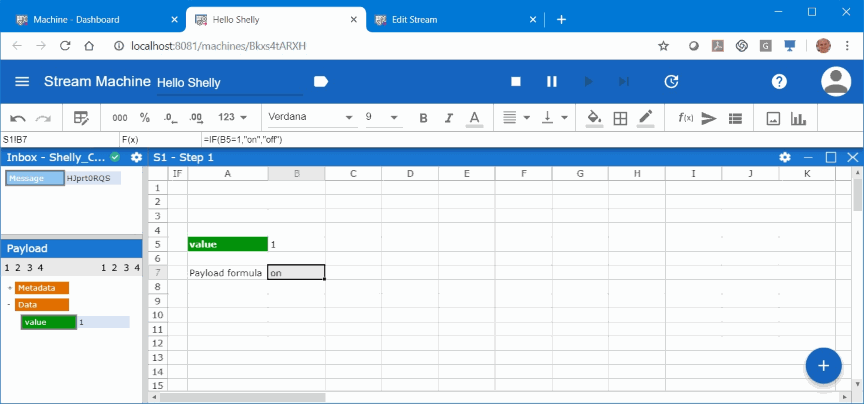
The IF-function in cell B7 converts the values from the switch signal (0 or 1) to the values needed to control the relay (“on” or “off”). In cell A9 I entered the label “Publish Topic” as a label for cell B9 which contains the actual MQTT topic of the relay. This is the topic where we want to publish to in order to switch the relay on or off.
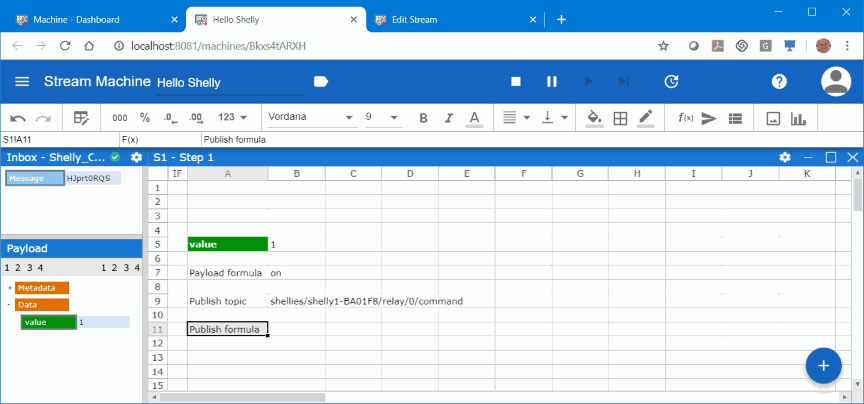
Now we need to create a publish formula that will publish the value in cell B7 to the topic stored in cell B9. To create the formula we use a formula wizard that we find one icon to the right of the f(x) icon in the white toolbar.
First we select cell B11 and then we press the wizard icon. We will then see the following dialog on the right side of the browser window.
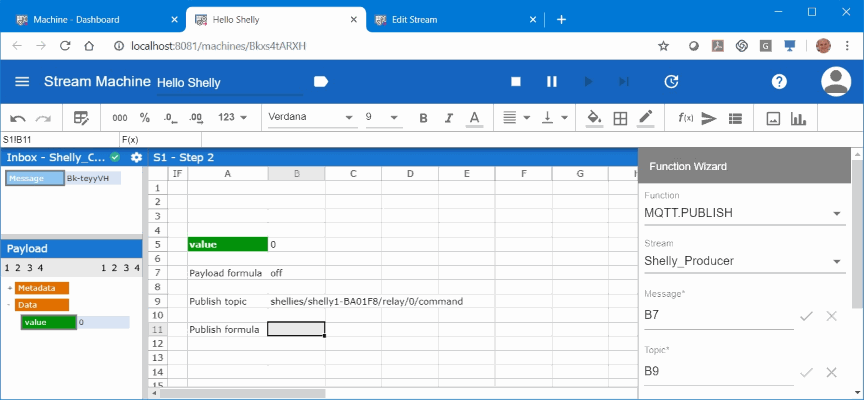
After hitting OK cell B11 has the formula MQTT.PUBLISH(|Shelly_Producer,B7,B9). It is not described here, but the Shelly_Producer has been created in the admin console before in almost the same way as we created the Shelly_Consumer before.
After adding a headline and a description in cell A2 and A3 the Streamsheet now looks like the following screenshot and is ready to switch on and off the light.
Of course, this could have been easily achieved without Streamsheets! But the purpose of the demo was to show the principle functionality of Streamsheets, in particular how to subscribe and how to publish data via MQTT.
So far we only used on formula (converting 0/1 to “on”/”off”). Now as we have the events and the corresponding payload data in the Streamsheet, we can use the power of the build-in spreadsheet engine and start to build more fancy functionality.
We will do one quick example of this right now. Lets assume we want the switch to control another light (i.e. another Shelly device) after 8 pm and also on the whole day on Sundays. To achieve this, we would simply change the Streamsheet as follows (the following screenshot was taken in formula view).
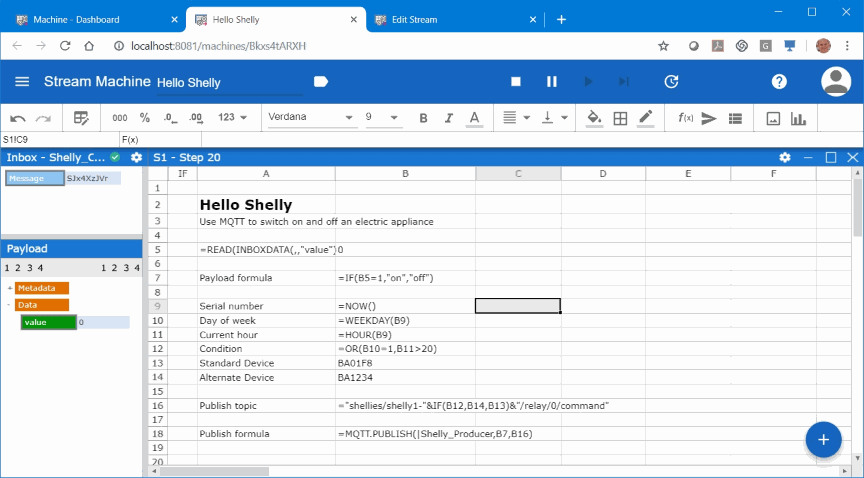
In cell B9 we calculate the current time serial using the NOW() formula. The WEEKDAY() formula in cell B10 returns the current day of the week (Sunday = 1). In cell B11 we use the HOUR() function to return the current hour.
The OR() function in cell B12 checks if it is Sunday or after 8 pm and returns TRUE/FALSE depending on the result of the OR condition.
Finally in cell B16 we use the IF() function with a string formula to calculate the topic we want to use as input for the MQTT.PUBLISH() function in cell B18.
About the author
Kristian Raue is a co-founder of Cedalo GmbH. Previously, he was the founder and CEO of Jedox AG in Freiburg, a leading provider of Business Intelligence software with locations in the USA, Australia, and Singapore.
From 1991 to 2000, Kristian Raue was the CEO of IntelliCube Software AG, which has merged with the INFOR Group. Kristian Raue studied industrial engineering with a focus on mechanical engineering at TU Darmstadt.

Subscribe for monthly updates