
Using MQTT in applications is very common to exchange information, trigger actions or update digital twins of physical assets.
So, there is a need for software libraries to implement MQTT clients in any popular programming language. And it is not surprising.
The Eclipse project named Paho provides open-source client libraries for various programming languages, such as Go, Python, C++, and JavaScript.
In this tutorial, I will focus on using the C++ client library in an application. This guide and the sample code cover all features available for the MQTT protocol in one source code file.
Check out other tutorials on using the Paho client in Python or Node.js to connect to an MQTT broker.
Prerequisites for the MQTT C++ Development Environment
Suppose you want to develop an application in C++. In that case, you can rely on a given integrated development environment (IDE), and several support tools to use for the build process.
If you’re starting from scratch, consider using one of these integrated development environments (IDEs) for C++ developers: NetBeans, Xcode, Visual Studio, Eclipse, Code::Blocks, or CLion. These IDEs provide code editing, completion, debugging, testing, refactoring, and compiling features. Depending on the operating system, the IDEs may use different underlying toolchains or built-kits. Some examples of build toolchains are Gradle, GNU make, CMake, and Visual Studio Build Tools. These tools can handle dependencies, configurations, testing, and publishing of your C++ projects.
The code in this tutorial does not dependent on the tools I used. However, you should know that I set up the environment with CMake using the GNU C/C++ compiler in Linux. The advantage of implementing CMake as a support tool for the build process is that it can support cross-platform development and integration with other languages and tools.
If you want to learn more about how to create IoT solutions using MQTT in PHP, read this article. You can also explore this guide on using the Paho MQTT Client in Rust, for a walk through of similar concepts in a Rust project.

So, in general, to build an MQTT C++ application, you will need the following:
- An IDE, which can also be in a form of a simple text editor.
- A range of build process support tools like CMake, GNU make, or others.
- A set of binaries that can compile your code, link libraries, debug, etc., like GNU Compiler Collection or MinGW-w64 for Windows users.
For this tutorial, I set up everything in advance, so you can use it in a ready-to-code codespace on GitHub. Follow this link to see the code and start the development.
If you prefer using a sample code in your environment or on a local computer, clone the source code from here. Then proceed using my instructions below.
git clone https://github.com/aschiffler/cpp-mqtt.git
cd cpp-mqtt
# create makefiles
cmake -S ./ -B ./build -G Ninja
# yes run twice due to git submodule init for paho client libraries
cmake -S ./ -B ./build -G Ninja
# build
cmake  --build ./build --target all --
The above code snippet will create an executable application with the cpp-mqtt name in the build folder.
Generally, the Paho Client library for C++ is a wrapper library that wraps the C version of the Paho library. As a result, in the sample application or the build setup, the C and the C++ libraries compile from the source and link statically into the final binary application. Other common libraries, such as OpenSSL, Crypto, and DynamicLoader link dynamically.
Overview of the Sample Code Using Paho MQTT C++ Library
The sample code of the main.cpp file has 300 lines of code and includes the most available features of the Paho MQTT Client for C++.
To name some:
- Connect via TLS
- Use WebSocket transport (read how to enable Mosquitto WebSockets)
- Use the MQTT protocol version 5
- Use derived classes for action listeners and callbacks
This sample code is an extended version compared to the one provided here, or in the source code repositories for the Paho libraries.
The following listings show an excerpt of the code and the original line numbers on the left. As you can see in the first listing below, we defined a main function and two classes. The primary function can take four arguments from the command line to override the defaults for broker address, client_id, username, and password.
The mqtt_client_callback class (lines 71-172) will handle the callback events like ‘connected,’ ‘message_arrived,’ or ‘disconnected.’ I implemented the main functionality of the sample application in this class. The subscription_callback (lines 36-66) class acts as a so-called action listener. It handles actions such as when the client subscribes to an MQTT topic and calls ‘on_success’ or ‘on_failure.’ The intention is to make the application more robust by the option to monitor actions like ‘subscribe’ or ‘publish.’
036: class subscription_callback : public virtual mqtt::iaction_listener
037: {
...
066: };


071: class mqtt_client_callback : 	public virtual mqtt::callback,
072: 						public virtual mqtt::iaction_listener
073: {
...
172: };


178: int main(int argc, char* argv[])
179: {
180: 	string address  = (argc > 1) ? string(argv) : DFLT_SERVER_ADDRESS,
181: 		 clientID = (argc > 2) ? string(argv) : DFLT_CLIENT_ID,
182: 		 username = (argc > 3) ? string(argv) : DFLT_USERNAME,
183: 		 password = (argc > 4) ? string(argv) : DFLT_PASSWORD;
...
274: 	try {
275: 		// Connect using SSL/TLS
276: 		cout << "\nConnecting..." << endl;
277: 		mqtt::token_ptr conntok = client.connect(connopts);
...
289: 		// Disconnect
290: 		cout << "\nDisconnecting..." << endl;
291: 		client.disconnect()->wait();
292: 		cout << "...OK" << endl;
293: 	}
294: 	catch (const mqtt::exception& exc) {
...
297: 	}
...
300: }
Configure a Client Object and Establish the Connection of Paho MQTT Client in C++
So let’s dive deeper into the sample code and see how to configure the connection with an MQTT broker. The steps below include some optional configuration to have a full-featured sample code.
Start by creating a client object.
208: mqtt::async_client client(address,clientID,mqtt::create_options(MQTTVERSION_3_1_1));To create the client object, we need to pass the broker address, client ID, and some MQTT protocol version 3.1.1. default configurations. See the separate section on protocol Version 5 for specific changes needed for version 5.
Optional: Set the transport security options:
Make use of these options only if you want to encrypt the communication between the client and the broker:
- Set Certificates with a trust store (line 213); This shall consist of at least the CA certificate, which signs the certificate of your MQTT broker (e.g., R3 from Let’s Encrypt), to allow the client to verify the broker certificate.
- Flag for whether a valid broker certificate is required for the connection to succeed (line 214
trueorfalse); Set tofalseto use encrypted traffic but do not verify the broker certificate; Set totruefor production case.
212: 	auto sslopts = mqtt::ssl_options_builder()
213: 			.trust_store(TRUST_STORE)
214: 			.enable_server_cert_auth(false)
...
218: 			.finalize();
Optional: Set the options for the last will message:
Set the topic, the payload, the quality of service level, and whether it is retained (last argument in line 253). To learn more about the last will message and retainment, you can read this article or see the usage in the sample application at the end of this article.
253: auto willmsg = mqtt::message(LWT_TOPIC, LWT_PAYLOAD, QOS, true);Finally, combine all the connection options in the connect_opts object (line 256), including username, password, and optional inputs (lines 260, 261) just as I described it earlier.
256: 	auto connect_opts = mqtt::connect_options_builder()
257: 		.user_name(username)
258: 		.password(password)
259: 		.mqtt_version(MQTTVERSION_3_1_1)
260: 		.will(willmsg)
261: 		.ssl(sslopts)
262: 		.connect_timeout(TIMEOUT)
263: 		.clean_session(true)
264: 		.finalize();
As stated at the beginning, the code uses callback events to implement error handling and reaction on receiving messages. To make the client object use the defined callback functions, create a callback_object as an instance of the mqtt_client_callback class from line 71. Pass the client object itself and the connect_opts object to the class’s constructor to enable topic subscriptions or reconnect the client if it loses the connection.
268: mqtt_client_callback callback_object(client,connect_opts);The set_callback method call sets this callback_object as a callback handler for the client.
271: client.set_callback(callback_object);As the last function call before going into an endless loop, the connect() method call initiates the client connection attempt using the set options.
277: client.connect(connopts);After this execution, the mqtt_client_callback class handles all the functionality due to the reaction on events. The following section explains only an excerpt of the two most important events. See here for the complete code example.
How to Use MQTT C++ Callbacks and Action Listener
At this point in the tutorial, the sample code is running, a configured client is now connected to an MQTT broker. The callback function is set, and the application waits for events. In the following extracted listing of the callback class, I skipped most of the code lines to focus on two possible function calls (= events): message_arrived and connected.
071: class mqtt_client_callback : 	public virtual mqtt::callback,
072: 						public virtual mqtt::iaction_listener
073: {


108: 	void message_arrived(mqtt::const_message_ptr msg) override {
...
115: 	}


120: 	void connected(const std::string& cause) override {
...
165: 	}


172: };
To realize minimal functionality and to demonstrate the message publishing process, in the connected() function (lines 120-165, above), a message object is created (lines 140-142, below) and published on the broker (line 144). The arguments of the make_message function call are topic, payload, quality of service level, and retainment (true/false).
140: 		auto msg = mqtt::make_message(
141: 			"hello", "Cedalo is awesome!",
142: 			QOS, true);
The created message object msg is then published by calling *publish().* The returned delivery token can optionally check the publishing process. See below the complete code on how to do that.
144: mqtt::delivery_token_ptr tok = client.publish(msg);Also, for demonstration within the connected() function*,* the client subscribes to a topic with a specific quality of service level. As an advanced option in the method call, an object subscribe_action_callback of an action listener callback is also passed.
155: 		mqtt::token_ptr subtok = client.subscribe(
TOPIC,
QOS,nullptr, subscribe_action_callback);
As part of the action listener, I defined the two functions (lines 40 and 52), which are called depending on the result of the subscription attempt from the client. This can be useful to monitor whether the client has the specific access rights to subscribe to a particular topic successfully.
36: class subscription_callback : public virtual mqtt::iaction_listener
37: {


40: 	void on_failure(const mqtt::token& tok) override {
...
50: 	}


52: 	void on_success(const mqtt::token& tok) override {
...
62: 	}
...
66: };
Let us wrap up so far.
After the client has connected to the MQTT broker, the connected() function is called in the callback class. Within this function call, the client first publishes a message on the topic ‘hello’ with the payload ‘Cedalo is awesome.’ After that, it subscribes to a topic and checks if the subscription is successful.
In the sample code that I provided, the action listener prints out the information on the terminal.
Now the client “waits” for messages to arrive and, when they do, executes the function message_arrived() on line 108.
Set up MQTT Protocol V.5 Specific Options for MQTT C++ Project
As I mentioned at the beginning of the article, you can set up the Paho client to use the MQTT protocol version 5. To do so, in the sample code, create the define “MQTT5” on line 32 in the main.cpp file.
So let’s review the changes and highlight some advantages of using MQTT protocol version 5.
First, creating the client object is now done by using the version 5 options object in the main function (line 260).
206: 	mqtt::async_client client(
address, clientID,
mqtt::create_options(MQTTVERSION_5));
One significant difference in this protocol version is that, among other things, it is possible to define message and session expiry intervals. Learn more about the MQTT Keep Alive parameter.
We can also set the message expiry and delay interval for the last will message. This is done in lines 225 to 233. Therefore, a properties object is created (line 225), the expiry interval and delay interval parameters are set, and the properties are injected/used in the last will message (line 233) object.
225: 	auto willproperties = mqtt::properties();
226: 	willproperties.add({
227: 		mqtt::property::MESSAGE_EXPIRY_INTERVAL, 20 });

229: 	willproperties.add({
230: 		mqtt::property::WILL_DELAY_INTERVAL, 10 });


233: 	auto willmsg = mqtt::message(
LWT_TOPIC, LWT_PAYLOAD,
QOS, true, willproperties);
Similarly, I set the session expiry interval property for the client connection. Therefore, in contrast to the approach I showed earlier in line 242, the properties object is injected on the connect_opts object.
Also, the option clean_start() in line 249 is now available with version 5, which controls session values’ (re-) usage during the connection.
236: 	auto properties = mqtt::properties();
237: 	properties.add({
238: 		mqtt::property::SESSION_EXPIRY_INTERVAL, 60 });

241: 	auto connect_opts = mqtt::connect_options_builder()
242: 		.properties(properties)
243: 		.user_name(username)
244: 		.password(password)
245: 		.mqtt_version(MQTTVERSION_5)
246: 		.will(willmsg)
247: 		.ssl(sslopts)
248: 		.connect_timeout(TIMEOUT)
249: 		.clean_start(true) // v5 specific
250: 		.finalize();
You can also set the message expiry interval for a specific message a client published. To do so, for example, in the callback function – creating the message object now requires one more parameter, which defines the message properties (line 137 marked in bold font). Also, the option clean_start() in line 249 is now available with version 5, which controls session values’ (re-) usage during connection.
131: 		auto pubproperties = mqtt::properties();
132: 		pubproperties.add({
133: 			mqtt::property::MESSAGE_EXPIRY_INTERVAL, 20 });
135: 		auto msg = mqtt::message::create(
136: 			"hello","Cedalo is awesome! (paho c++ client v5)",
137: 			QOS, true, pubproperties );
...
144: 		mqtt::delivery_token_ptr tok = cli_.publish(msg);
Finally, it is not mandatory to set anything more than the protocol version itself to use version 5 instead of version 3.1.1. Using the old version will have no disadvantage if there is no need to use intervals for expiry, session, or delays.
Run and Observe the Sample MQTT C++ Application
You can start the compiled sample application using the ready-to-code environment in the browser. In this case, you do not need to enter any additional command line parameters but only use the default values.
If you want to specify another broker address or credentials, for example the Pro Mosquitto broker, from the Cedalo MQTT Platform trial, you must use the following scheme.
cpp-mqtt <transport>://<broker IP or DNS name>:<port> <clientID> <username> <password>The
Ensure that the clientID, username, and password credentials fit the set client parameters on the broker. Also, ensure the client can publish/subscribe to the defined topics (lines 21,22,24).
The default value for the broker is wss://localhost:8080 to connect to the Mosquitto MQTT broker, which is configured and started automatically within the ready-to-code environment and allows anonymous connections without any credentials. The broker exposes 3 ports: 1883 (mqtt), 8883 (mqtts) and 8080 (wss), for testing different transport schemes. The required certificates are created automatically during the build time.
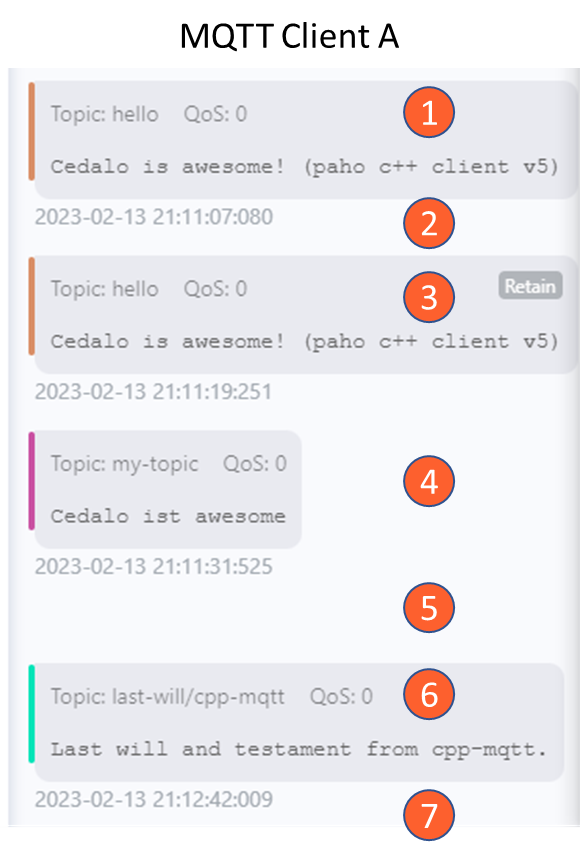
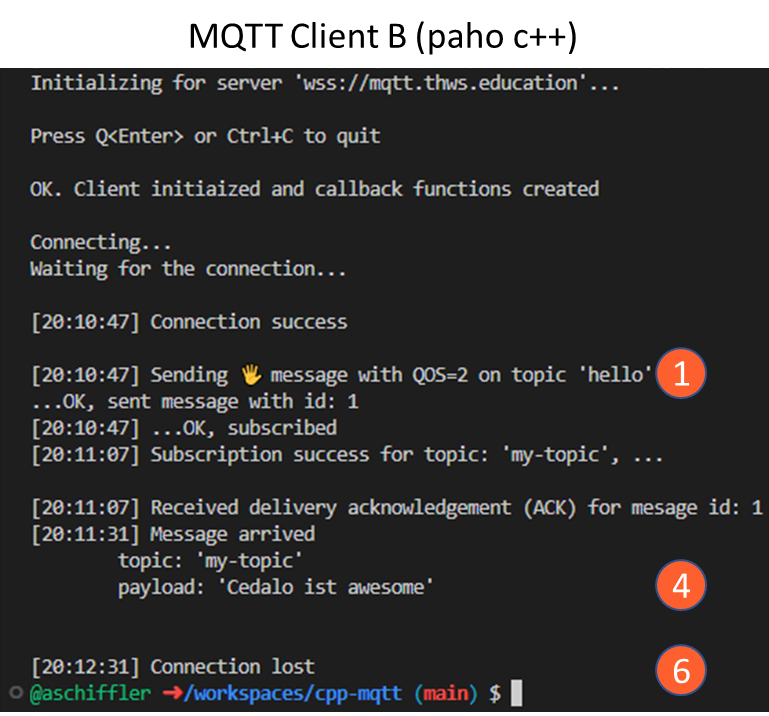
So let’s look at the functionality if we use the sample code with MQTT protocol version 5. The following descriptions refer to the two images below for client A and client B (our sample Paho C++ client) and the point in time marked by the numbers written in the colored circles. Client A is another MQTT client who has an active subscription to all topics of the broker (also includes the last will topic) and is started before client B.
The sample application cpp-mqtt (client B) starts:
- connects successfully to the broker,
- sends the last will message with retain true, a delay interval of 10 seconds, and an expiry interval of 20 seconds,
- and sends a message with an expiry interval of 20 seconds and retains set to true.
Now the time sequence is as follows (also refer to the images):
- Client A receives the message ‘Cedalo is awesome (Paho C++ client v5).’
- Client A is forced to disconnect from the broker.
- Client A has connected again and receives the retained message from client B because client A was (re-)connected within the 20 seconds interval of the published first message.
- Client A publishes a message ‘Cedalo is awesome.’
- Client B receives the message and prints its content on terminal.
- Client A is forced to disconnect and reconnect again; NO retained message (compare to 3.) is received from the broker because the message from client B has expired.
- Client B is forced to disconnect, and 10 seconds later (delay interval), the last will message is received by client A.
- Client A is forced to reconnect with the broker; No last will message is received, although the message has been set to retain, but the expiry interval is exceeded.
Possible Issues and Troubleshooting of your MQTT C++ Project
The sample code that I provided in this article shall run without any issues as it is. If you plan on compiling it for Windows OS or other CPU architecture, this might cause issues.
In case of issues about the content and the functionality of the sample code, you can raise an issue on the github repository and describe the problem. Alternatively, you can refer to the example/test code provided on the Paho C/C++ libraries here and here.


