
If you are familiar with the Mosquitto MQTT broker, then you know it is an open-source software that different platforms and operating systems support.
In this tutorial, we will guide you through installing and configuring the Mosquitto MQTT broker on the well-known Raspberry Pi in just a few simple steps.
What is a Raspberry Pi?
Raspberry Pi is a popular embedded system board that is relatively small in size and easy to use. Its applications range from hobbyist to professional work areas.
Raspberry Pi comes in different series with different characteristics, with the latest version being the Pi 4.
For this project, we will use a Raspberry Pi 3 A+ (see Figure 1).
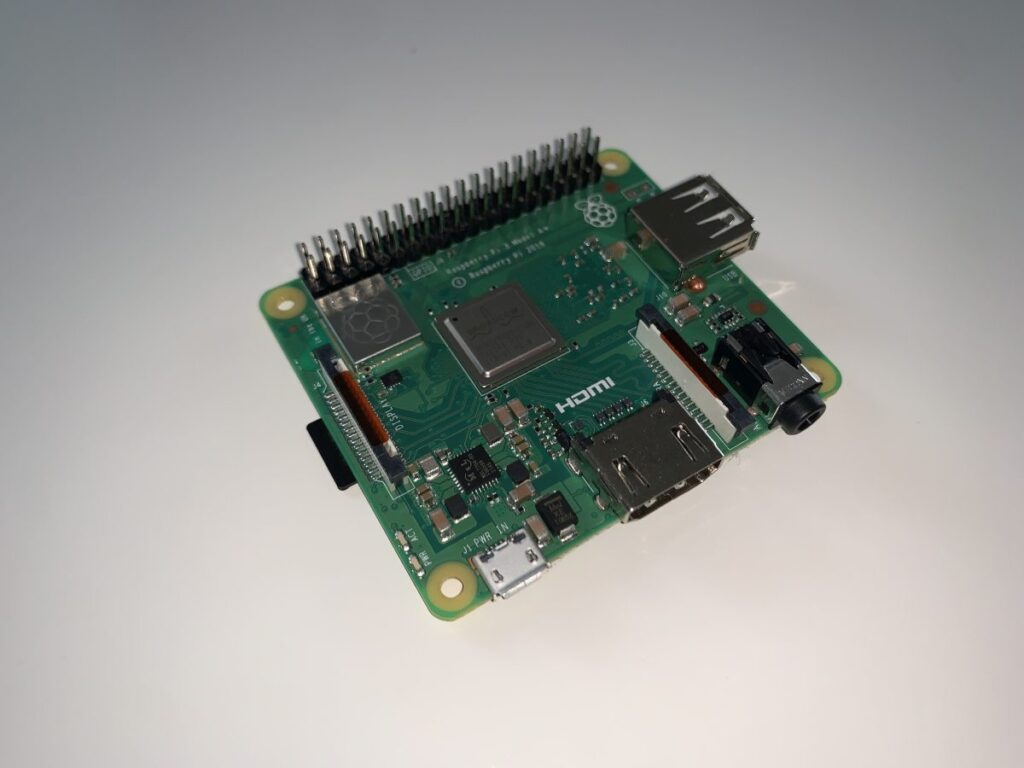
Figure 1 - Raspberry Pi 3A+ system board.
This specific version has the following relevant characteristics:
- Processor
- Broadcom BCM2837B0 Chip
- 64-bit Quad Core ARM Cortex-A53 @ 1,4 GHz
- RAM Memory
- 512 MB LPDDR2 SDRAM
- Connectivity
- 2,4 GHz and 5 GHz IEEE 802.11 b/g/n/ac Wireless LAN
- Bluetooth 4.2 BLE
- 1x USB 2.0
Why run the Mosquitto MQTT broker over Raspberry Pi?
Installing a Mosquitto broker over a Raspberry Pi is a wise choice that offers numerous benefits. These include:
- Easy installation and configuration - Setting up the Mosquitto MQTT broker on a Raspberry Pi is a straightforward operation process that takes only a few minutes.
- Cost-effective solution - Raspberry Pi boards are affordable, making it possible to create low-cost but efficient MQTT solutions.
- Low power consumption - Raspberry Pi is a low-power platform that consumes less energy while ensuring good performance.
- Local data handling - Raspberry Pi allows you to create a local broker solution without relying on any cloud server - playing a pivotal role in increasing efficiency.
If you want to take your solution to the next level, check out the Pro Edition for Eclipse Mosquitto. Experience its pro capabilities by signing up for a free Cedalo MQTT Platform trial, available for cloud and on-premises deployments. Access advanced features like Persistent Queueing, Audit Trails, MQTT High Availability, and more.
Let’s get started: preparing your Raspberry Pi
Raspberry Pi should be up and running to install the Mosquitto broker. An operating system must be present to start the installation process.
The following chapter will be relevant if you recently purchased a Raspberry Pi and need to configure it for the first time. However, if you already have a fully functional Raspberry, you can skip to the Mosquitto broker installation chapter.
How to install an operating system on your Raspberry Pi
Several operating systems exist for Raspberry Pi, which can confuse beginners - especially when each system has its advantages and drawbacks.
However, the simplest option for beginners wanting to get their Raspberry up and running quickly is to download the official operating system, the Raspberry Pi OS.
We will download a tool called “Raspberry Pi Imager,” to prepare our Raspberry with a fully functional OS.
In my case, I will select the Windows download since it will be running from a Windows machine. The Imager will install the OS on a micro SD Card - the memory media type used by the Raspberry Pi. Make sure to have a micro SD Card with a minimum capacity of 8 GB to accommodate the OS.
Start the Imager once it has been downloaded (see Figure 2).
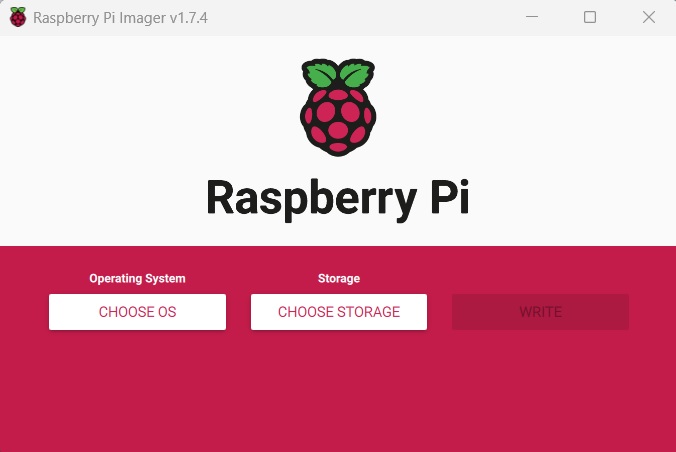
Figure 2 - Starting screenshot of the Raspberry Pi Imager.
Select Choose OS, then Raspberry Pi OS.
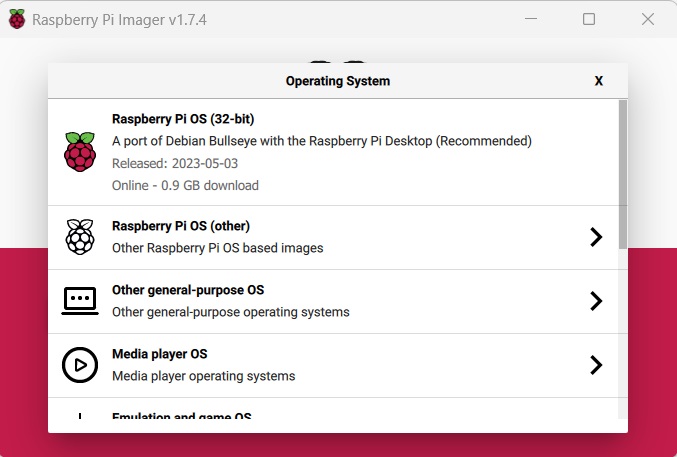
Figure 3 - Selection of the operating system.
The installation procedure will start after choosing the SD Card storage option and clicking Write.
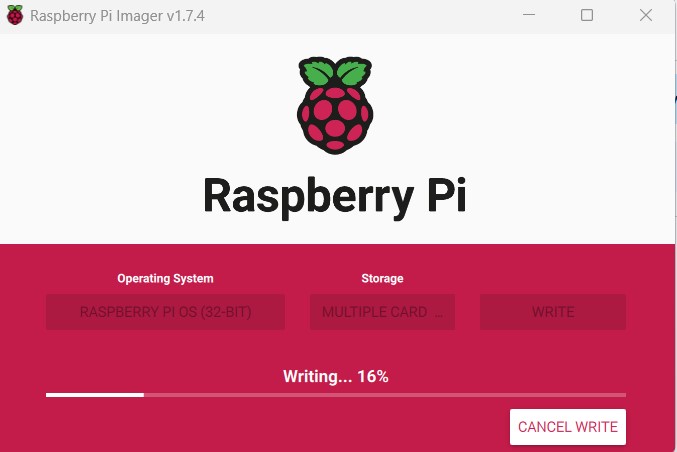
Figure 4 - Installation of Raspberry Pi OS in progress.
Once the installation is complete, remove the micro SD Card from the PC, and insert it into the Raspberry Pi.
To start the Raspberry Pi, connect the power supply and wait for it to turn on. Within a few seconds, the system should be ready to use.
Like any other computer, Raspberry Pi also requires input and output devices to let the user communicate with it. There are two ways to achieve this:
- Connect a keyboard, mouse, and screen.
- Establish a remote connection through SSH.
For further details, refer to the official Raspberry Pi setup guide, and here you can find an extensive guide on configuring and using SSH remote access.
Installing the Mosquitto broker on Raspberry Pi
Please note that this tutorial assumes using the Raspberry Pi OS. If you are using a different OS, the following steps may differ.
Moreover, you can check out our professional technical support offering if you have any further questions about the open-source Mosquitto MQTT broker.
First, updating the Raspberry Pi system software, including the OS and other apps, to the latest version is necessary to ensure optimal performance. We can use the update and upgrade commands with the following syntax to achieve this:
sudo apt update && sudo apt upgradeWe can proceed with the actual installation of Mosquitto, after the update has finished. Let’s enter the following command:
sudo apt install -y mosquitto mosquitto-clientsThis command will install the Mosquitto broker and the client applications, like the subscriber and publisher.
Once the installation is complete, it will be possible to proceed with the configuration.
Configuring and testing the Mosquitto broker on Raspberry Pi
This section will provide examples of configurations that cover the most common Mosquitto use cases. We will explore the basic default configuration and how to improve it with remote access and authentication.
After installation, all the configurations can be made in the file mosquitto.conf, located in the /etc/mosquitto folder.
We will then activate each feature with a specific option in this file.
Mosquitto broker basic default configuration
The basic default configuration provided with the installation is simple and allows us to use our broker only with a reduced subset of functionalities.
Let’s start the broker with the following command:
mosquitto -vOnce started, the following log will be shown:
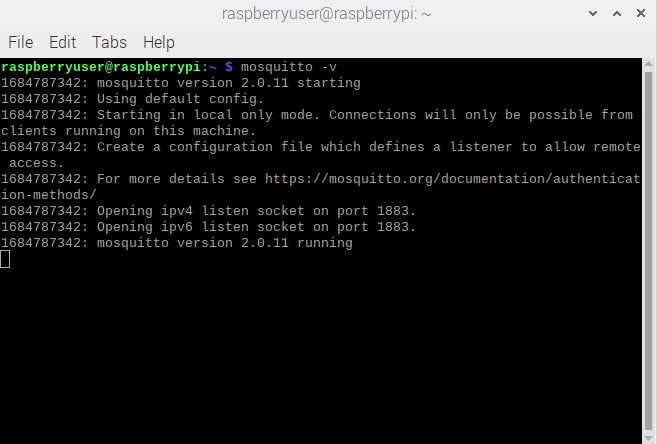
Figure 5 - Starting the Mosquitto broker service.
Now we have the option of keeping the console open or closed since Mosquitto runs as a service and will continue running in the background independent of the console’s launching status. Another possibility would be to run Mosquitto using option -d (daemon mode) as follow:
mosquitto -v -dThis allows the terminal to return control to the user for inputting further commands.
Figure 7 clearly shows that the message “Starting in local only mode” indicates that no remote access is active.
To conduct a small communication test, start the subscriber and publisher client applications by opening two separate consoles in our Raspberry Pi and typing the following commands:
- Console 1:
mosquitto_sub -h localhost -t /test/topic - Console 2:
mosquitto_pub -h localhost -t /test/topic -m “Hello from localhost”
In Figure 6 it is possible to see the message sent by the publisher.
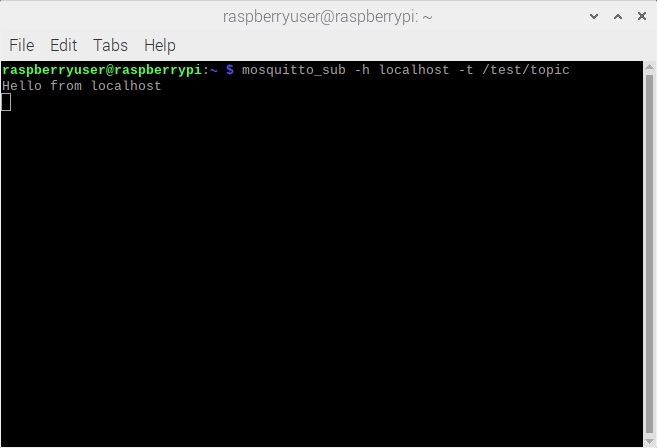
Figure 6 - Starting the subscriber client in localhost.
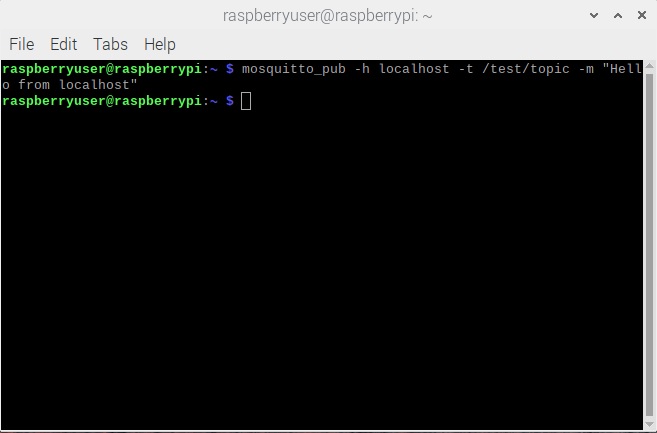
Figure 7 - Starting the publisher client in localhost and sending a message to the subscriber.
Since remote access has not been activated, the only possible use case is to run the broker and clients on the same machine (Raspberry Pi). In the next section, we will learn how to enable this feature.
Enabling remote access on the Mosquitto MQTT broker
By default, our Mosquitto broker only accepts connection requests from the localhost and not from other devices on the network.
To enable the remote access function, we must add the following configurations to the Mosquitto configuration file:
- listener 1883
- allow_anonymous true
We can modify the configuration file in Raspberry Pi using the GUI or the console.
If we use the console, we can open the file with our preferred text editor, which in my case, is Vim. Edit the configuration file by adding the two lines provided before (see Figure 8).
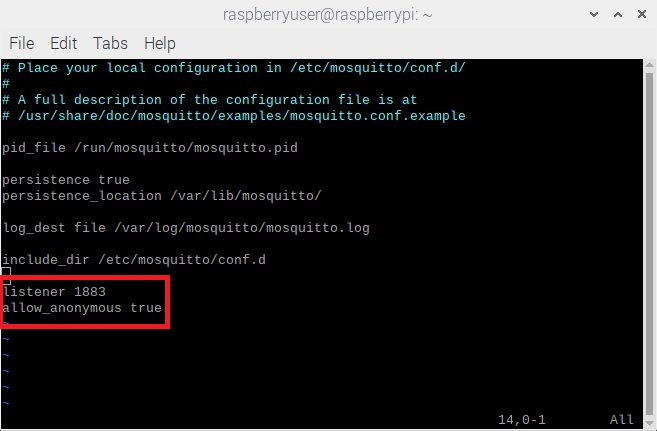
Figure 8 - Enabling remote access through the configuration.
Save the changes and close the file, then restart the broker using the following command:
sudo service mosquitto restartNow that remote access is active, the broker will also be accessible from other remote devices.
We can test the configuration using a remote publisher client located on another machine, in this case, a PC, while the subscriber runs from a Raspberry Pi. Figure 9 shows a graphical representation of the current test setup.
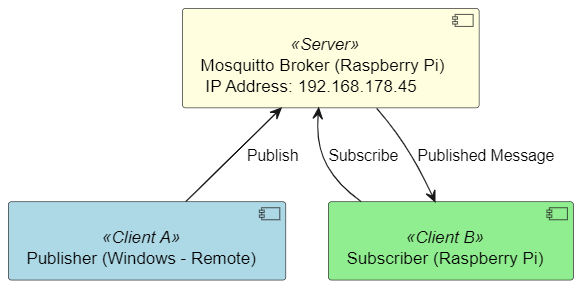
Figure 9 - Remote access test setup with a remote client hosted by a Windows machine.
First, start the subscriber client using the command in Figure 6, then the publisher client on the remote machine.
Using a Windows PC with the Mosquitto MQTT installed, we can run a test publisher using the following command:
.\mosquitto_pub.exe -h “IP Address” -t ‘/test/topic’ -m ‘hello world’The crucial aspect of the command is that the remote client must refer to the broker using its IP address or hostname. Figure 10 illustrates how the IP address of the broker is specified.
As shown in Figure 11, the subscriber can receive the published message correctly, demonstrating that the broker can now accept connections originating from other remote devices.
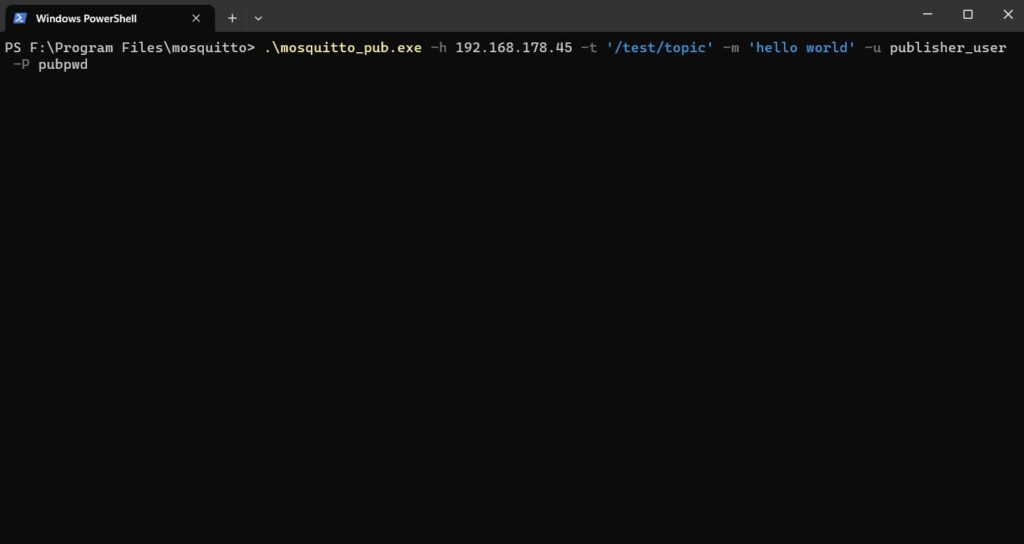
Figure 10 - Start the remote publisher client on a Windows machine.

Figure 11 - The remote device receives the “Hello World” message.
Remote access is necessary when implementing MQTT over real-word systems, where a network of remote and local devices must communicate and exchange information.
Of course, when remote devices can access the broker, it is important to prioritize security and prevent malicious connections. Mosquitto brokers have a specific user authentication mechanism that will protect the MQTT network, and we will cover this in the next chapter.
Enabling user authentication on the Mosquitto MQTT Broker
User authentication allows the broker to accept connections from MQTT clients only upon successful authentication with a username and password. Mosquitto enables the creation of multiple users with the application mosquitto_passwd.
When a user creates their account, their username and password are stored in a password file. The broker will then use this file to evaluate every connection request. A client will be allowed to connect if their connection request contains a username and password matching one of the entries in the password file.
Usernames are stored in clear text, but passwords are stored as hashed values. This ensures the confidentiality of user data.
To begin testing user creation, let’s start with the first user, which in our example will be the publisher. Execute the following command in the Raspberry Pi console to create a new user:
sudo mosquitto_passwd -c /etc/mosquitto/pwdfile publisher_userAfter launching the command, a prompt for inserting a password will appear. Upon entering the password, the user will be created in the specified file:
- /etc/mosquitto/pwdfile
Once the file is created, we can also add the subscriber-client user named subscriber_user by entering the following command:
sudo mosquitto_passwd -b /etc/mosquitto/pwdfile subscriber_user subpwdTo add a new user to an existing password file, use the command with option -b and provide the password as an argument. Unlike option -c, it won’t prompt for a password request.
With the user creation now complete, edit the mosquitto.conf file and add the following lines (as shown in Figure 12) to activate the configuration:
- allow_anonymous false
- password_file /etc/mosquitto/pwdfile
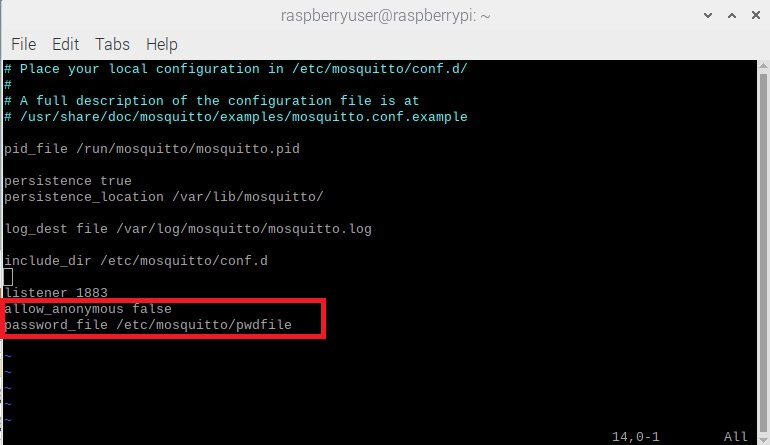
Figure 12 - Activation of Mosquitto users handling through the configuration file.
Save and close the file, and restart the broker using the command:
sudo service mosquitto restartThen launch the subscribing client, specifying the username and the password, using the following command (see Figure 13):
mosquitto_sub -h localhost -t /test/topic -u subscriber_user -P subpwd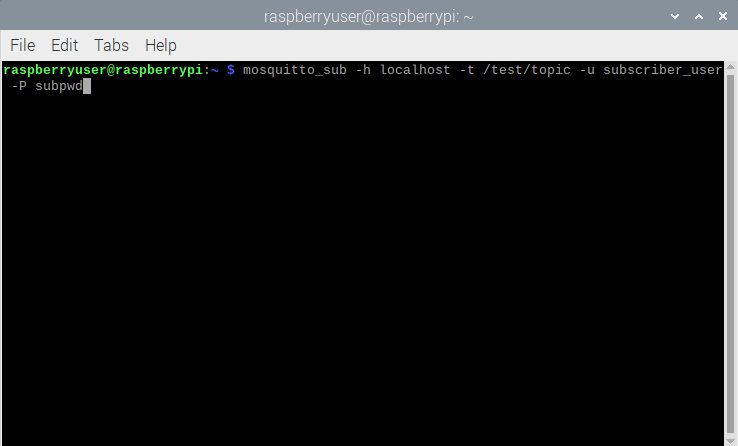
Figure 13 - Starting the subscriber client with user authentication.
Do the same for the publishing client using the following command (see Figure 14):
.\mosquitto_pub.exe -h “IP Address” -t ‘/test/topic’ -m ‘hello world’ -u publisher_user -P pubpwd
Figure 14 - Starting the publisher client with user authentication.
The message will be routed to the subscriber if the usernames and passwords are correct in the command argument. The broker will refuse the connection if a username or password is wrong, as illustrated in Figure 15.
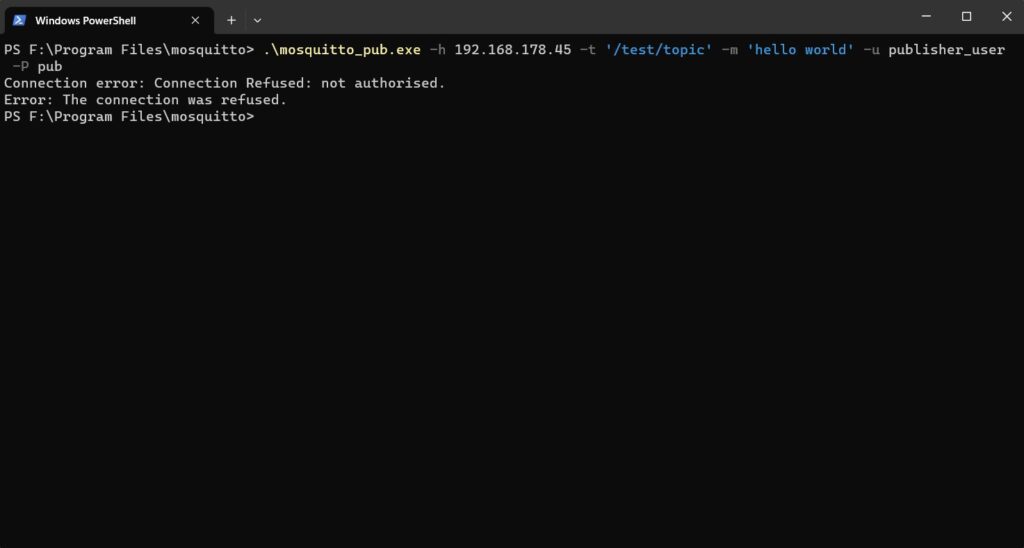
Figure 15 - Connection with a wrong password gets refused by the broker.
Conclusions
This article demonstrates the simple steps to installing the Mosquitto MQTT broker on Raspberry Pi and configuring it for client authentication and remote access. The process is uncomplicated and can also be performed by those approaching Raspberry Pi for the first time.
While the Mosquitto MQTT broker allows different configurations, we focused on the most critical and common subset, allowing us to build effective MQTT networks for real-world scenarios.


