
This guide walks you through creating a smart thermostat using a professional version of open-source Mosquitto™ MQTT broker, Home Assistant, and an ESP32 board with Tasmota firmware. Whether you’re a DIY enthusiast or looking to improve your home’s energy efficiency, this project leverages IoT to provide a custom, interactive solution. By following these steps, you’ll gain practical experience in setting up an MQTT broker, utilizing Home Assistant for comprehensive home automation, and programming an ESP32 board to interact with environmental sensors. This guide will help you implement MQTT integration with Home Assistant even if you use different hardware or firmware.
Integrating Home Assistant and MQTT
Let’s explore the reasons for using the Home Assistant MQTT integration.
Advantages of integrating Home Assistant and MQTT
When setting up a smart home system, an external MQTT broker like the Pro Edition for Eclipse Mosquitto™ offers several advantages over the MQTT add-on integrated within Home Assistant.
Let’s take a look at some of them:
- Firstly, an external MQTT broker enhances performance and reliability and can handle a higher number of messages and connections without experiencing latency or downtime. This is crucial for maintaining a responsive and stable smart home environment, especially as the number of connected devices increases.
- Separating the MQTT broker from your Home Assistant setup ensures better security and isolation. If one system fails or comes under attack, the other remains unaffected, providing an additional layer of protection for your smart home network.
- An external broker grants more flexibility in terms of deployment. You can host it on a different machine with better hardware resources or even in the cloud, which is beneficial for remote management and scalability.
- Adopting an external broker also lets you manage devices at a tenant level, where you can deploy devices from different sites, buildings, floors, etc. You can connect several Home Assistant instances to the same MQTT broker, significantly enhancing scalability.
- Lastly, an external MQTT broker can support a wider range of features and configuration options, enabling more complex and tailored setups. Pro Mosquittooffers advanced features such as centralized management, enhanced security, database integrations, REST API, clusterization, etc.
While the MQTT add-on within Home Assistant provides convenience and simplicity, using an external broker greatly enhances your smart home setup’s performance, security, and customization capabilities.
Test the advanced capabilities of the Pro Mosquitto MQTT broker and the Management Center, with a free 30-day trial license. Explore features such as Persistent Queueing, Audit Trails, MQTT High Availability, and more.
Controlling a thermostat with Home Assistant and MQTT
In this tutorial, I’ll build the system shown in Figure 1 that automates thermostat controlling with Home Assistant and Pro Mosquitto MQTT broker.
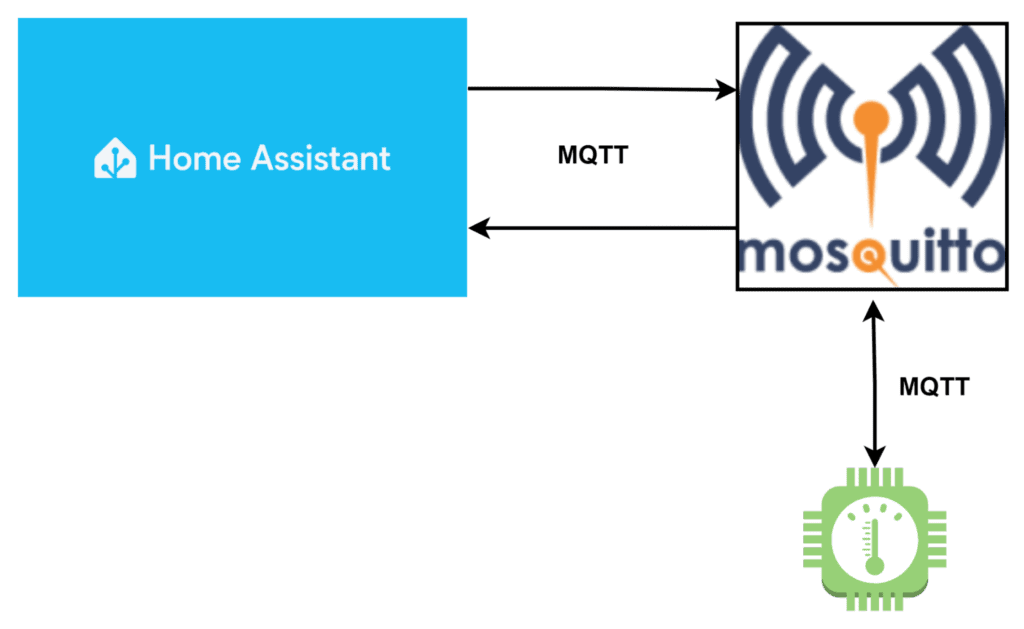
Figure 1 - System architecture.
The system includes the following:
- You can install a Home Assistant instance on any host, such as a VM or Raspberry Pi.
- A Pro Mosquitto instance running in a Docker container can be hosted in a VM, on-premise, or cloud.
- An ESP32 device running a Tasmota firmware. You can use any ESP32 that is compatible with Tasmota.
Although this tutorial has specific instructions for the chosen hardware and operating system, its concepts apply to any hardware/OS.
Characteristics of the example system:
- Home Assistant and Pro Mosquitto will connect using MQTT. Here, Home Assistant will subscribe and publish to topics managed by Pro Mosquitto.
- Home Assistant will interact with the ESP32 through the Pro Mosquitto broker.
- ESP32 will communicate solely with the Pro Mosquitto broker, routing all communications through the MQTT broker rather than having direct contact with the Home Assistant.
Notice that this system separates the device communication layer from the home automation system. Pro Mosquitto is responsible for the device communication while the Home Assistant manages the device data, stores it, visualizes it, runs automation, and interacts with the user.
How to integrate Home Assistant and Mosquitto Pro
This section will show the steps to communicate Home Assistant with Pro Mosquitto.
First, request an on-premises trial license to use Pro Mosquitto, and select “Docker” in the “Container Setup” field on the form.
Instructions for installing Pro Mosquitto
Before installing Pro Mosquitto in a Docker environment, you will first need to meet the following prerequisites:
- A running Docker environment.
- Login to the Cedalo registry.
- A valid license with the High Availability feature enabled will be sent to you by Cedalo via email.
- Also, Cedalo will provide you with a link to download all the necessary files. The directory structure is shown in Figure 2.
- Place the license files in the following locations:
- server1/license/license.lic
- server2/license/license.lic
- server3/license/license.lic
- server1/management-center/config/license.lic
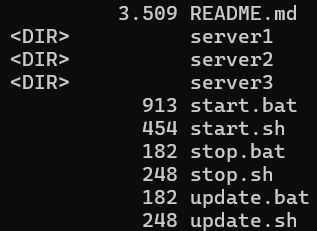
Figure 2 - Directory structure.
Step-by-Step Implementation
Follow these steps to install Mosquitto Pro:
1. Edit the docker-compose files
To begin with, locate the docker-compose.yml files in each of the server directories. Then, do the following:
- Look for the port settings in the HA proxy sections on each server. You can find the Management Center configuration in server 1.
- Change the IP
127.0.0.1to your host’s IP address. This allows you to connect to the brokers from other hosts. If you leave the default configuration the servers will only accept connections from the local host. - You can also remove the IP part entirely to allow connections to any IP address that belongs to the host where you are running the containers. However, this last option is less secure and not recommended. See Figures 3 and 4 for locating the configurations.
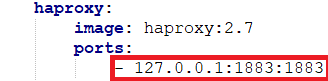
Figure 3 - Published ports in HA proxy.
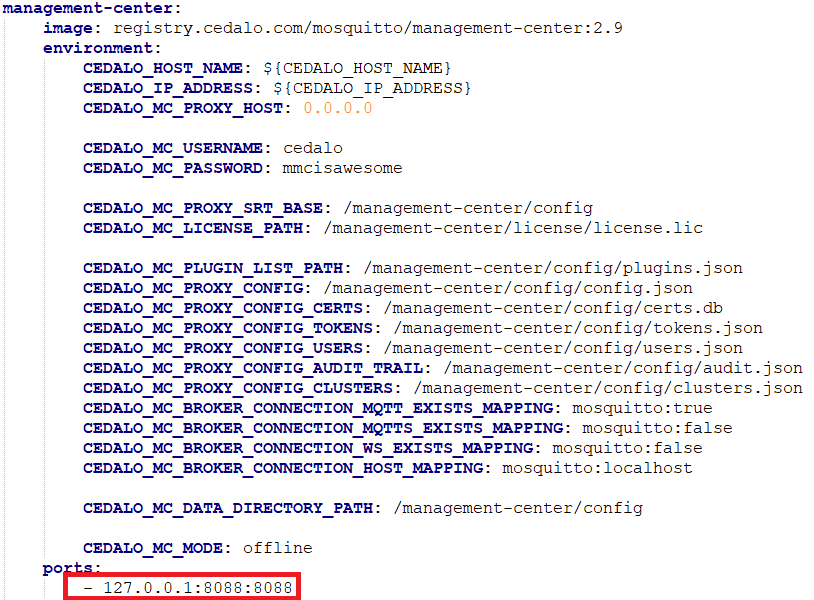
Figure 4 - Published ports in the Management Center.
2. Login in the Cedalo Docker register
Run the following command from the console to log in.
docker login registry.cedalo.com -u -p3. Choose your operating system
After that, depending on your operating system, select the appropriate script:
- Linux/MacOS: use
.shfiles - Windows: use
.batfiles
4. Start the cluster
In this step, open your shell and run one of the following scripts:
- Linux/MacOS:
./start.sh up -d- Windows:
.\start.bat up -d5. Check the created containers
After that, the following containers will be created:
- Three Mosquitto cluster nodes.
- Three HAProxys to forward MQTT client connections to the cluster leader (active MQTT node).
- Management Center, connecting to individual Mosquitto nodes and HAProxys.
6. Network configuration
- The compose file creates a network with IP range
172.20.0.0/16for internal container communication. - Each Mosquitto node opens port
1885on the internal network as an admin port for MMC reachability. Avoid exposing this port outside the internal network. - The active cluster leader opens port
1883in the Docker private network to allow HAProxy to forward requests from its public1883port.
7. Access the Management Center
- Firstly, open the Management Center at http://localhost:8088/
- Then, use the default credentials from server1’s compose file:
CEDALO_MC_USERNAME: cedalo
CEDALO_MC_PASSWORD: mmcisawesome
See Figure 5.
- Finally, Check the cluster state in the “Cluster” menu. A green icon indicates the leader.
8. Management Center connections
The Management Center has six predefined connections:
- Three brokers via port
1885 - Three HAProxys via port
1883 - All three HAProxy connections are included to cover all failover scenarios. Changes can only be made to the cluster leader. HAProxy connections enable direct leader access via port
1883, while port1885directs to each node.
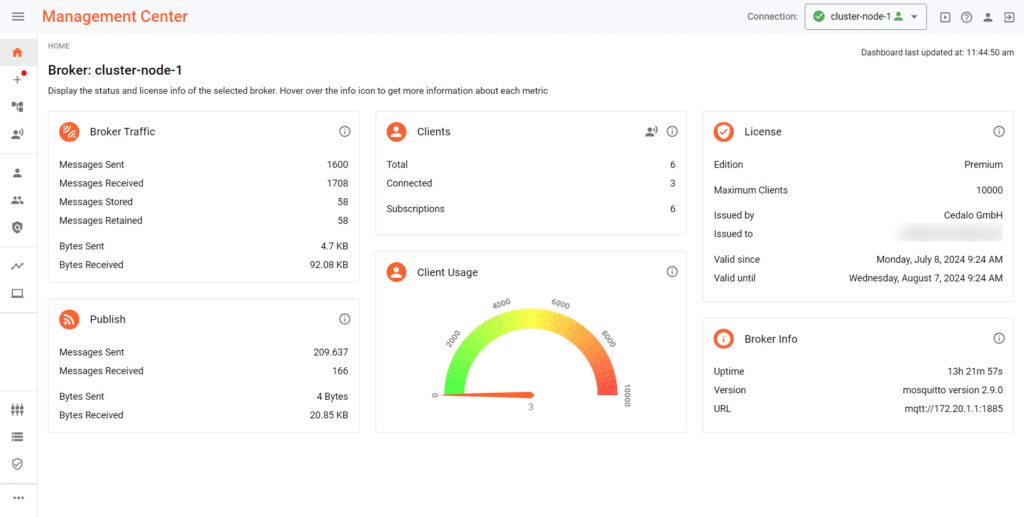
Figure 5 - Management Center home page.
Configuring Pro Mosquitto using the Management Center
This section explores various configurations using the Management Center.
Enabling brokers and proxies
To begin with, check if the brokers and proxies are running. To do this, navigate to “Broker Connections” in the left menu to see the list. You can enable or disable them simply by using the slide button (Figure 6).
Next, enable at least one broker and, optionally, a proxy. You can choose to enable all of them. This tutorial will enable all the brokers and proxies to test the entire system.
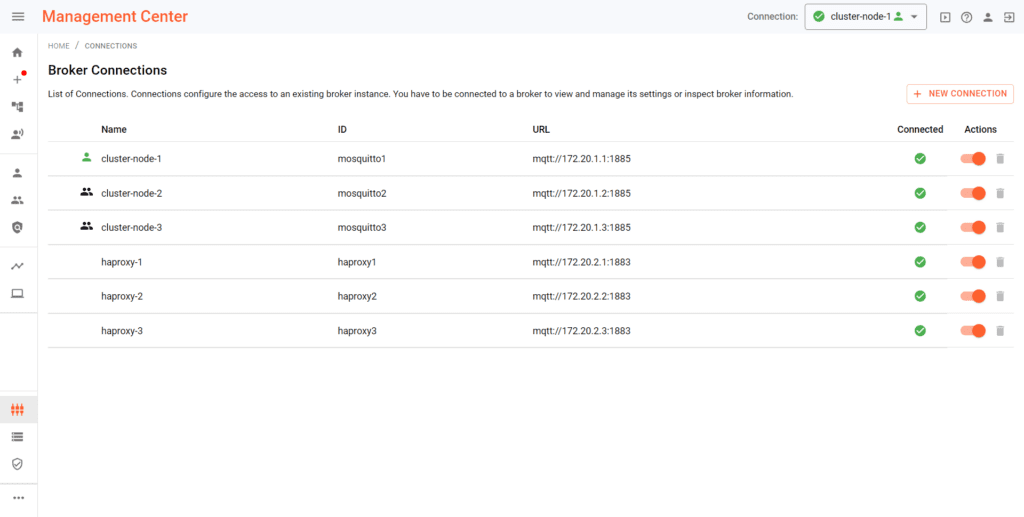
Figure 6 - Broker Connections.
Creating clients
To connect other devices and systems to Pro Mosquitto, you need to create clients.
Follow these steps to create a new client:
- Click on “Clients” on the left menu.
- On the clients page, click on the “+ NEW CLIENT” button on the top right of the screen.
- On the client configuration page, enter the name and password fields, as shown in Figure 7. Leave all other fields empty.
NOTE: If you specify a client ID, you must use that ID on your device. If you use any other client ID, the broker will reject the connection. In this case, leave it blank in the broker. - Create a client for Home Assistant and another for the device.
- Once you create the clients, ensure they have permission to publish and subscribe. Go to the clients section and add the “client” role to each client, as shown in Figure 8.
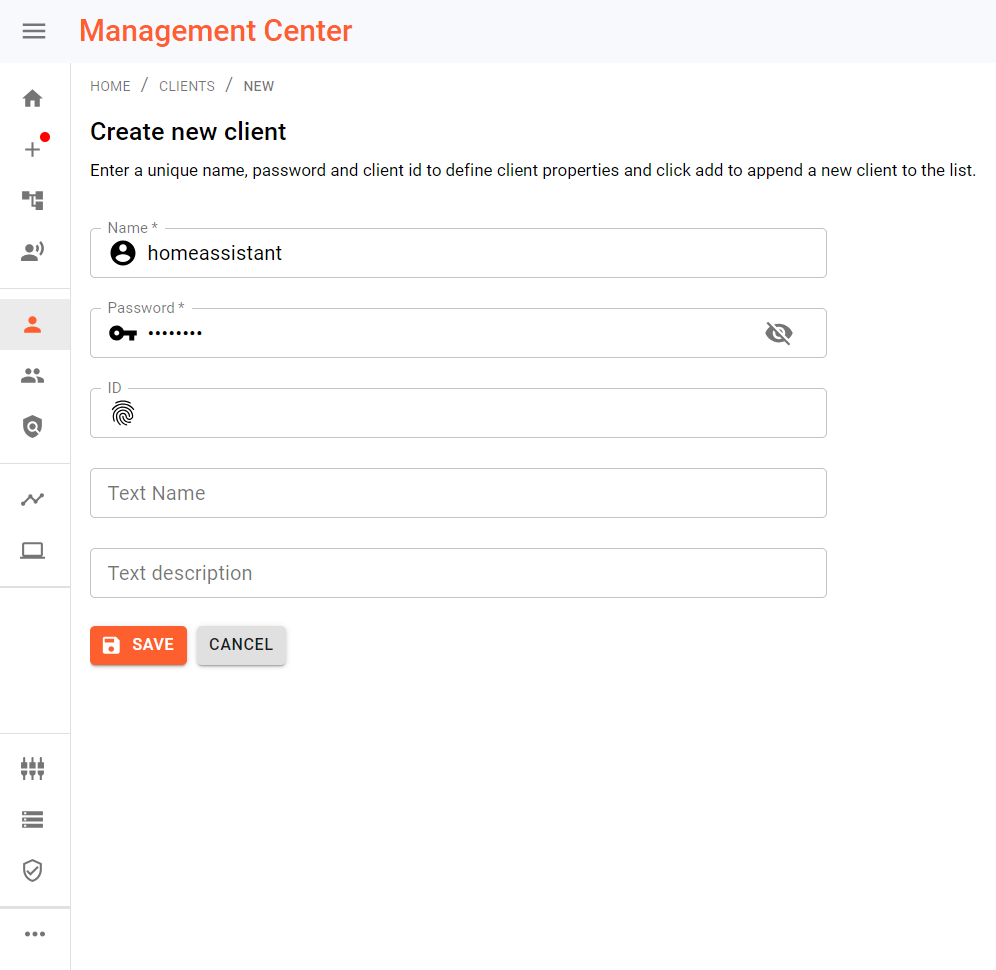
Figure 7 - New client configuration.
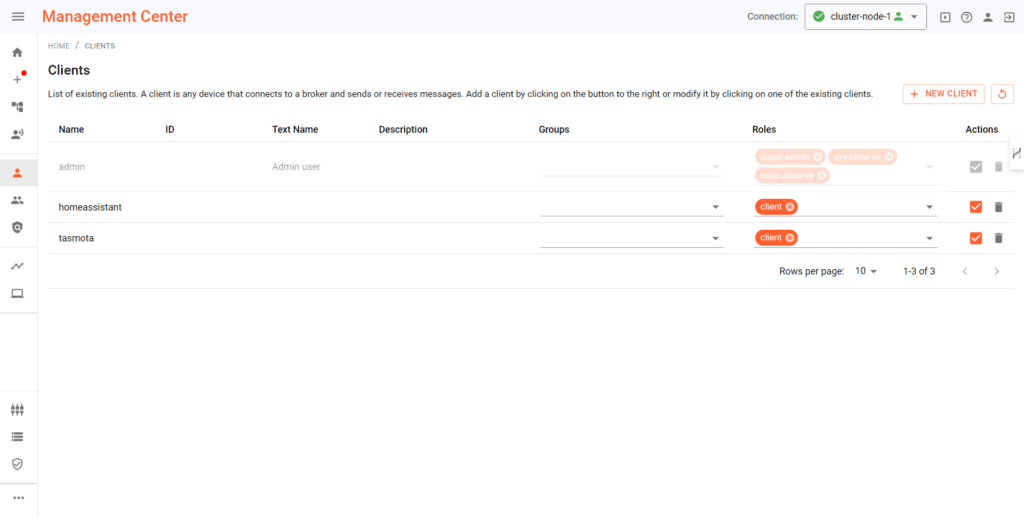
Figure 8 - Client Management.
At this point, you’ve made all the necessary configurations in the broker. In the following section, I describe how to connect Home Assistant to the broker.
Connecting Home Assistant to Pro Mosquitto
Follow these instructions to run a Home Assistant instance if you haven’t done so already, and use this Home Assistant integration to connect Home Assistant to Pro Mosquitto.
This integration lets you connect Home Assistant to any MQTT broker (version 3.1.1).
The Home Assistant MQTT integration has many advanced features, like device discovery. For this tutorial, I will use the manual setup procedure. Follow the steps below to add and configure the integration:
- Access the web interface of your Home Assistant instance.
- Go to Settings > Device&Services section.
- Click on the button “+ Add Integration”, in the bottom right of the screen.
- Search for and select MQTT (see Figure 9).
- Enter the broker details, i.e., IP, port, username and password for a Mosquitto client previously created through the Management Center. Then click on Submit (see Figure 10).
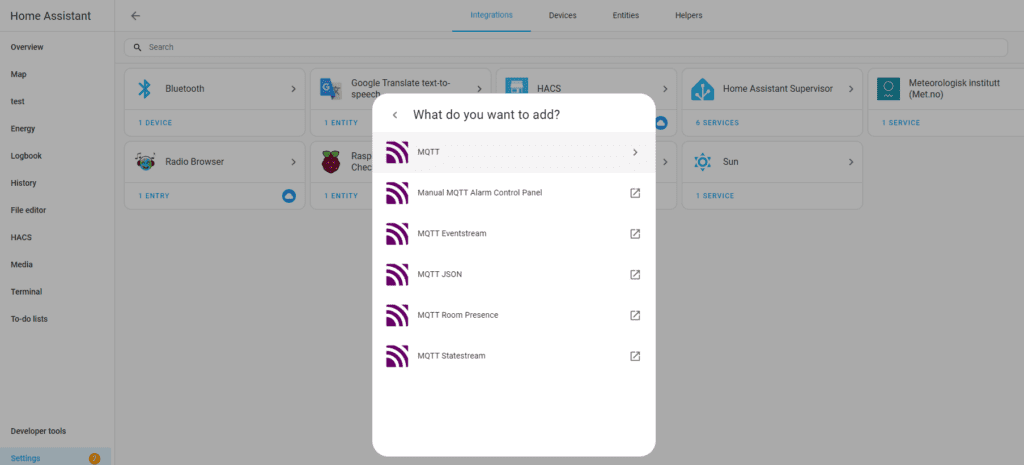
Figure 9 - Select MQTT integration.
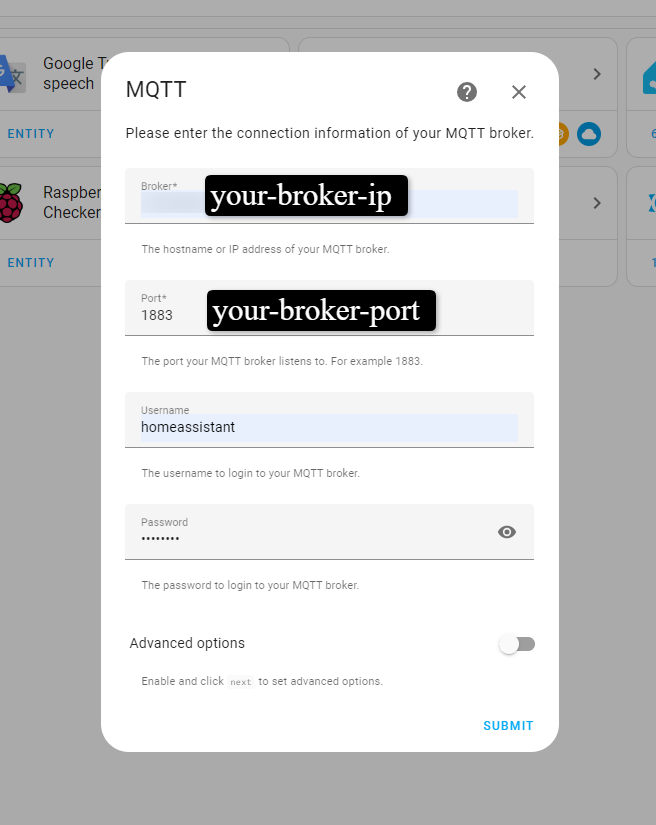
Figure 10 - MQTT configuration.
These steps will guide you in establishing a connection between Home Assistant and Pro Mosquitto. In the following section, you’ll learn how to connect a Tasmota-based device to the Pro Mosquitto broker.
Creating a Tasmota device
As mentioned in the introduction, you can build the IoT device using any hardware and software platform. However, this specific case will utilize the ESP32 Dev Kit V1 and the Tasmota firmware.
The example board will connect to a DS18B20 temperature sensor and a relay, as shown in Figure 11.
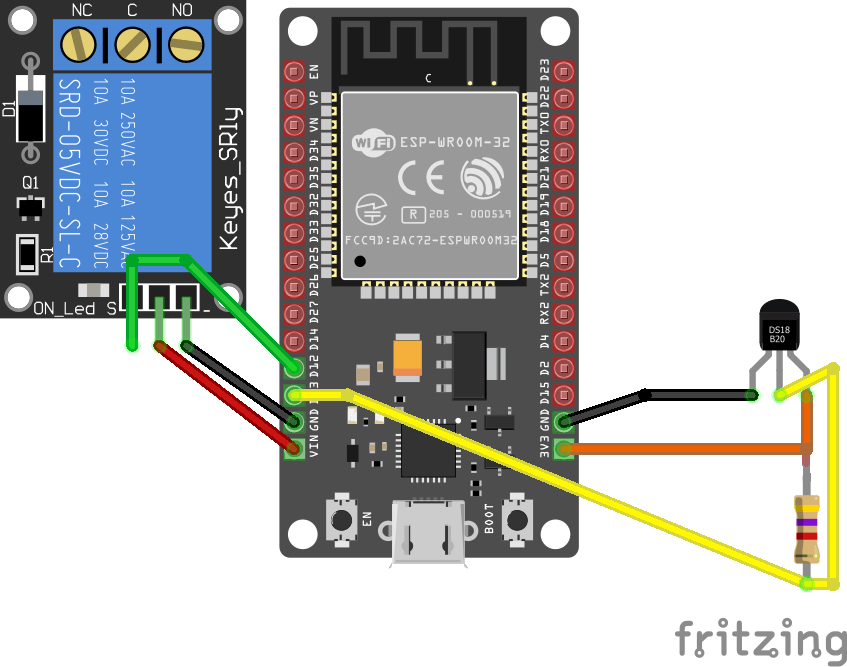
Figure 11 - Tasmota device based on ESP32.
Programming the device
To program the device using the Tasmota firmware:
- To begin with, connect the device to the computer using a USB cable.
- After that, look for the port where the device is attached.
- On Windows use devmgmt.msc on Windows to check for COM ports under ‘Ports (COM & LPT)’.
- On Linux, run
dmesg | grep ttyand look for the correct TTY. - On macOS, use
ls /dev/tty.*
- Use the web installer using this documentation.
- Select “Tasmota” and click CONNECT, then select the correct port from step 2 (see Figure 12).
- The previous step will download the firmware and reboot the device.
- After the installation is complete, click the “NEXT” button. The installer will search for available Wi-Fi networks and automatically connect to the strongest one. Choose the desired network from the dropdown menu and enter the Wi-Fi password as prompted. Wait for the configuration process to finish, then click “CONTINUE”.
- After that, you can access the web interface by clicking “Visit device” (see Figure 13).
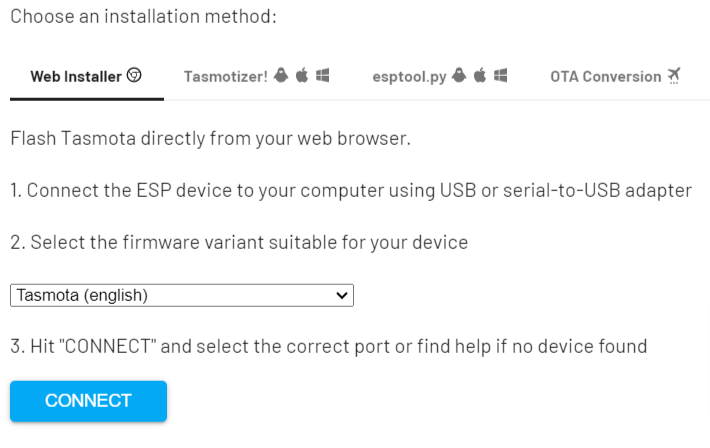
Figure 12 - Programming a device with TASMOTA.
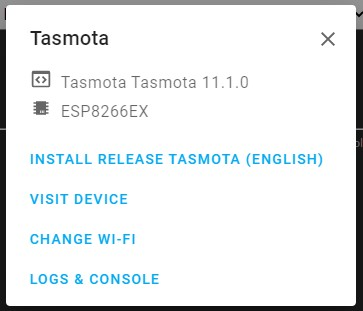
Figure 13 - Final set up screen.
Connecting to the MQTT broker
After programming the device with the Tasmota firmware, let’s configure it:
- Firstly, go to the home page and click Configuration. See Figure 14.
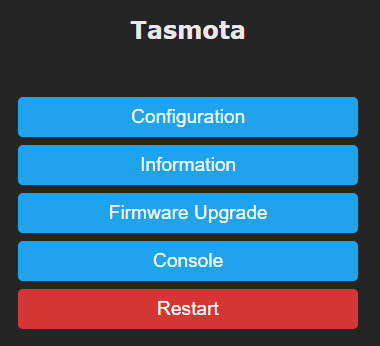
Figure 14 - Tasmota home page.
- Then, look for the MQTT configuration and enter the settings, as shown in Figure 15. You need to specify at least the IP address of the broker, port, user, and password.
- Finally, verify the device’s connection to the broker by checking the client list under “Client Inspection” in the Management Center.
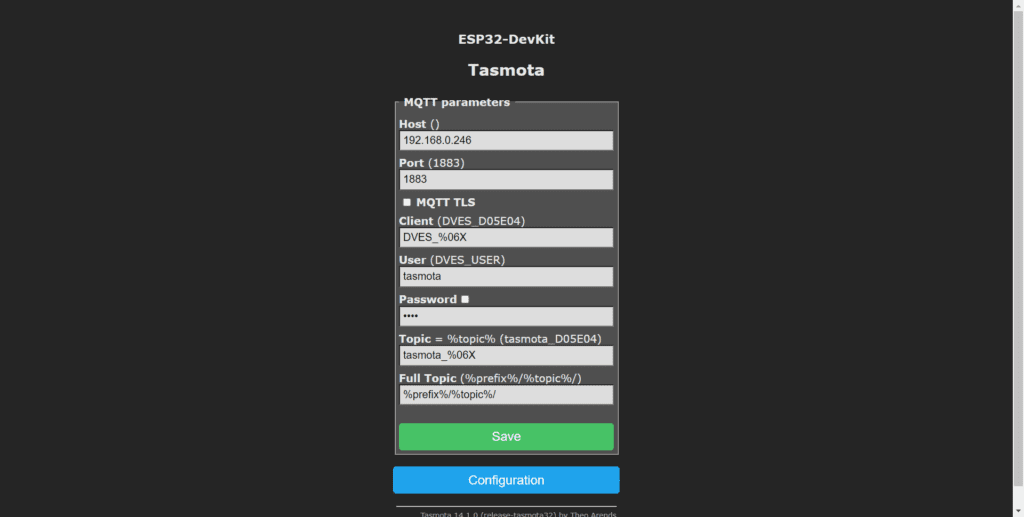
Figure 15 - Configuring MQTT in the Tasmota device.
Configuring the sensor and the relay
The following steps describe how to enable the sensor and the relay:
- Go to Configuration > Configurate Template.
- Change the configurations of the pins to Relay and DS18B20, as shown in Figure 16.
- After that, save the changes, and go back to the previous page.

Figure 16 - Template configuration page.
Other configurations
At this point, you can end the Tasmota configuration with two simple steps.
- First, go to Configuration > Other Configuration and check the Activate option in the Template section, as shown in Figure 17.
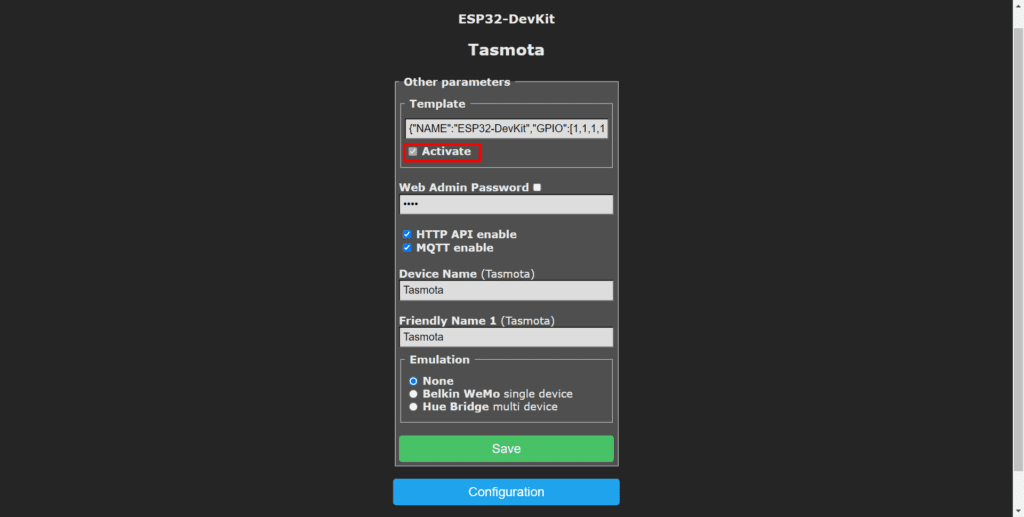
Figure 17 - Enabling the template.
- Then, go to Tools > Console and enter the following command:
SetOption19 0This will allow the Tasmota integration in Home Assistant to discover the device (Figure 18).
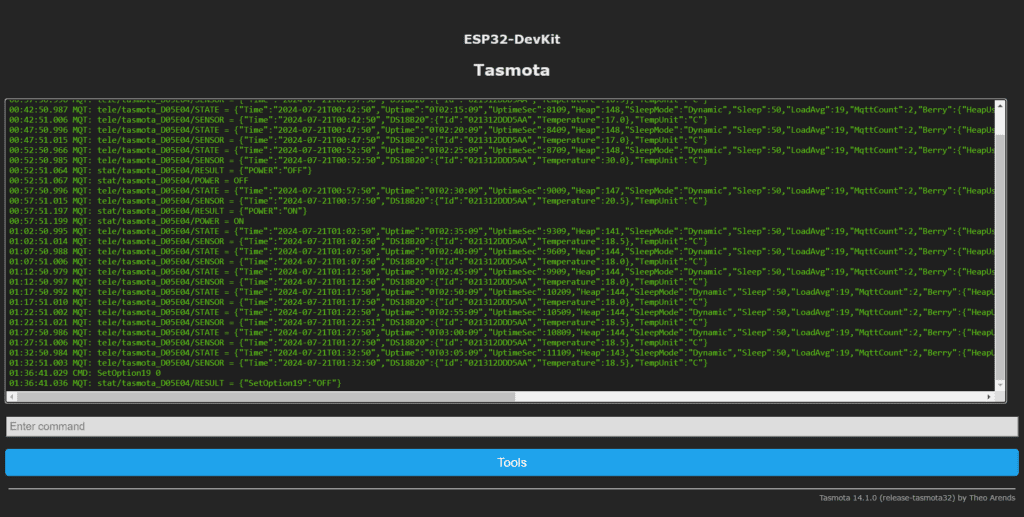
Figure 18 - Tasmota console.
After that, you are ready to install the Tasmota integration in Home Assistant.
Adding the Tasmota device to Home Assistant
To add the device to Home Assistant, follow these steps:
- First, access the web interface of Home Assistant.
- Then, go to Settings > Devices & Services.
- At this point, you will see a new device discovered, like the one shown in Figure 19.
- Finally, click on the new device to see the details (Figure 20).
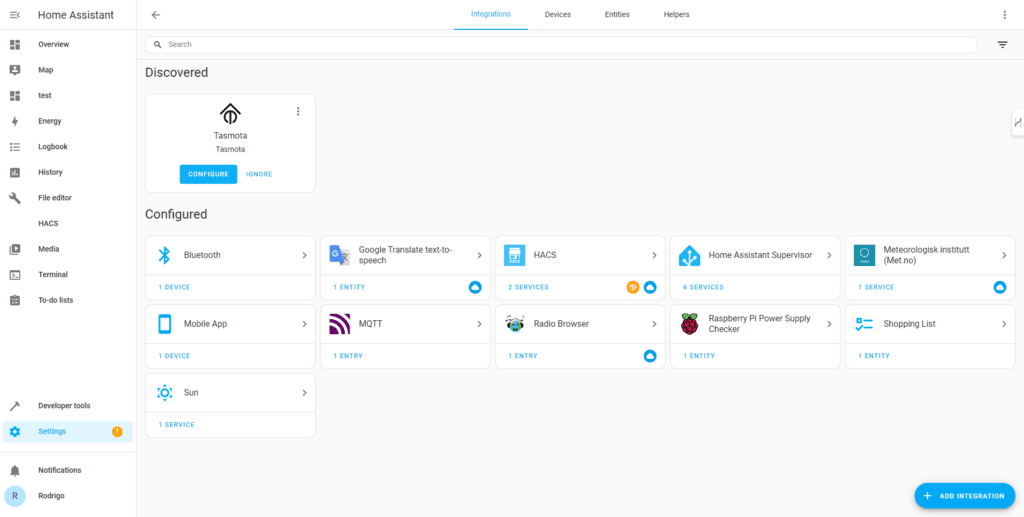
Figure 19 - New Tasmota device discovered.
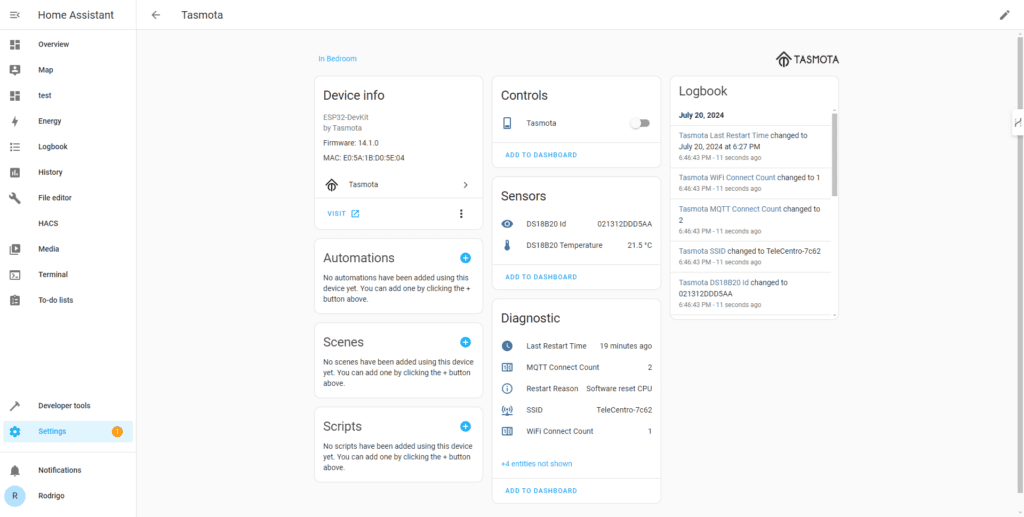
Figure 20 - Device details.
- Click on the + button in the Automations card to create an automation (Figure 21).
- Create a new automation like the one shown in Figure 22. This will trigger the relay when the temperature is lower than 19 degrees.
- Create a new automation like the one shown in Figure 23. This will turn off the relay when the temperature exceeds 24 degrees.
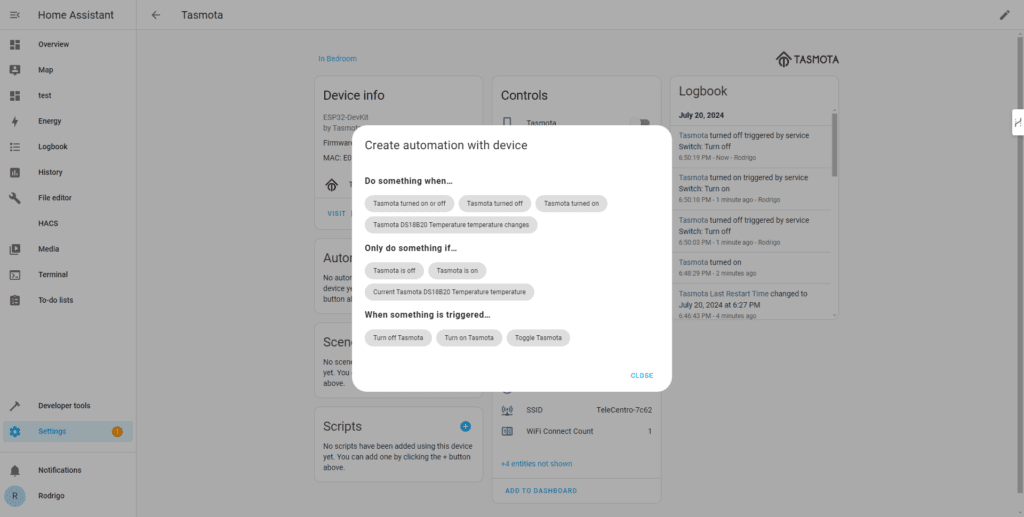
Figure 21 - Create an automation.
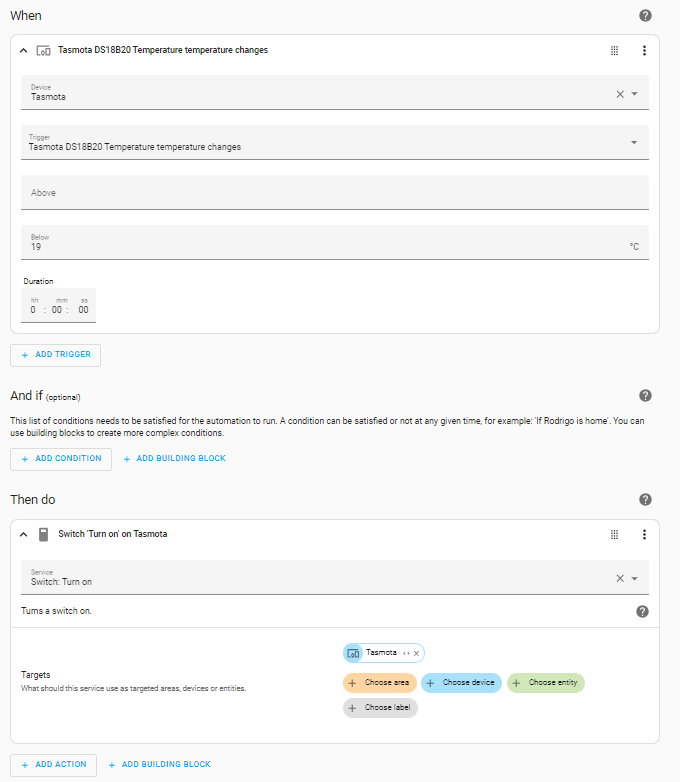
Figure 22 - Turn on the switch when the temperature is low.
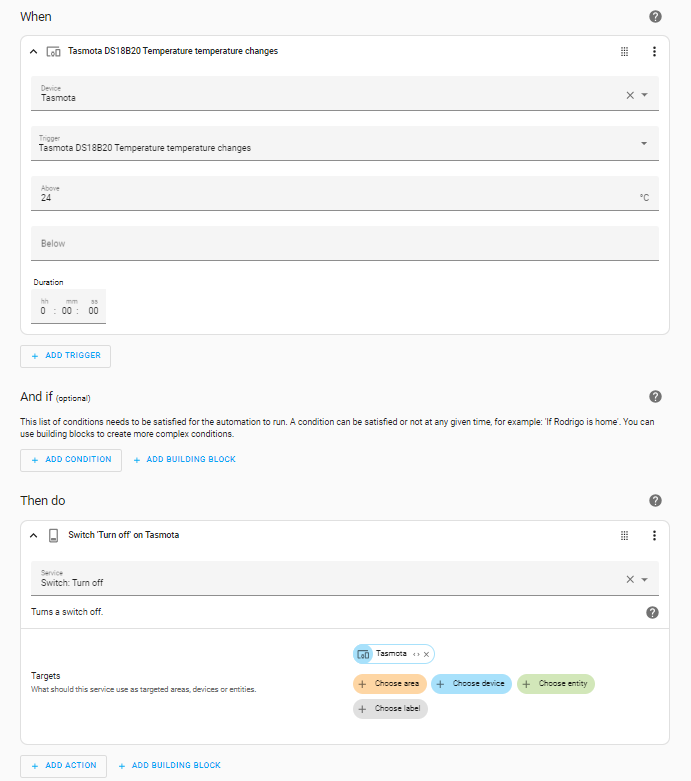
Figure 23 - Turn off the switch when the temperature is high.
Add the new device to the dashboard
The final stage of this project consists of adding the Tasmota device to the Home Assistant dashboard. To do so:
- Go to the Overview page and click on the pencil icon on the top right of the screen. This enables you to edit the dashboard.
- Click “+ ADD CARD” on the bottom right of the screen to open the dialog box shown in Figure 24.
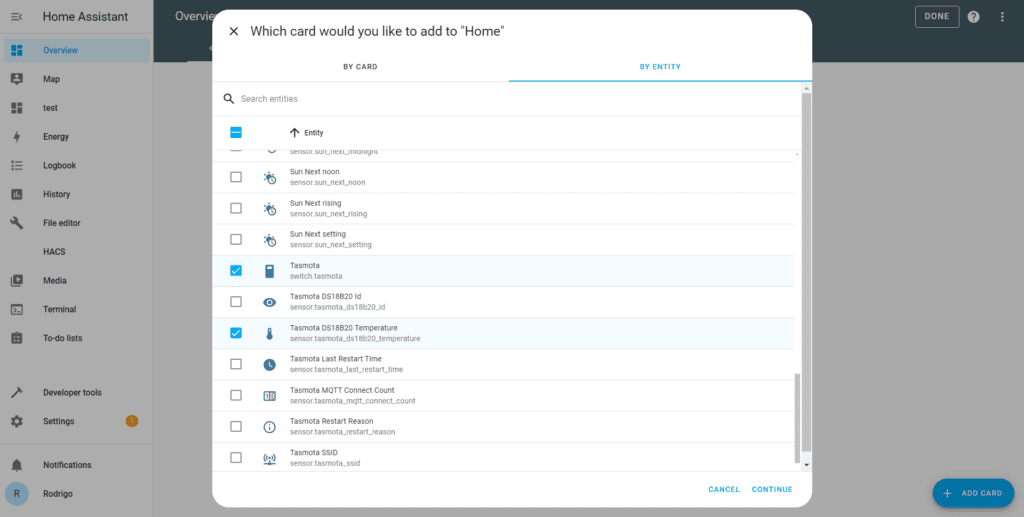
Figure 24 - Select the switch and sensor entities of the Tasmota device.
- Select the entities you want to show in the new card. In this case, the switch and temperature entities like in Figure 24.
- Add the new card to the dashboard. Refer to Figures 25 and 26.
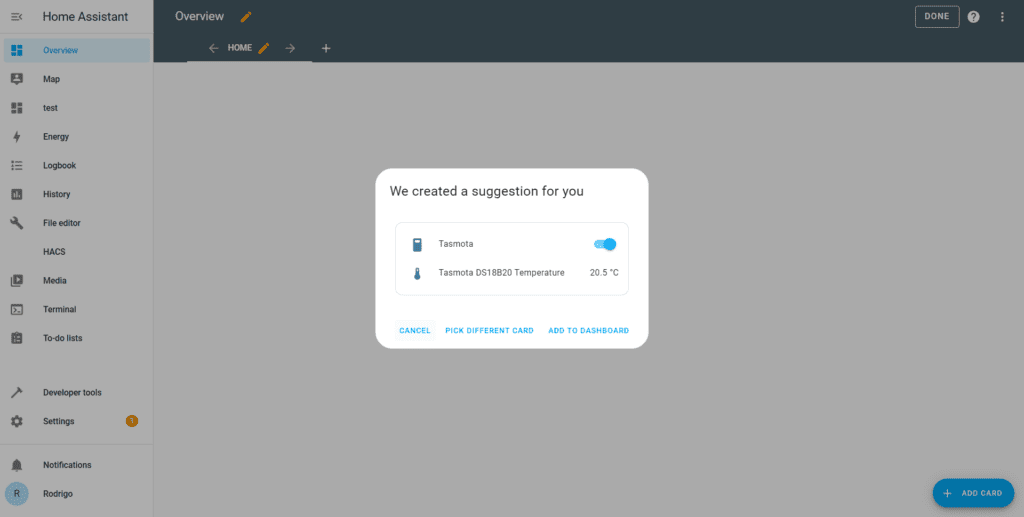
Figure 25 - Add the device card to the dashboard.

Figure 26 - Card added to the dashboard.
With these last steps, you have completed the project with the following system:
- A Pro Mosquitto clusterized solution running in Docker containers.
- A Management Center to control the brokers and proxies.
- A Home Assistant instance connected to the Pro Mosquitto cluster.
- A Tasmota device with a temperature sensor and a relay, connected to the Pro Mosquitto broker.
- An automation in Home Assistant to control the thermostat (Tasmota device).
- A dashboard in Home Assistant showing the temperature and the state of the relay.
Advanced Pro Mosquitto Implementation
This section analyzes an advanced distributed use case for handling a high workload from a large amount of devices.
To adapt the system for such a scenario, use the following steps:
- Delete existing cluster: Go to the Cluster menu in the Management Center and delete the existing cluster. This action removes all entries from associated folders.
- Deploy on separate servers: Place the folders named server1, server2, and server3 on three distinct servers. This leads to more complex configuration. You will need at least 3 VMs, and you will have to implement an overlay network, using VXLAN protocol and an orchestration tool like swarm (if you are using Docker).
- Update IP addresses: Modify IP addresses in the compose files and haproxy.cfg files to match your local network configuration. You can see the default configuration below.
global
    daemon
    maxconn 4096

frontend mqtt_frontend
    bind *:1883
    mode tcp
    default_backend mqtt_backend
    timeout client 10m

backend mqtt_backend
    timeout connect 5000
    timeout server 10m
    mode tcp
    option redispatch
    server m1 172.20.1.1:1883 check on-marked-down shutdown-sessions
    server m2 172.20.1.2:1883 check on-marked-down shutdown-sessions
server m3 172.20.1.3:1883 check on-marked-down shutdown-sessions- Change Management Center connection details: Update the connection details in the config.json file in server1/management-center/config. You can also do this using the MMC web console, in the Broker Connections section.
You can refer to this Cedalo Documentation to successfully set up your Mosquitto 3-node cluster and leverage the full potential of your Docker environment.
Conclusion
This tutorial covers implementing a Pro Mosquitto broker cluster with proxies and the Management Center. To implement the system and set up the Docker compose files to deploy the cluster according to your needs, you must sign up for a Pro Mosquitto trial license.
Once the Pro Mosquitto containers are up, configure clients to grant them permission to publish and subscribe to MQTT messages. Next, configure the Home Assistant MQTT integration to connect to the new broker. Then, you can create a Tasmota device, connect it to the broker, and configure a template to interact with the temperature sensor and relay. Finally, you will discover the device in Home Assistant, create automations, and add the device to the dashboard.
By completing this project, you’ll gain the knowledge to design and implement home automation systems using Home Assistant and the Pro Mosquitto broker. Utilizing the broker for device communication will enable you to achieve high availability, security, and scalability. This way, you can expand your system while maintaining centralized device management.
Further improvements can be made to the system by leveraging the capabilities of Home Assistant. For instance, you can use online weather services to predict whether using the heater is necessary. Additionally, you can implement more complex automation by interacting with other sensors or even manual commands. Lastly, you can analyze collected data, display it on a dashboard, and predict the thermostat behavior using ML models. The possibilities for expansion and enhancement of the system are limitless.


