
The Internet of Things (IoT) is a technical field that is continuously evolving, with new use cases, technologies, and devices being created more frequently.
All the devices taking part in the IoT world must somehow be connected to communicate and exchange information, thus requiring a common communication language, defined in the field as a protocol.
MQTT (MQ Telemetry Transport) is a popular protocol in IoT that is lightweight and enables reliable communication between IoT devices. It utilizes a publish-subscribe protocol, where multiple devices can communicate with each other through a central MQTT broker.
This article will demonstrate how easy it is to debug MQTT implementations and analyze MQTT packets using Wireshark.
We will use the popular open-source MQTT broker, Mosquitto, to set up our project. You can download it using this link: https://mosquitto.org/download/. There is also a Pro version of Mosquitto that includes advanced features and offers professional support.
What is Wireshark?
Wireshark is a free and open-source network packet analyzer that can troubleshoot network issues or test new protocol implementations. It is widely considered an indispensable tool for network administrators and developers. Wireshark can monitor network traffic on many different media types (wired, wireless, etc.) and can analyze a multitude of different protocols.
It is possible to download Wireshark from the following link: https://www.wireshark.org/download.html. Let’s install the tool and then move to the next chapter.
Analyzing MQTT packets with Wireshark
After installing Wireshark, the following window will appear (Image 1):
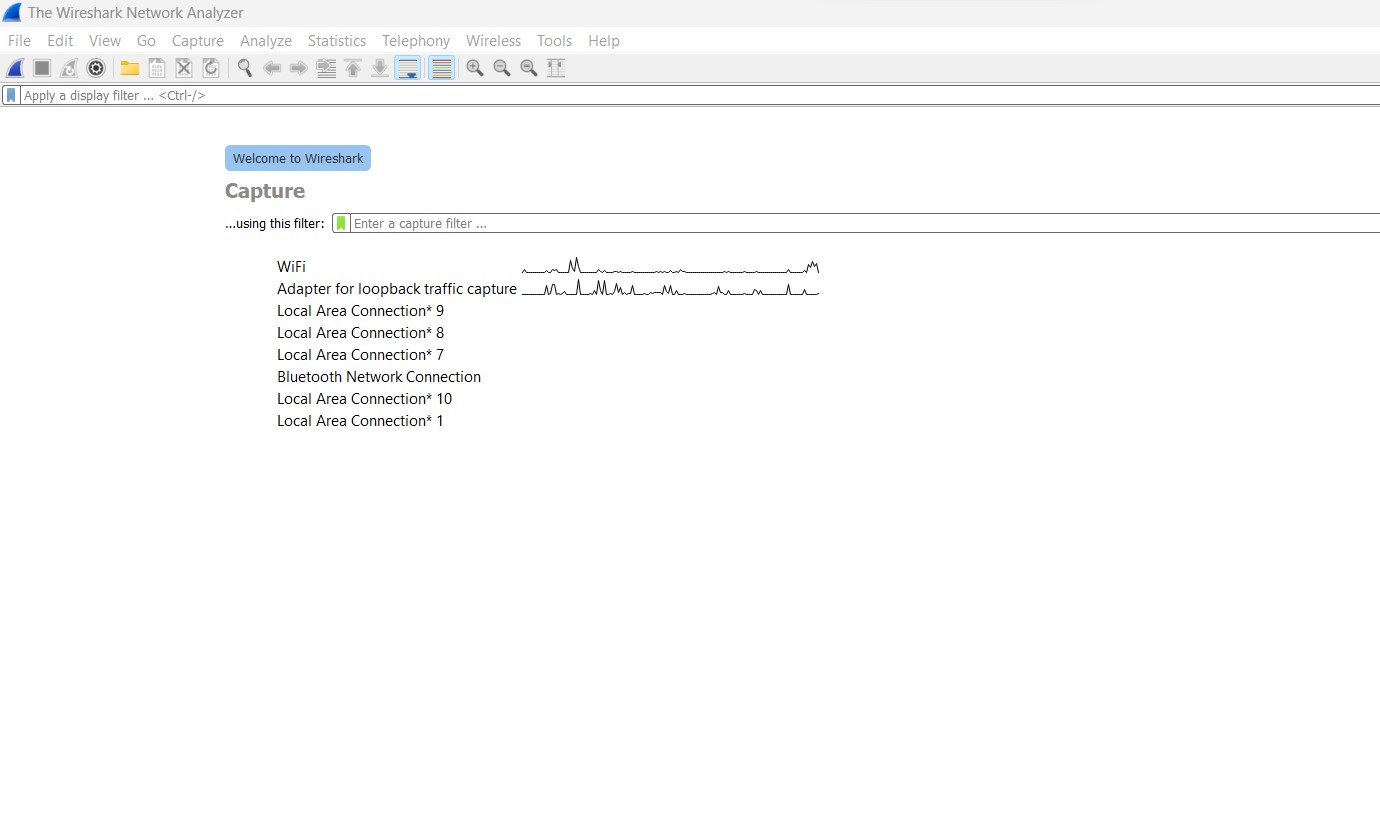
Image 1 - Wireshark start window showing options to select the network to monitor.
The window will list all the detected network adapters on our machine. Select the one through which our Mosquitto MQTT broker will receive and send requests - in this example, it is the WiFi network adapter.
After double-clicking on the chosen network adapter, the following window will appear (Image 2):
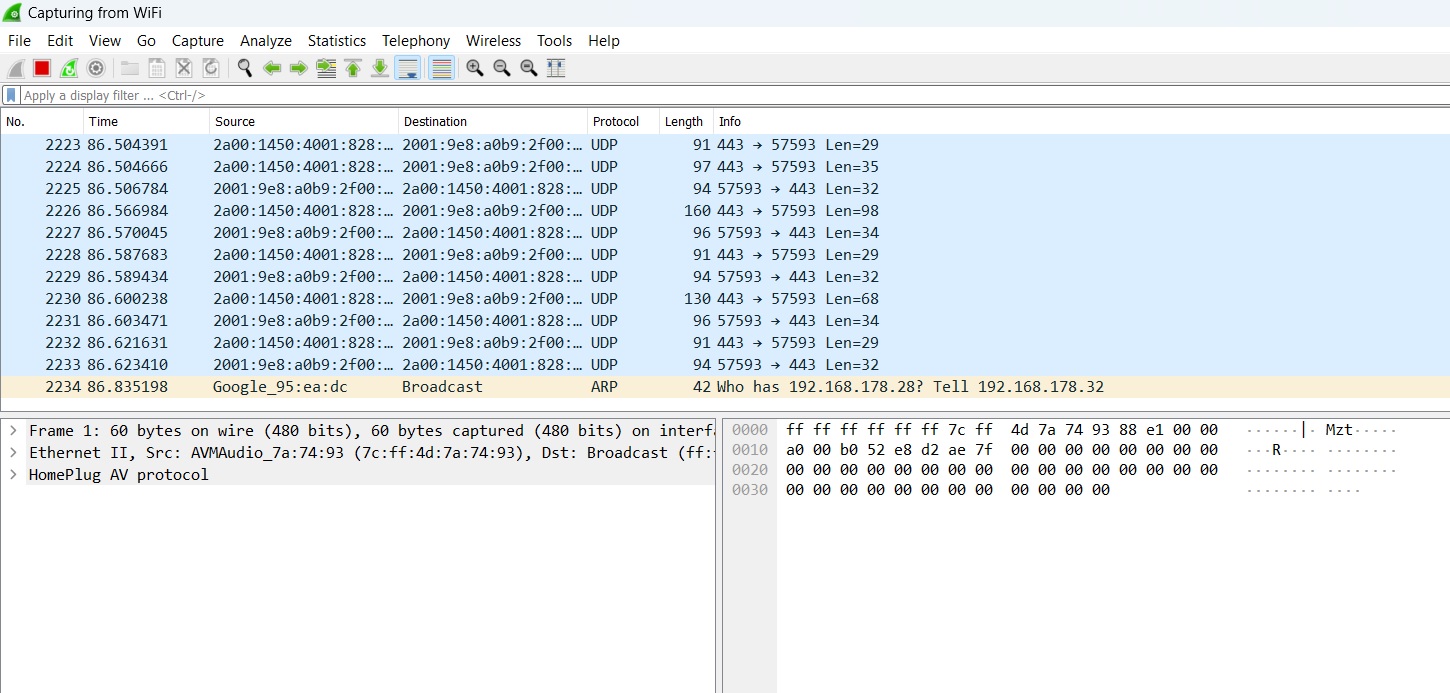
Image 2 - Wireshark logging window.
Network logging will begin and display all the traffic over the network adapter. Even when the user unintentionally transmits no data, some traffic is still present. While looking for specific packet types, other non-relevant packets and communications may confuse or make our MQTT traffic logging much more difficult.
Read this blog post to learn more about MQTT packets, its structure, types, formats, and more.
Setting up Wireshark MQTT filters
Wireshark filters allow our network analysis log to be filtered based on a specific protocol. In our case, we will set up a specific MQTT Filter, as only MQTT packets are of interest to us.
Type “MQTT” in the filter bar as shown in the following image (Image 3):
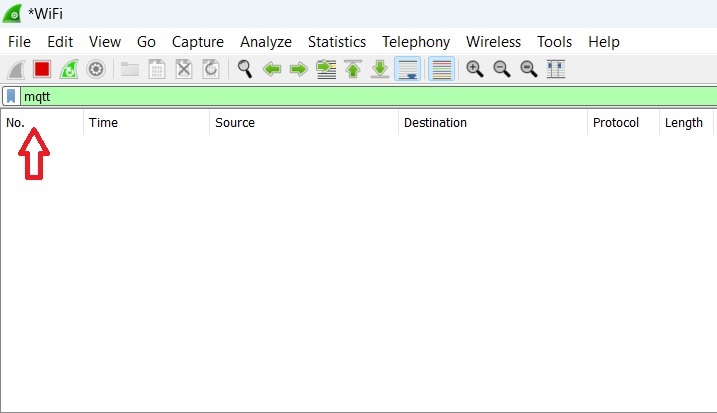
Image 3 - Setting up an MQTT Filter in Wireshark.
Press Enter or click on the blue arrow at the far right of the window, to apply the filter. The logging window will be cleared once the filter is applied, and only the MQTT packets will be shown.
MQTT Wireshark Project configuration
For our test, we will create a minimum working environment composed of all the necessary MQTT elements: the broker, a publisher, and a subscriber.
The broker will run on a PC, while the publisher and subscriber will be located on another device, in this case, a Raspberry PI 3 (read our MQTT broker Raspberry PI guide for instructions on how to set it up there).
While all three elements could run from a single PC, having a distributed system makes our Wireshark analysis easier since we would be able to monitor the transmission and reception of the packets on different IP addresses (Image 4).
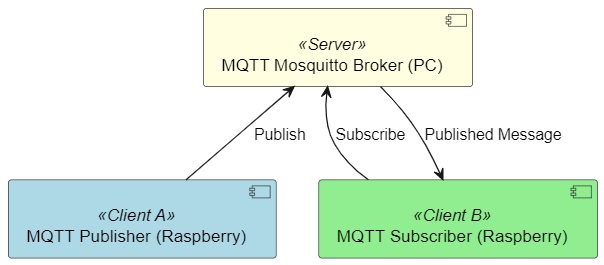
Image 4 - MQTT test network distribution over two devices.
MQTT Wireshark Analysis
This section will outline the necessary steps to analyze MQTT packets using Wireshark.
Start the broker
We can begin with the tests after downloading and installing Mosquitto from the link provided in the introduction.
For our project, we utilized the commonly used open-source version of Mosquitto. However, if you need more advanced features such as enhanced security, management APIs, or a high-performance local persistence database, consider exploring the Pro Mosquitto option. Additionally, you can sign up for a free Cedalo MQTT Platform trial with MQTT HA functionality. If you prefer to stick with the open-source version, you can request the open-source Mosquitto support service.
The first step is to start the MQTT broker on the PC by typing the Mosquitto broker start command. In this example, the MQTT broker is hosted by a Windows machine (refer to this guide on how to install Mosquitto on Windows). The following screenshot of the Powershell prompt window will show the command syntax and the output provided by Mosquitto after its start (Image 5).
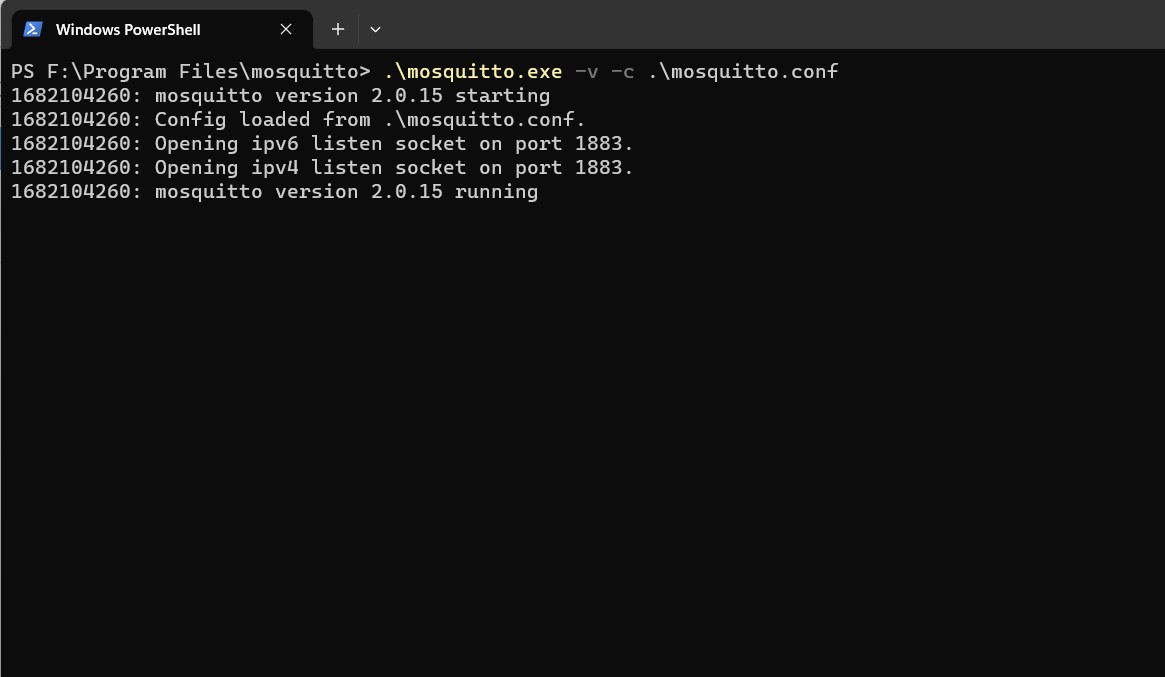
Image 5 - Mosquitto broker command syntax and output after start.
The option -v (verbose) will start Mosquitto and display as much debugging information as possible. Moreover, a customized configuration file is also passed as an argument with the option -c.
The configuration file mosquitto.conf can be created (if not already present) and written with the following settings:
listener 1883allow_anonymous true
With this configuration, we can define the listening port of the broker. More importantly, it implicitly tells the broker to be open to connections that can originate from external machines and, therefore, not only listen to the localhost. This configuration is mandatory if we want a distributed solution involving more machines and devices.
Moreover, through the allow_anonymous true configuration, we can also allow connections without authentication (password).
Note: The MQTT broker typically runs on port 1883 per the default configuration. However, if anyone wants to run the port from a different value, such as 1884, they can change the port number in the configuration to listener 1884.
Enable the subscription and subscribe to a topic
Now, let’s start the subscriber using the utility mosquitto_sub to subscribe to a specific topic. As previously mentioned, the subscriber and publisher clients will run on Raspberry Pi, but these two client utilities are not natively available. So we need to install the package mosquitto-clients to run the mosquitto_sub and mosquitto_pub utilities (respectively, subscriber and publisher). Once the installation is complete, we can start the subscriber. Image 6 displays the command format used on our Raspberry Pi.

Image 6 - Starting the subscriber on Raspberry Pi.
With option -h, we can specify the broker’s hostname (in our case, an IP address must be adjusted to the user-specific one). Then, use option -t to specify the topic to which the subscriber must subscribe.
MQTT Subscription packets analysis with Wireshark
Once the subscription operation is complete, it becomes possible to analyze the packet traffic with Wireshark (refer to Image 7).
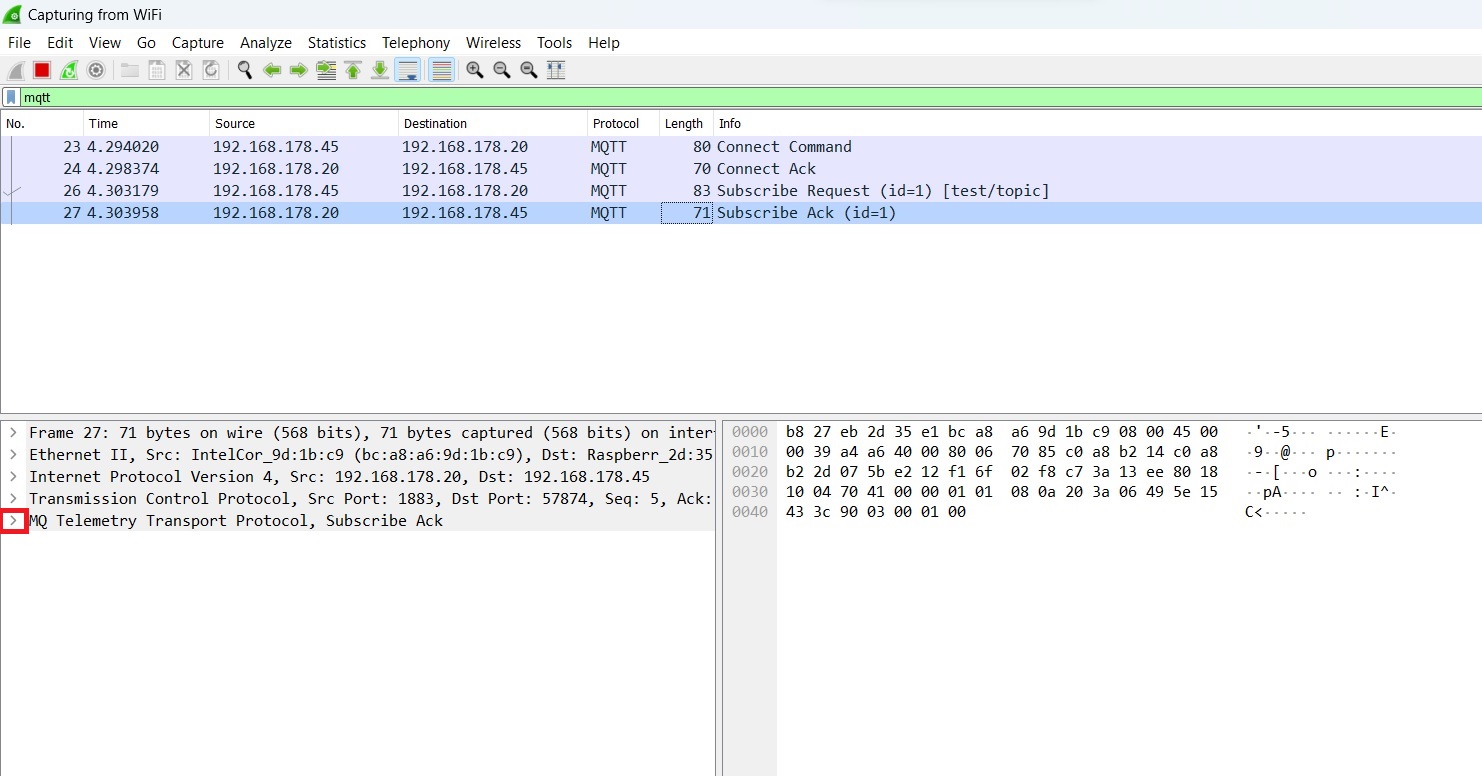
Image 7 - Logged network traffic during subscription operation.
The Wireshark screenshot shows four MQTT packets exchanged between the broker and the subscriber in the following order:
- CONNECT: The Subscriber sends a connection request to the broker.
- CONNACK: The broker confirms the reception of the connection command and confirms the connection.
- SUBSCRIBE: The subscriber subscribes to a specific topic.
- SUBACK: The broker confirms the subscription.
The most relevant packets of this communication are the “CONNECT” command and the “SUBSCRIBE” request. Therefore, we will analyze them further using the Wireshark MQTT dissector, which will allow us to analyze the packet content in detail. Wireshark can parse specific protocols and show the content in a structured way - displaying every packet field and its content.
Subscriber Connect packet
The CONNECT packet corresponds to the connection request from the subscriber to the broker. Let’s open the MQTT packet content section by clicking on the small arrow near the packet name (as highlighted by the red square in Image 7). The following view will appear (Image 8):
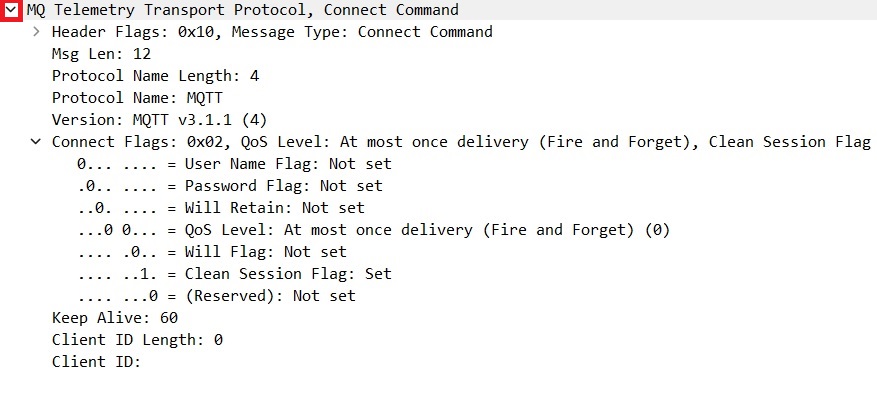
Image 8 - CONNECT command.
The most relevant fields of the CONNECT packet are:
- Protocol Name: MQTT
- Version: MQTT v3.1.1
- User Name: Not set - The session is not authenticated.
- Password: Not set - The session is not authenticated.
- QoS Level: 0 - A value of zero indicates “At most once.”
- Keep Alive: 60 Seconds.
MQTT Subscribe Packet Wireshark Visualization
The SUBSCRIBE packet sent from client B to the broker (Image 4) corresponds to the subscription request from the subscriber to the broker on the topic “test/topic.” Clicking on the small arrow near the packet name will open the MQTT packet content view, and the following content visualization will appear (Image 9):
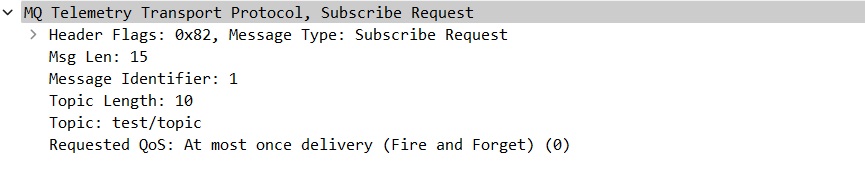
Image 9 - SUBSCRIBE request.
The most relevant fields in a SUBSCRIBE packet are the following:
- Topic Length: Length of the subscribed topic.
- Topic: String of the subscribed topic.
- QoS Level: 0 - A value of zero indicates “At most once.”
Check out this MQTT dashboard in Grafana guide to learn how to vizualize the core MQTT broker metrics in a comprehensive and intuitive report.
Publisher Connection and publishing packets
Now, let’s proceed with the publisher. To start, we must use the utility mosquitto_pub. I will start the publisher on my Raspberry PI with the following command (Image 10):
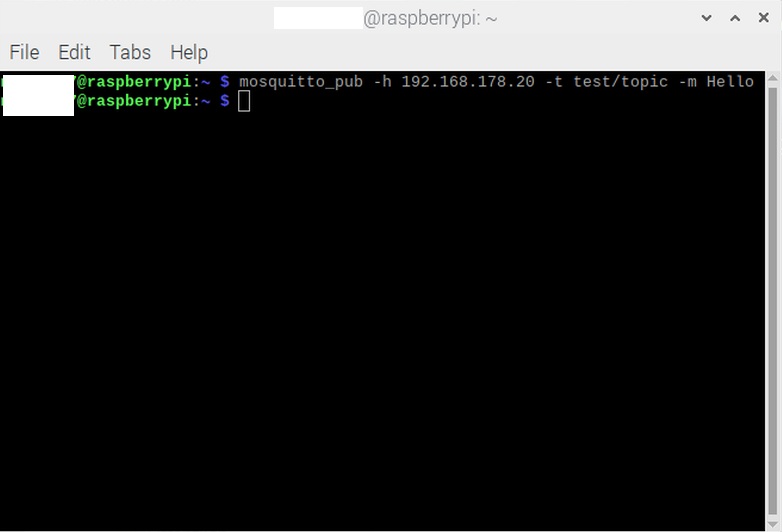
Image 10 - Starting publisher from Raspberry Pi.
The command has:
- Option -h for specifying the hostname (IP address) of the broker
- Option -t to specify the topic (which must be the same as the one used by the subscriber) to which the publisher must publish the message
- Option -m to specify the message
Then press Enter to issue the command. The subscriber receives the message, as shown in Image 11.
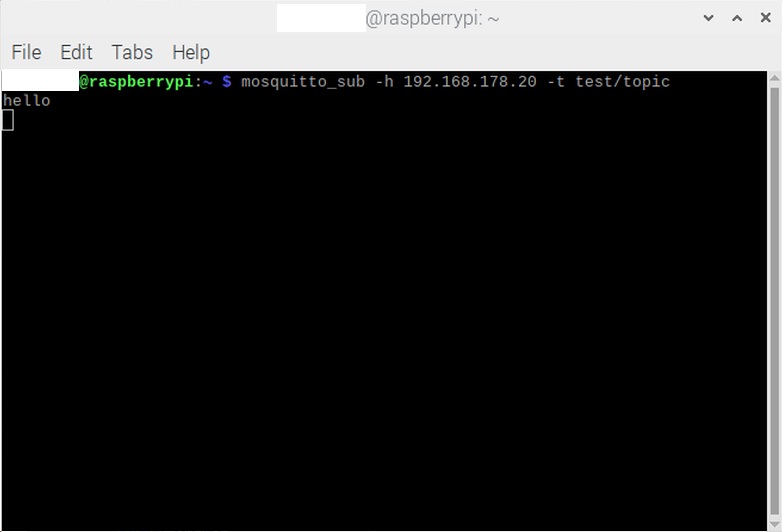
Image 11 - The published message received from the subscriber.
MQTT Publish Packet Wireshark Visualization
The image below shows that it is possible to observe the Wireshark log regarding the publishing operation (Image 12):
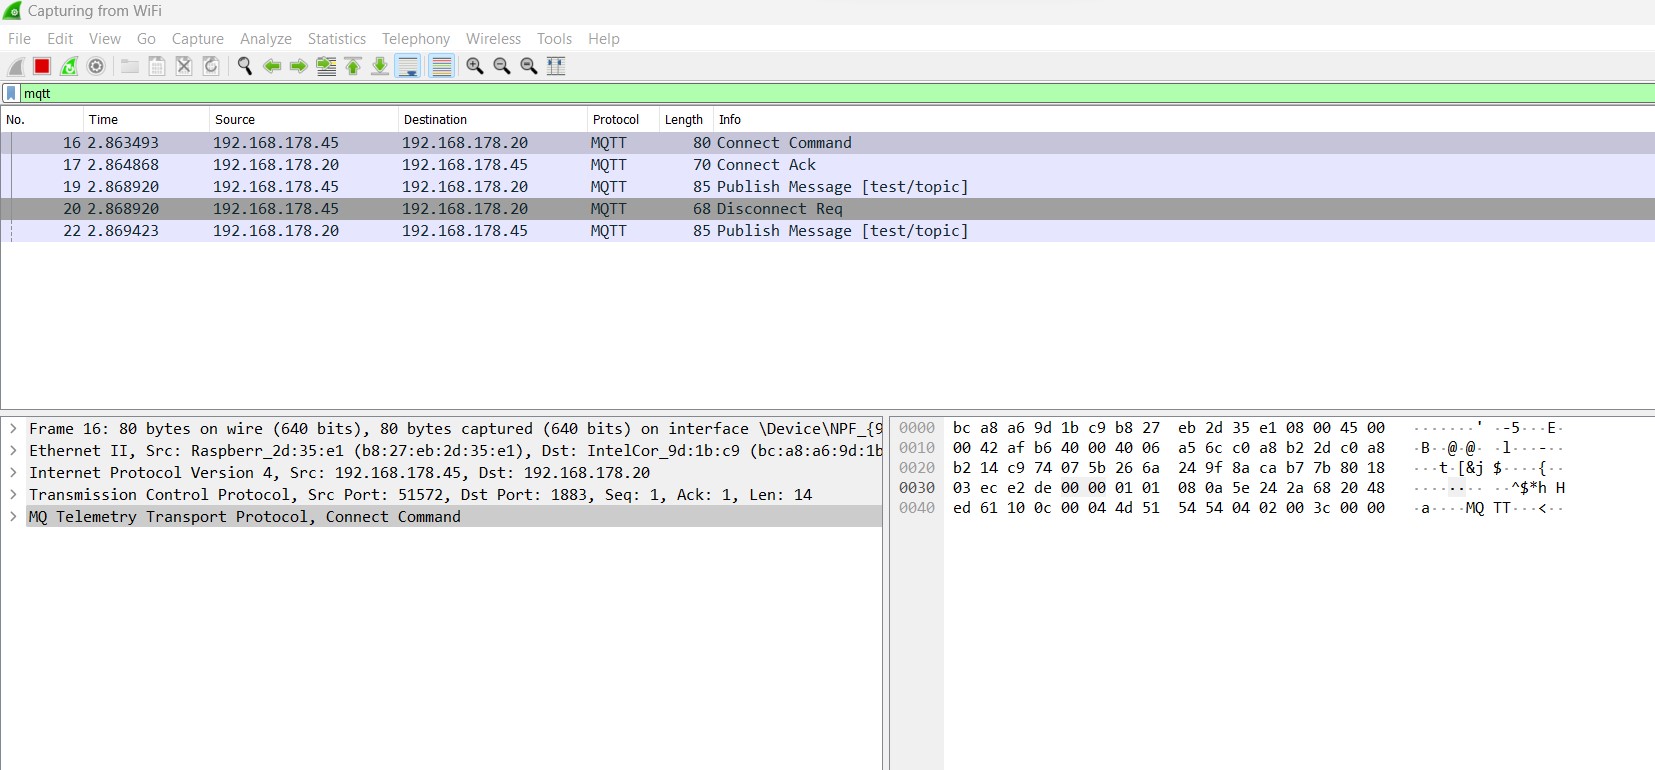
Image 12 - Logged network traffic during the publishing operation.
Four MQTT packets have been exchanged between the broker and the publisher (plus an extra one which will be described later in this section), in the following order:
- CONNECT: The Publisher sends a connection request to the broker.
- CONNACK: The broker confirms the reception of the connection command and confirms the connection.
- PUBLISH: The publisher sends the message.
- DISCONNECT: The publisher disconnects from the broker.
After the fourth packet, the publisher closes the connection. However, the broker still sends one more message: it simply forwards the published message received from the publisher to all the subscribers. This is depicted as the fifth package in image 12. The broker’s primary objective is to receive published messages and distribute them to all subscribers based on their subscribed topics.
Relevant packets of this communication are the “CONNECT” command and the “PUBLISH” message. As the “CONNECT” command of the publisher is identical to that of the subscriber, we will omit the analysis of this packet type here. Instead, we will only analyze the “Publish Message” packet.
MQTT Publish Message Wireshark Analysis
The PUBLISH packet sent from client A to the broker (Image 4) consists of the publishing request from the publisher. The publisher client uses this request to send a message about a specific topic, which the broker will broadcast to all the other clients subscribed to the same topic. The following is an analysis of the packet content (Image 13):

Image 13 - PUBLISH message content.
The relevant fields in this packet are:
- Topic Length: Length of the topic where the message is sent.
- Topic: String of the topic where the message is sent.
- Message: The message the publisher sends expressed as a string. The string shows the hexadecimal encoded 5 bytes of the string “hello.”
MQTT Disconnect Wireshark Analysis
The DISCONNECT request represents the last step in terminating the communication between different elements of a network.
With MQTT, we can observe two kinds of disconnection requests: the one operated by the publisher and the one operated by the subscriber.
The DISCONNECT requests are identical for both cases, with the main difference being the time at which the packet is sent. For the publisher, a connect/disconnect combination is executed each time a message is published. On the other hand, the subscriber establishes a connection during the subscription operation and keeps it open until a specific disconnect request is issued. This typically occurs when the subscriber unsubscribes from all topics. The following screenshot shows the content of a disconnect packet (Image 14):

Image 14 - DISCONNECT request packet content.
This packet is simple and does not transmit extra information apart from the disconnection request.
MQTT Keep Alive Flag Wireshark Analysis
The MQTT Keep-Alive timer is one of the parameters configured when a connection is established between the broker and a specific client (publisher or subscriber). The Keep-Alive timer is a numerical value expressed in seconds that indicates the maximum time which can elapse between different messages sent by the client.
During the connection phase, the Keep-Alive timer is loaded with the configured value in seconds. The timer is then reduced every second and is newly reloaded only when the client sends a message.
Usually, when the Keep-Alive timer elapses, and no messages are available/sent, the client will send a PING message to the broker to notify them that it is still connected. This will initiate a handshake between the client and the broker in a Ping request and a Ping response.
The following screenshot shows a repeated ping handshake between broker and client, with a Keep-Alive timer configured to 60 seconds:
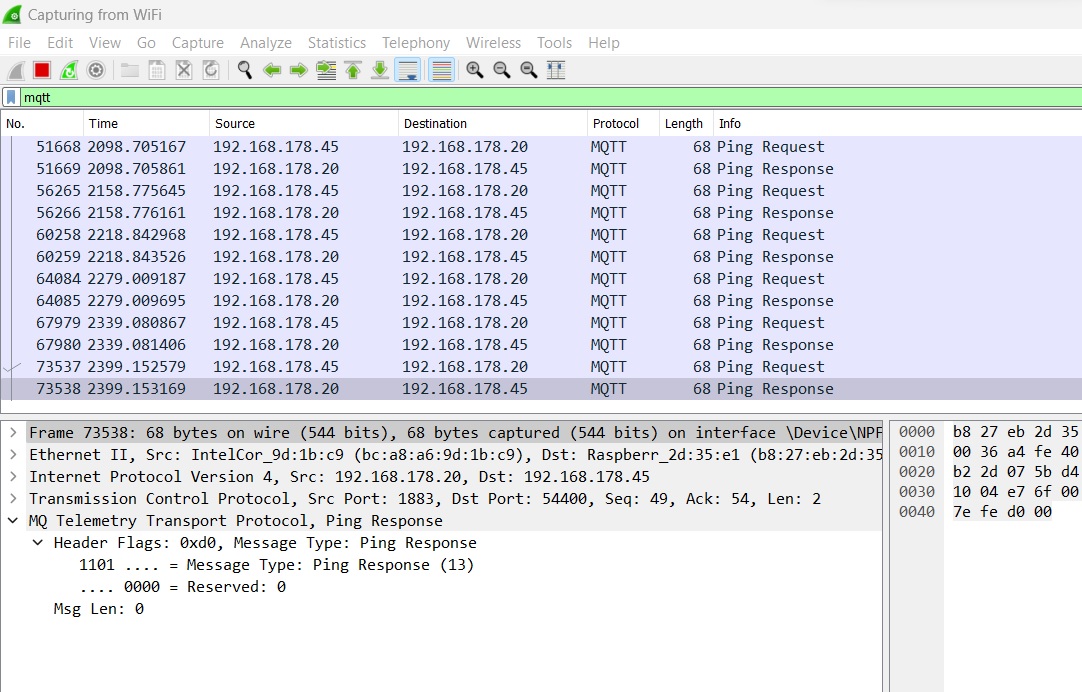
Image 15 - Ping response and request, part of the keep-alive mechanism.
If, for whatever reason, the client does not send a Ping request after the Keep-Alive timer has expired, the broker will close the connection automatically after 1.5 times the Keep Alive value - which in this case would correspond to 90 seconds.
Conclusion
We have seen how easy it can be to use Wireshark to analyze our MQTT networks and debug our system implementations. In our tests, we configured just the smallest possible MQTT network architecture with two clients and one server using the MQTT protocol version 3.1.1. Though small, the setup covered the fundamental functionalities and architectural peculiarities of the MQTT protocol.


